 |
am3zzw00019966
WINDSHIELD INSTALLATION
id091200000700
Reusing Windshield
1. Remove the sealant along the perimeter of the glass using a utility knife.
2. Clean and degrease an approx. 50 mm {2.0 in} wide strip along the perimeter of the windshield.
3. Inspect the glass for cracks. If it is cracked, chamfer it using sandpaper.
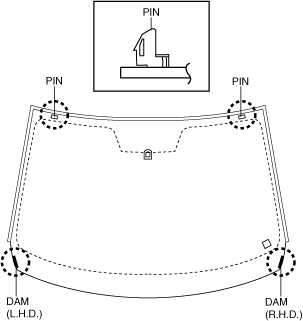
4. Align the alignment marks made before removal and install the pin to the windshield referring to the figure.
am3zzw00019966
|
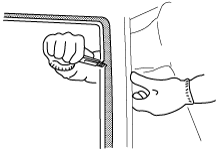
5. Apply the dam.
6. Install the windshield molding.
am3zzw00020586
|
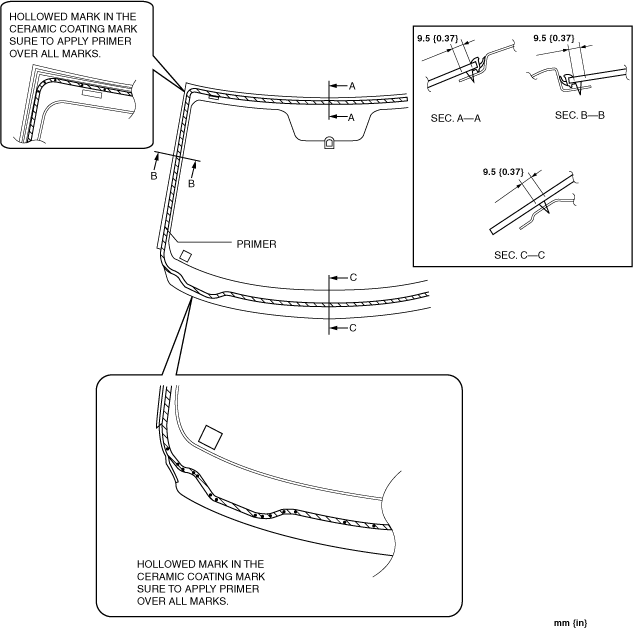
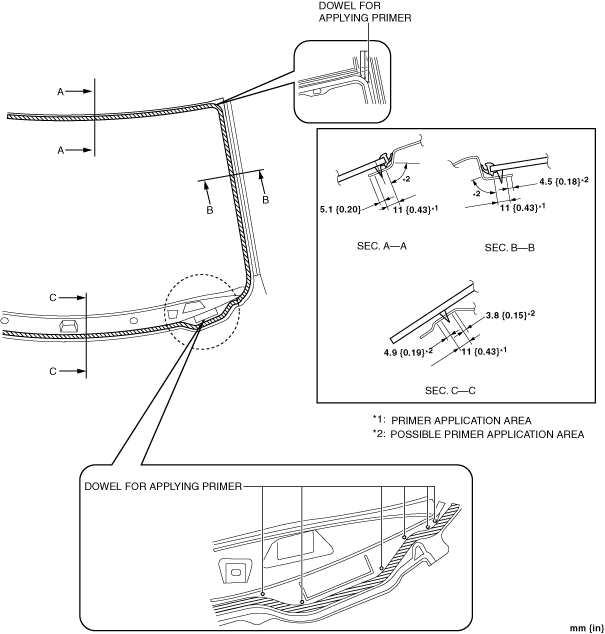
7. Apply primer to the area of the glass shown in the figure.
am3zzw00020587
|
8. Cut away the old sealant using a utility knife so that 1—2 mm {0.04—0.07 in} thickness of sealant remains along the perimeter of the frame.
ac5uuw00001058
|
9. Clean and degrease along the perimeter of the bonding area on the body.
10. Apply primer to the area of the body shown in the figure.
am3zzw00020588
|
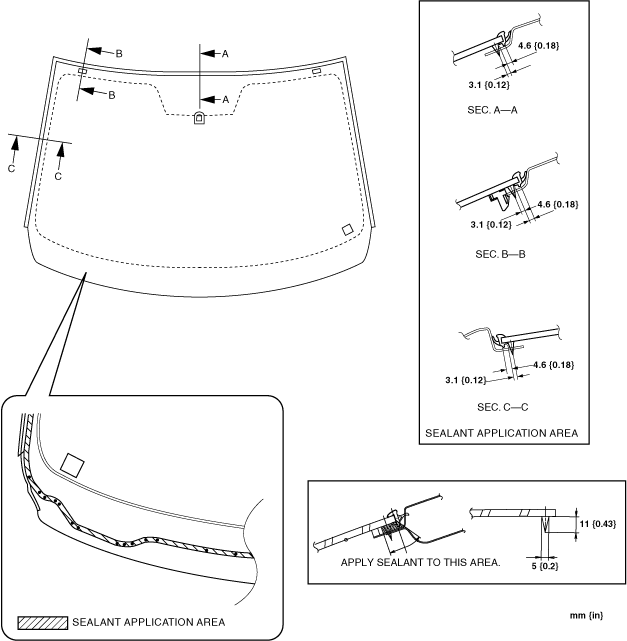
11. Apply sealant to the area of the glass surface as shown in the figure.
am3zzw00020589
|
12. Insert the positioning pins to the body and install the windshield.
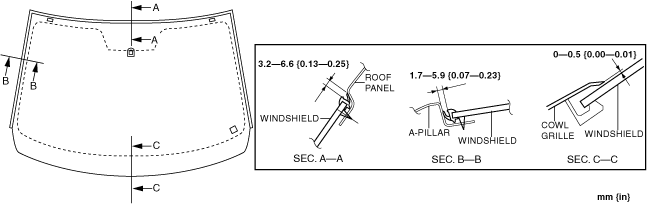
13. Verify that the clearance between the A-pillar and the roof is within the range shown in the figure, and press along the perimeter of the glass.
am3zzw00020590
|
14. Connect the auto-dimming mirror connector. (with auto-dimming mirror) (See AUTO-DIMMING MIRROR REMOVAL/INSTALLATION.)
15. Connect the forward sensing camera (FSC) connector. (See FORWARD SENSING CAMERA (FSC) REMOVAL/INSTALLATION.)
16. Connect the rain sensor connector. (with auto light/wiper system) (See RAIN SENSOR REMOVAL/INSTALLATION.)
17. Install the following parts:
18. Connect the negative battery cable. (See NEGATIVE BATTERY CABLE DISCONNECTION/CONNECTION [MZR 1.6].) (See NEGATIVE BATTERY CABLE DISCONNECTION/CONNECTION [SKYACTIV-G 1.5, SKYACTIV-G 2.0, SKYACTIV-G 2.5].) (See NEGATIVE BATTERY CABLE DISCONNECTION/CONNECTION [SKYACTIV-D 2.2].) (See NEGATIVE BATTERY CABLE DISCONNECTION/CONNECTION [SKYACTIV-D 1.5].)
19. Allow the sealant to harden completely.
20. If the forward sensing camera (FSC) or forward sensing camera (FSC) clips are replaced, perform forward sensing camera (FSC) aiming. (See FORWARD SENSING CAMERA (FSC) AIMING.)
21. If the rain sensor is replaced, perform the sensitivity setting procedure for the auto lights. (See RAIN SENSOR REMOVAL/INSTALLATION.)
Not Reusing Windshield
1. Clean and degrease an approx. 50 mm {2.0 in} wide strip along the perimeter of the windshield.
2. Inspect the glass for cracks. If it is cracked, chamfer it using sandpaper.
3. Install the windshield molding.
am3zzw00020586
|
4. Apply primer to the area of the glass shown in the figure.
am3zzw00020587
|
5. Cut away the old sealant using a utility knife so that 1—2 mm {0.04—0.07 in} thickness of sealant remains along the perimeter of the frame.
ac5uuw00001058
|
6. Clean and degrease along the perimeter of the bonding area on the body.
7. Apply primer to the area of the body shown in the figure.
am3zzw00020591
|
8. Apply sealant to the area of the glass surface as shown in the figure.
am3zzw00020589
|
9. Insert the positioning pins to the body and install the windshield.
10. Verify that the clearance between the A-pillar and the roof is within the range shown in the figure, and press along the perimeter of the glass.
am3zzw00020590
|
11. Install the following parts:
12. Connect the negative battery cable. (See NEGATIVE BATTERY CABLE DISCONNECTION/CONNECTION [MZR 1.6].) (See NEGATIVE BATTERY CABLE DISCONNECTION/CONNECTION [SKYACTIV-G 1.5, SKYACTIV-G 2.0, SKYACTIV-G 2.5].) (See NEGATIVE BATTERY CABLE DISCONNECTION/CONNECTION [SKYACTIV-D 2.2].) (See NEGATIVE BATTERY CABLE DISCONNECTION/CONNECTION [SKYACTIV-D 1.5].)
13. Allow the sealant to harden completely.
14. Adjust the forward sensing camera (FSC) aiming. (See FORWARD SENSING CAMERA (FSC) AIMING.)
15. If the rain sensor is replaced, perform the sensitivity setting procedure for the auto lights. (See RAIN SENSOR REMOVAL/INSTALLATION.)