CLOCK SPRING REMOVAL/INSTALLATION
id081000802000
1. Disconnect the negative battery cable.
2. Remove the following parts:
-
(1) Driver-side air bag module (See DRIVER-SIDE AIR BAG MODULE REMOVAL/INSTALLATION [TWO-STEP DEPLOYMENT CONTROL SYSTEM].)
-
Driver-side air bag module (See DRIVER-SIDE AIR BAG MODULE REMOVAL/INSTALLATION [STANDARD DEPLOYMENT CONTROL SYSTEM].)
-
(2) Steering wheel (See STEERING WHEEL AND COLUMN REMOVAL/INSTALLATION.)
-
(3) Front scuff plate (See FRONT SCUFF PLATE REMOVAL/INSTALLATION
-
(4) Front side trim (See FRONT SIDE TRIM REMOVAL/INSTALLATION.)
-
(5) Lower panel (See LOWER PANEL REMOVAL/INSTALLATION.)
-
(6) Column cover (See COLUMN COVER REMOVAL/INSTALLATION.)
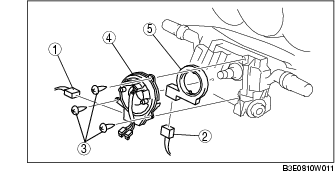
3. Remove in the order indicated in the table.
|
1
|
Clock spring connector
|
|
2
|
Steering angle sensor connector (Vehicles with steering angle sensor)
|
|
3
|
Screw
|
|
4
|
Clock spring
|
|
5
|
Steering angle sensor (Vehicles with steering angle sensor)
|
4. Install in the reverse order of removal.
5. Turn the ignition switch to the ON position.
6. Verify that the air bag system warning light illuminates for approx. 6 s and goes out.
-
• If the air bag system warning light does not operate normally, refer to the on-board diagnostic system (air bag system) and perform inspection of the system.
Clock Spring Installation Note
-
Caution
-
• If the clock spring is not adjusted, the spring wire in the clock spring could over-wind and break when the steering wheel is turned. Always adjust the clock spring after installing it.
1. Adjust the clock spring after installing it. (See CLOCK SPRING ADJUSTMENT.)
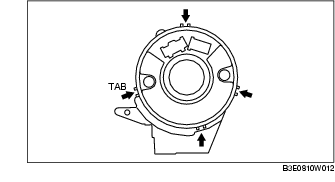
Steering Angle Sensor Removal Note
1. Detach the tabs at the four locations shown in the figure and remove the steering angle sensor.