FRONT DOOR REMOVAL/INSTALLATION
id091100800200
1. Disconnect the negative battery cable.
2. To remove the checker, remove the following parts:
-
(1) Inner garnish (See INNER GARNISH REMOVAL/INSTALLATION.)
-
(2) Regulator handle (Vehicles with manual window system) (See REGULATOR HANDLE REMOVAL.) (See REGULATOR HANDLE INSTALLATION.)
-
(3) Front door trim (See FRONT DOOR TRIM REMOVAL/INSTALLATION.)
-
(4) Front door speaker (See FRONT DOOR SPEAKER REMOVAL/INSTALLATION.)
3. To remove the front door hinges, remove the following parts:
-
(1) Windshield wiper arm and blade (See WINDSHIELD WIPER ARM AND BLADE REMOVAL/INSTALLATION.)
-
(2) Cowl grille (See COWL GRILLE REMOVAL/INSTALLATION.)
-
(3) Front side turn light (See FRONT SIDE TURN LIGHT REMOVAL/INSTALLATION.)
-
(4) Front bumper (See FRONT BUMPER REMOVAL/INSTALLATION.)
-
(5) Front combination lights (See FRONT COMBINATION LIGHT REMOVAL/INSTALLATION.)
-
(6) Side step molding (Vehicle with the side step molding) (See SIDE STEP MOLDING REMOVAL/INSTALLATION.)
-
(7) Front fender panel (See FRONT FENDER PANEL REMOVAL/INSTALLATION.)
4. Remove in the order indicated in the table.
5. Install in the reverse order of removal.
6. Adjust the front door. (See DOOR ADJUSTMENT.)
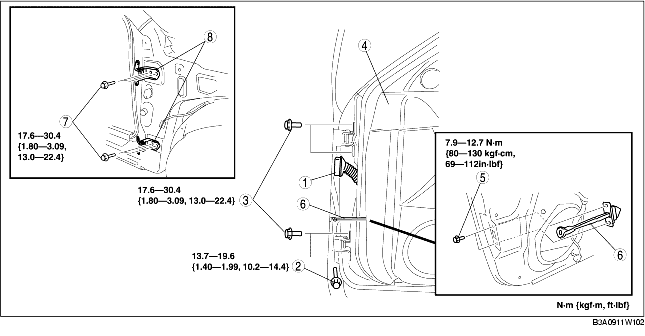
.
|
1
|
Connector
|
|
2
|
Bolt A
|
|
3
|
Bolt B
|
|
4
|
Front door
|
|
5
|
Bolt C
|
|
6
|
Checker
|
|
7
|
Bolt D
|
|
8
|
Front door hinge
|
Connector Removal Note
1. Pull down the lever in the direction indicated by the arrow and disconnect the connector.
