FRONT BUMPER REINFORCEMENT REMOVAL/INSTALLATION
id091000800600
-
Caution
-
• Because the shroud panel is installed to the front bumper reinforcement, support the shroud panel using a jack before removing the front bumper reinforcement so as not to apply excessive force to the shroud panel.
1. Disconnect the negative battery cable.
2. Remove the following parts:
- (1) Front bumper (See FRONT BUMPER REMOVAL/INSTALLATION.)
- (2) Energy-absorbing form (See ENERGY-ABSORBING FORM REMOVAL/INSTALLATION.)
- (3) Seal plate (See SEAL PLATE REMOVAL/INSTALLATION.)
- (4) Front combination light (See FRONT COMBINATION LIGHT REMOVAL/INSTALLATION.)
- (5) Aerodynamic under cover No.1 (See AERODYNAMIC UNDER COVER NO.1 REMOVAL/INSTALLATION.)
- (6) Bumper stiffener lower (See BUMPER STIFFENER LOWER REMOVAL/INSTALLATION.)
- (7) Ambient temperature sensor (See AMBIENT TEMPERATURE SENSOR REMOVAL/INSTALLATION [FULL-AUTO AIR CONDITIONER].) (See AMBIENT TEMPERATURE SENSOR REMOVAL/INSTALLATION [MANUAL AIR CONDITIONER].)
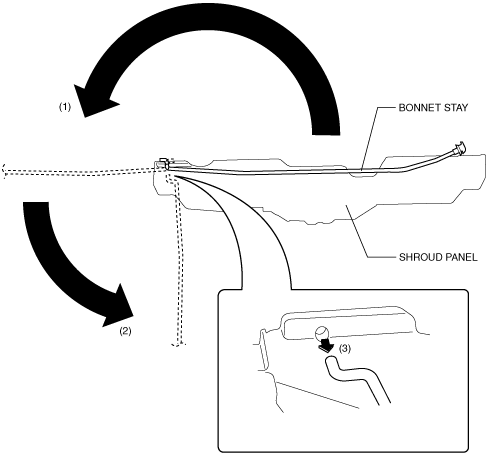
3. Rotate the bonnet stay in the direction of the arrow (1),(2), then remove the bonnet stay in the direction of the arrow (3).
4. Remove the bonnet stay from the shroud panel, wrap the bonnet stay with protective tape, and install it to the shroud side member to support the bonnet.
5. Remove the bolts A.
6. Remove the bolt B.
7. Remove the bolts C and bolts D.
8. Remove the front bumper reinforcement.
9. Install in the reverse order of removal.
