POWER WINDOW SUBSWITCH INSPECTION
id091200002300
Auto-open/close Function for All Windows
1. Disconnect the negative battery cable.
2. Remove the inner garnish. (front passenger’s side) (See INNER GARNISH REMOVAL/INSTALLATION.)
3. Remove the front door trim. (front passenger’s side) (See FRONT DOOR TRIM REMOVAL/INSTALLATION.)
4. Remove the rear door trim. (rear side) (See REAR DOOR TRIM REMOVAL/INSTALLATION.)
5. Remove the power window subswitch. (See POWER WINDOW SUBSWITCH REMOVAL/INSTALLATION.)
6. Connect the negative battery cable.
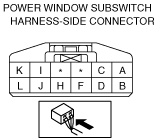
7. Measure the voltage at each terminal.
-
• If the voltage is not as specified in the terminal voltage table, inspect the parts under “ Inspection item(s)” and related wiring harnesses.
-
― If the system does not work properly even though the inspection items or related wiring harnesses do not have any malfunction, replace the power window subswitch.
Terminal voltage table (reference)
|
Terminal
|
Signal name
|
Connected to
|
Measured condition
|
Voltage (V)
|
Inspection item (s)
|
|
A
|
Communication
|
Power window main switch
|
Because this terminal is for communication, good/no good judgment by terminal voltage is not possible
|
• Power window main switch
• Related wiring harness
|
|
B
|
Power-cut signal
|
Power window main switch
|
Switch the ignition to ON and power-cut switch at UNLOCK
|
B+
|
• Power window main switch
• Related wiring harness
|
|
C
|
Power supply
|
P/W 30 A fuse
|
Switch the ignition to ON
|
B+
|
• P/W 30 A fuse
• Related wiring harness
|
|
D
|
Pulse 2
|
Power window motor
|
Door glass operating
|
Alternates between 1.0 or less and B+
|
• Power window motor
• Related wiring harnesses
|
|
F
|
Pulse 1
|
Power window motor (driver’s side)
|
Door glass operating
|
Alternates between 1.0 or less and B+
|
• Power window motor (driver’s side)
• Related wiring harness
|
|
H
|
Close output
|
Power window motor
|
Other
|
1.0 or less
|
• Power window motor
• Related wiring harnesses
|
|
While door glass is closing
|
B+
|
|
I
|
Open output
|
Power window motor
|
Other
|
1.0 or less
|
• Power window motor
• Related wiring harnesses
|
|
While door glass is opening
|
B+
|
|
J
|
Power supply
|
Power window motor (driver’s side)
|
Switch the ignition to ON
|
B+
|
• Power window motor (driver’s side)
• Related wiring harness
|
|
K
|
GND
|
Body ground
|
Under any condition
|
1.0 or less
|
• GND
|
|
L
|
Sensor ground
|
Power window motor
|
Under any condition
|
1.0 or less
|
• Power window motor
• Related wiring harnesses
|
Auto-open/close Function for Driver-side
Passenger's side
1. Disconnect the negative battery cable.
2. Remove the inner garnish. (See INNER GARNISH REMOVAL/INSTALLATION.)
3. Remove the front door trim. (See FRONT DOOR TRIM REMOVAL/INSTALLATION.)
4. Remove the power window subswitch. (See FRONT DOOR TRIM DISASSEMBLY/ASSEMBLY.)
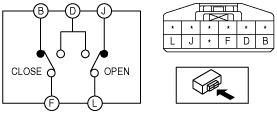
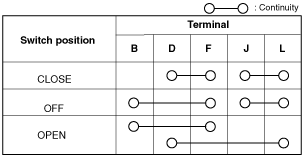
5. Verify that the continuity is as indicated in the table using a tester.
-
• If not as indicated in the table, replace the power window subswitch.
Rear
1. Disconnect the negative battery cable.
2. Remove the rear door trim. (See REAR DOOR TRIM REMOVAL/INSTALLATION.)
3. Remove the power window subswitch. (See REAR DOOR TRIM DISASSEMBLY/ASSEMBLY.)
4. Verify that the continuity is as indicated in the table using a tester.
-
• If not as indicated in the table, replace the power window subswitch.
 am6zzw00005424