TRUNK LID REMOVAL/INSTALLATION


id091000801600

1.  Disconnect the negative battery terminal. (See NEGATIVE BATTERY TERMINAL DISCONNECTION/CONNECTION.)

2.  Remove the following parts:

(1)  Trunk covering (See TRUNK COVERING REMOVAL/INSTALLATION.)
(2)  Trunk board (See TRUNK BOARD REMOVAL/INSTALLATION.)
(3)  Trunk side pocket (See TRUNK SIDE POCKET REMOVAL/INSTALLATION.)
(4)  Trunk end trim (See TRUNK END TRIM REMOVAL/INSTALLATION.)
(5)  Trunk lid recess (See TRUNK LID RECESS REMOVAL/INSTALLATION.)
(6)  Trunk lid trim (See TRUNK LID TRIM REMOVAL/INSTALLATION.)

3.  Set the trunk side trim aside. (See TRUNK SIDE TRIM REMOVAL/INSTALLATION.)

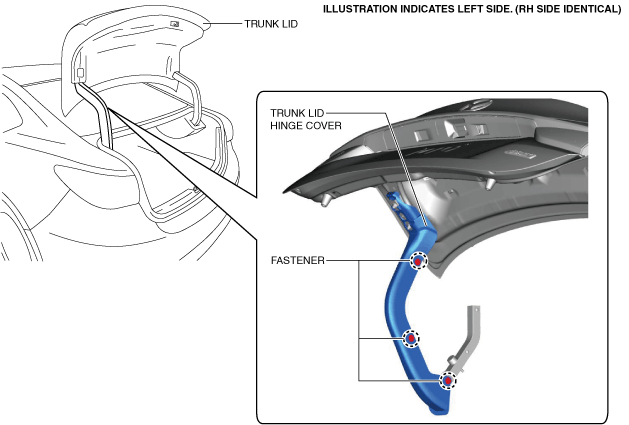
4.  Remove the fasteners.

am6zzw00015737

5.  Remove the trunk lid hinge cover.

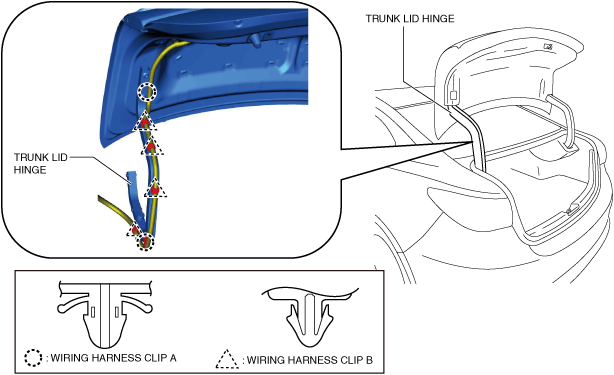
6.  Remove wiring harness clips A and B shown in the figure.

am6zzw00015738

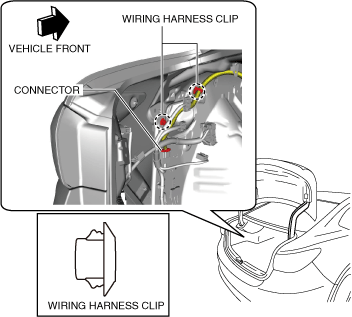
7.  Disconnect the connector.

am6zzw00015739

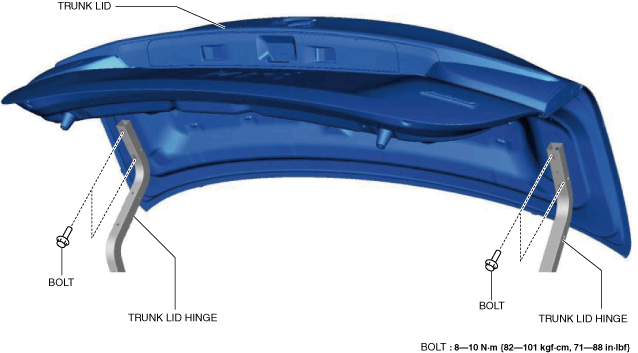
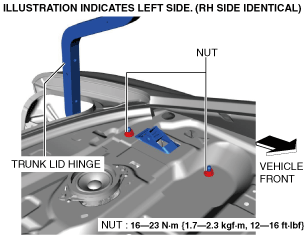
8.  Remove the wiring harness clips.

9.  Remove the bolts, then remove the trunk lid.

am6zzw00015740

•  When removing the trunk lid hinge, perform the following procedure:
1.  Remove the following parts:
1.  Rear seat cushion (See REAR SEAT CUSHION REMOVAL/INSTALLATION.)
2.  Rear seat side back (See REAR SEAT SIDE BACK REMOVAL/INSTALLATION.)
3.  Tire house trim (See TIRE HOUSE TRIM REMOVAL/INSTALLATION.)
4.  C-pillar trim (See C-PILLAR TRIM REMOVAL/INSTALLATION.)
5.  High-mount brake light (See HIGH-MOUNT BRAKE LIGHT REMOVAL/INSTALLATION.)
6.  Rear package trim (See REAR PACKAGE TRIM REMOVAL/INSTALLATION.)
2.  Insert a crescent wrench in the position shown in the figure.
am6zzw00015741
3.  Move a crescent wrench in the direction of the arrow shown in the figure, remove the balance spring from the trunk lid hinge.
4.  Remove the nuts.
am6zzw00015742
5.  Remove the trunk lid hinge.

10.  Install in the reverse order of removal.

11.  Adjust the trunk lid. (See TRUNK LID ADJUSTMENT.)

12.  Perform the rear mount camera aiming. (with 360° view monitor system) (See 360°VIEW MONITOR SYSTEM AIMING.)