C-PILLAR TRIM REMOVAL/INSTALLATION
id091700802200
4SD
1. Remove the following parts:
- (1) Rear scuff plate (See REAR SCUFF PLATE REMOVAL/INSTALLATION.)
-
- (2) Rear seat cushion (See REAR SEAT CUSHION REMOVAL/INSTALLATION.)
-
- (3) Rear seat side back (See REAR SEAT SIDE BACK REMOVAL/INSTALLATION.)
-
- (4) Tire house trim (See TIRE HOUSE TRIM REMOVAL/INSTALLATION.)
-
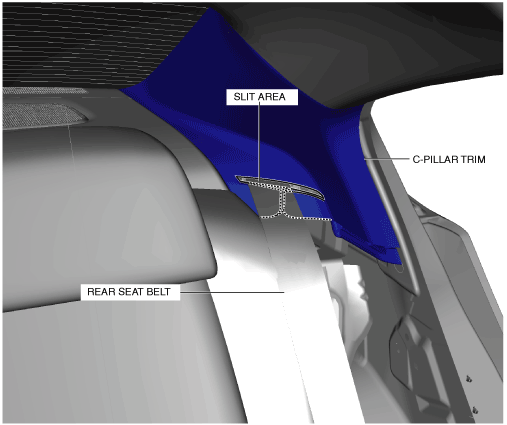
2. Set the rear seat belt aside from the slit area shown in the figure.
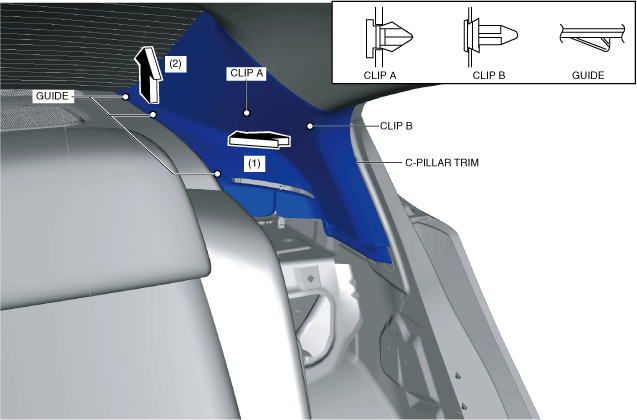
3. Pull the C-pillar trim in the direction of the arrow in the order of (1), (2) while detaching clip A, clip B and guides.
4. Install in the reverse order of removal.
WGN
1. Disconnect the negative battery terminal. (See NEGATIVE BATTERY TERMINAL DISCONNECTION/CONNECTION.)
2. Remove the following parts:
- (1) Rear scuff plate (See REAR SCUFF PLATE REMOVAL/INSTALLATION.)
-
- (2) Rear seat cushion (See REAR SEAT CUSHION REMOVAL/INSTALLATION.)
-
- (3) Rear seat belt lower anchor installation bolt (See REAR SEAT BELT REMOVAL/INSTALLATION.)
-
- (4) Trunk covering (See TRUNK COVERING REMOVAL/INSTALLATION.)
-
- (5) Trunk board (See TRUNK BOARD REMOVAL/INSTALLATION.)
-
- (6) Trunk side pocket (See TRUNK SIDE POCKET REMOVAL/INSTALLATION.)
-
- (7) Trunk end trim (See TRUNK END TRIM REMOVAL/INSTALLATION.)
-
- (8) Trunk side upper trim (See TRUNK SIDE UPPER TRIM REMOVAL/INSTALLATION.)
-
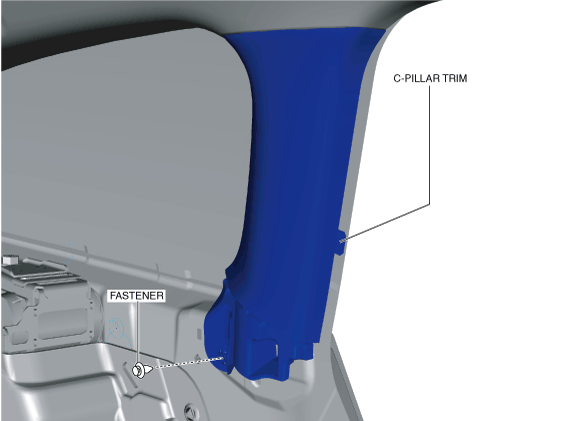
3. Remove fastener.
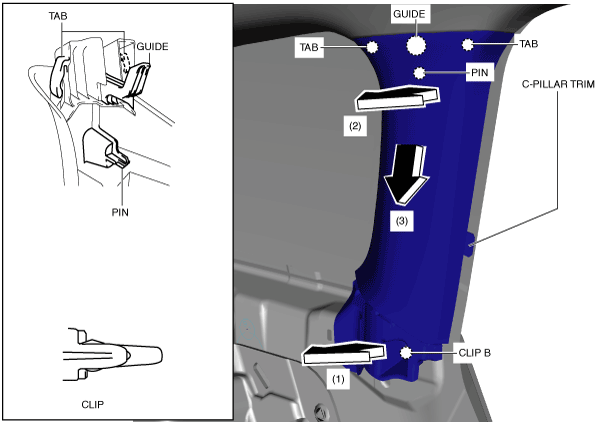
4. Pull the C-pillar trim in the direction of the arrow in the order of (1), (2), (3) while detaching clip, tabs, guide and pin.
-
Caution
-
• If the C-pillar trim is pulled in the direction of the arrow (3) forcefully, guide may be damaged. Carefully pull the C-pillar trim so as not to damage guide.
5. Install in the reverse order of removal.