 |
SUPPLIER IDENTIFICATION PROCEDURE [CAR-NAVIGATION SYSTEM]
id0902f7358400
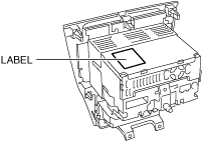
Identification Using the Label or Inscribed Lettering
1. Disconnect the negative battery cable.
2. Remove the following parts:
3. Verify the supplier by referring to the label attached to each unit.
ar8uuw00001069
|
Verify Using the Diagnostic Assist Function
1. Launch the diagnostic assist function. (See DIAGNOSTIC ASSIST FUNCTION [CAR-NAVIGATION SYSTEM].)
2. Press the “Diagnostic assist code input switch”, and input the diagnostic assist code “06”.
am6zzw00002784
|
3. Select “ENTER”.
4. Identify the supplier code by referring to the display.
am6zzw00002785
|
|
Supplier code |
Supplier name |
|---|---|
|
1
|
SANYO Automedia
|
|
2
|
Panasonic
|
|
3
|
Clarion
|
|
4
|
Pioneer
|
|
5
|
VISTEON
|
5. Press the POWER/VOLUME switch to return to the diagnostic assist code input screen.
6. Press the POWER/VOLUME switch to release the diagnostic assist function.