1. Transmission safety information
Caution
- Be careful not to cause any damage.
- Because damage to the rib especially decreases the case strength, even greater caution is necessary when handling the rib sections.
Warning
- When performing work on heavy items such as the case and gears, take care to prevent injury.
2. Preliminary and post procedures
1. Preliminary procedures
1) Open the engine hood.
2) Disconnect the battery cable from the battery negative terminal.
Caution
- After turning OFF the ignition switch (power mode for models with passive entry and start system), do not disconnect the battery cable within 3 minutes.
- If the battery cable is disconnected within 3 minutes, the vehicle electronic control system may malfunction.
- If the battery cable is disconnected, perform the setting of the front door power window switch with AUTO UP/AUTO DOWN function after connecting the battery negative terminal.
3. Transfer preparation
1. 4WD models
1) Change the transfer mode to 2WD using the 2-4 switch.
Caution
- Before removing the transfer from the vehicle, change the transfer mode to 2WD using the 2-4 switch.
4. Engine hood removal
5. Engine cover removal
1) Remove the engine cover from the engine.
6. Wiper linkage disconnect
7. Cowl panel removal
1) Remove the cowl panel from vehicle.

8. Transmission preparation
1) Raise the vehicle using a jack.
Note
- Use a suitable stand to support the vehicle.
Caution
- The accurate ATF amount cannot be measured if the vehicle is at an angle. Perform work within ±1° inclination of the vehicle front and rear.
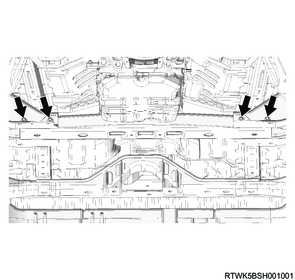
9. Transmission air deflector removal
1) Remove the transmission air deflector from the frame.
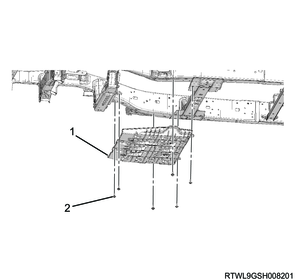
Legend
- Transmission air deflector
- Bolt
10. Coolant drain
Refer to the following items about engine coolant draining.
Refer to "1.Engine 1D.Cooling(4JJ3 with DPD) coolant replacement".
Refer to "1.Engine 1D.Cooling(4JJ3 without DPD) coolant replacement".
Refer to "1.Engine 1D.Cooling(RZ4E-TC) coolant replacement".
11. ATF drain
When the transmission is disassembled.
1) Remove the drain plug from the oil pan.
2) Drain the ATF.
Note
- Keep a record of the amount of fluid that is drained.
Caution
- If chips and particles are found on the oil cleaner magnet when examining it, damage on the gear is suspected.
- Examine the chips and particles on the oil cleaner magnet to determine what type of wear has occurred in the transmission.

3) Temporarily tighten the drain plug to the oil pan.
12. Rear propeller shaft removal
13. Front propeller shaft removal
1. 4WD models
Refer to "3.Driveline, Axle 3C.Drive Shaft System front propeller shaft removal".
14. ATF cooler/warmer removal
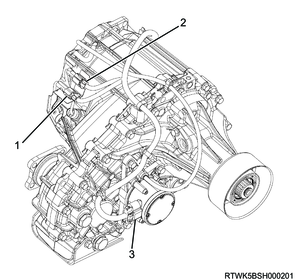
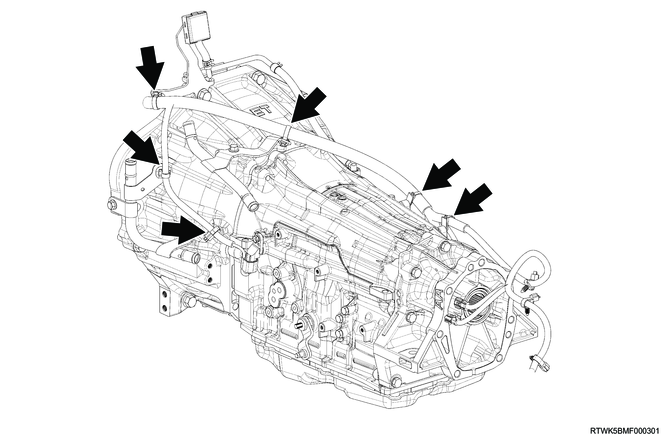
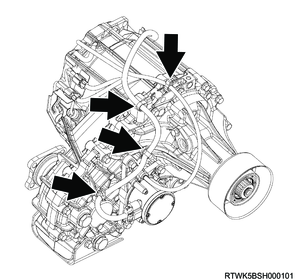
15. Engine harness disconnect
1. 4WD models
1) Disconnect the engine harness from the connectors of the following parts.
- Turbine speed sensor connector
- Transmission internal harness connector
- Output speed sensor connector
- Inhibitor switch connector
- 2-4 switch connector
- Neutral switch connector
- Actuator connector
Note
- Removing bonding tapes from the turbine speed sensor connector and output speed sensor connector makes it easier to disconnect the connectors.
Caution
- When disconnecting 2-4 switch connector while the battery is connected, do not turn the vehicle ignition switch to the ON position.
Transmission left side

Legend
- Turbine speed sensor connector
Transmission right side
Legend
- Output speed sensor connector
- Transmission internal harness connector
- Inhibitor switch connector
Transfer side
Legend
- 2-4 switch connector
- Neutral switch connector
- Actuator connector
2) Disconnect the clips.
2. 2WD models
1) Disconnect the engine harness from the connectors of the following parts.
- Turbine speed sensor connector
- Transmission internal harness connector
- Output speed sensor connector
- Inhibitor switch connector
Note
- Removing bonding tapes from the turbine speed sensor connector and output speed sensor connector makes it easier to disconnect the connectors.
Transmission left side
Legend
- Turbine speed sensor connector
Transmission right side
Legend
- Output speed sensor connector
- Transmission internal harness connector
- Inhibitor switch connector
2) Disconnect the clips.
4JJ3 equipped models

RZ4E-TC equipped models

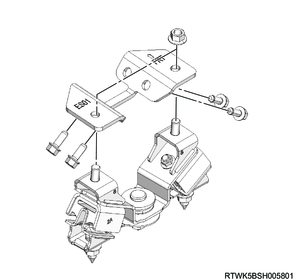
16. Automatic transmission control cable disconnect
1) Disconnect the automatic transmission control cable from the select control lever.
2) Remove the automatic transmission control cable bracket from the transmission.
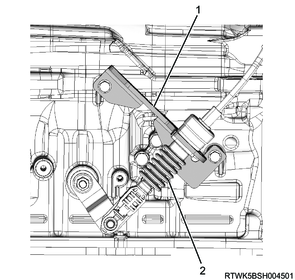
Legend
- Automatic transmission control cable bracket
- Automatic transmission control cable
17. Starter motor removal
18. Torque converter disconnect
1) Remove the lower cover from the transmission.
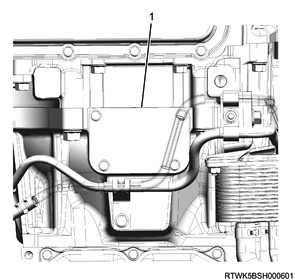
Legend
- Lower cover
2) Remove the flexible plate bolt from the torque converter.
Caution
- Do not reuse the flexible plate bolts.
- Do not damage the ATF cooler pipe.
19. Transmission crossmember removal
1) Install special tool to the cylinder head.
Refer to "1.Engine 1B.Mechanical(4JJ3 with DPD) Engine mounting removal".
Refer to "1.Engine 1B.Mechanical(4JJ3 without DPD) Engine mounting removal".
Refer to "1.Engine 1B.Mechanical(RZ4E-TC) Engine mounting removal".
2) Install the wire to the engine hanger and hoist.
Note
- Hold up the engine as high as not to be lifted up.
3) Support the transmission using a transmission jack.
4) Remove the nut from the transmission crossmember.
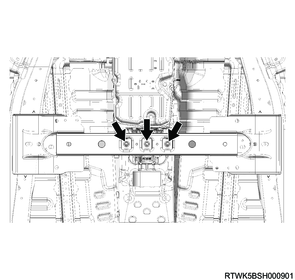
5) Remove the transmission crossmember from the frame.
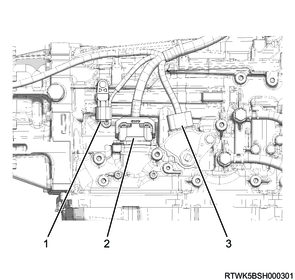
20. Breather hose disconnect
1) Disconnect the breather hose from the breather hose clip bracket.
4JJ3 equipped models
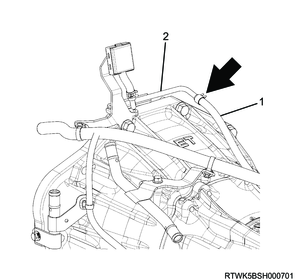
Legend
- Breather hose
- Breather hose clip bracket
RZ4E-TC equipped models
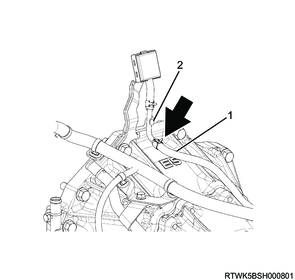
Legend
- Breather hose
- Breather hose clip bracket
21. Transmission removal
1) Remove the transmission from the engine.
Caution
- Remove the breather hose clip bracket together.
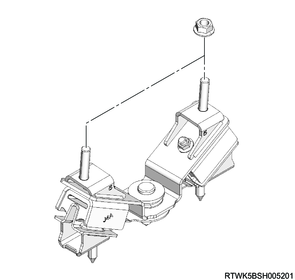
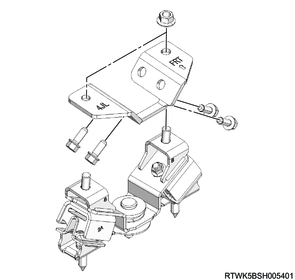
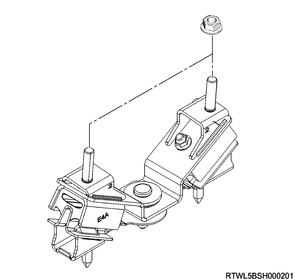
22. Cushion rubber removal
1) Remove the cushion rubber from the transmission.
Note
- In case 2WD equipped models, remove the cushion rubber from the cushion rubber bracket before removing the cushion rubber bracket from the transmission.
4JJ3 equipped models (4WD)
4JJ3 equipped models (2WD)
RZ4E-TC equipped models (4WD)
RZ4E-TC equipped models (2WD)