SAS CONTROL MODULE REMOVAL/INSTALLATION [TWO-STEP DEPLOYMENT CONTROL SYSTEM]
id0810b1801400
-
Warning
-
• If the connector is connected and the ignition switch is turned to the ON position with the SAS control module not secured completely using the installation nuts, the SAS control module may detect a degree of impact even when something contacts it lightly, deploying the air bag module and pre-tensioner seat belt accidentally.
• If the DSC sensor initialization is not completed after removing/installing the SAS control module, the DSC will not operate normally which could lead to an unexpected accident. After the SAS control module is removing/installing, always perform the DSC sensor initialization to ensure proper DSC operation.
• If the MRCC initial setting is not completed after removing/installing the SAS control module, the Mazda radar cruise control (MRCC) system will not operate normally which could lead to an unexpected accident. After removing/installing the SAS control module, always perform the MRCC initial setting to assure proper Mazda radar cruise control (MRCC) system operation.
• If configuration is not performed when the SAS control module is replaced with a new one, the vehicle specification information is not stored in the SAS control module and the system will not operate normally.
-
Caution
-
• When replacing the SAS control module, always perform the configuration procedure before removing the SAS control module. If the configuration is not performed and the SAS control module is removed, DTC B0003:53 will be displayed.
• When performing configuration, it is necessary to read the vehicle specification information from the SAS control module before replacing it. Connect the M-MDS to the vehicle and perform vehicle identification before removing the SAS control module. The vehicle specification information is temporarily stored in the M-MDS.
-
Note
-
• The SAS control module prior to replacement stores the vehicle specification information.
• A new SAS control module does not store any vehicle specification information.
• If the vehicle specification information from the SAS control module prior to replacement cannot be read, perform the configuration using As-Built data.
1. Perform SAS control module configuration when replacing it. (See SAS CONTROL MODULE CONFIGURATION (USING READ/WRITE FUNCTION) [TWO-STEP DEPLOYMENT CONTROL SYSTEM].)
2. Switch the ignition to off.
3. Disconnect the negative battery terminal and wait for 1 min or more. (See NEGATIVE BATTERY TERMINAL DISCONNECTION/CONNECTION.)
4. Remove the following parts:
- (1) Console side panel (See CONSOLE SIDE PANEL REMOVAL/INSTALLATION.)
-
- (2) Switch panel (See SWITCH PANEL REMOVAL/INSTALLATION.)
-
- (3) Cup holder (See CUP HOLDER REMOVAL/INSTALLATION.)
-
- (4) Selector lever knob (ATX) (See SELECTOR LEVER COMPONENT REMOVAL/INSTALLATION.)
-
- (5) Shift lever knob (MTX) (See SHIFT LEVER REMOVAL/INSTALLATION [C66M-R, C66MX-R].) (See SHIFT LEVER REMOVAL/INSTALLATION [D66M-R, D66MX-R].)
-
- (6) Shift panel (See SHIFT PANEL REMOVAL/INSTALLATION.)
-
- (7) Front console box (See FRONT CONSOLE BOX REMOVAL/INSTALLATION.)
-
- (8) Side wall (See SIDE WALL REMOVAL/INSTALLATION.)
-
- (9) Rear console (See REAR CONSOLE REMOVAL/INSTALLATION.)
-
- (10) Rear vent duct (with rear vent duct) (See REAR VENT DUCT REMOVAL/INSTALLATION.)
-
- (11) Mazda ERA-GLONASS control module (with Mazda ERA-GLONASS) (See MAZDA ERA-GLONASS CONTROL MODULE REMOVAL/INSTALLATION.)
-
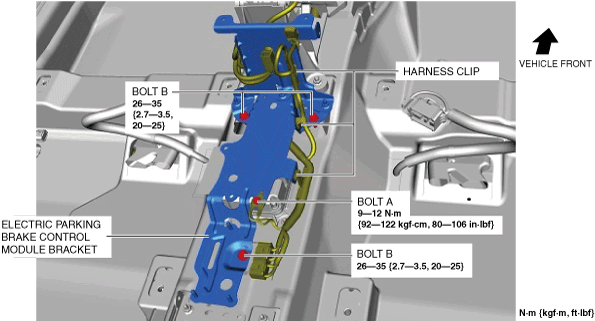
- (12) Electric parking brake control module (See ELECTRIC PARKING BRAKE CONTROL MODULE REMOVAL/INSTALLATION.)
-
5. Remove the harness clips.
6. Remove bolt A.
7. Remove bolts B.
8. Remove the electric parking brake control module bracket.
9. Disconnect the SAS control module connectors.
10. Remove the nuts.
11. Remove the SAS control module.
12. Install in the reverse order of removal.
13. Switch the ignition ON (engine off or on).
14. Verify that the air bag/seat belt pre-tensioner system warning light illuminates for approx. 6 s and turns off.
-
15. Perform the DSC sensor initialization (when removing/installing SAS control module). (See DSC RELATED PARTS SENSOR INITIALIZATION PROCEDURE.)
16. Perform the MRCC initialization (when removing/installing SAS control module). (With MRCC) (See MRCC INITIALIZATION SETTING.)
-
Note
-