CONSOLE LID REMOVAL/INSTALLATION


id091700607400

1.  Disconnect the negative battery terminal. (See NEGATIVE BATTERY TERMINAL DISCONNECTION/CONNECTION.)

2.  Remove the following parts:

(1)  Console side panel (See CONSOLE SIDE PANEL REMOVAL/INSTALLATION.)
(2)  Switch panel (See SWITCH PANEL REMOVAL/INSTALLATION.)
(3)  Cup holder (See CUP HOLDER REMOVAL/INSTALLATION.)
(4)  Shift lever knob (MTX) (See SHIFT LEVER REMOVAL/INSTALLATION [C66M-R, C66MX-R].) (See SHIFT LEVER REMOVAL/INSTALLATION [D66M-R, D66MX-R].)
(5)  Selector lever knob (ATX) (See SELECTOR LEVER COMPONENT REMOVAL/INSTALLATION.)
(6)  Shift panel (See SHIFT PANEL REMOVAL/INSTALLATION.)
(7)  Front console box (See FRONT CONSOLE BOX REMOVAL/INSTALLATION.)
(8)  Side wall (See SIDE WALL REMOVAL/INSTALLATION.)
(9)  Rear console (See REAR CONSOLE REMOVAL/INSTALLATION.)

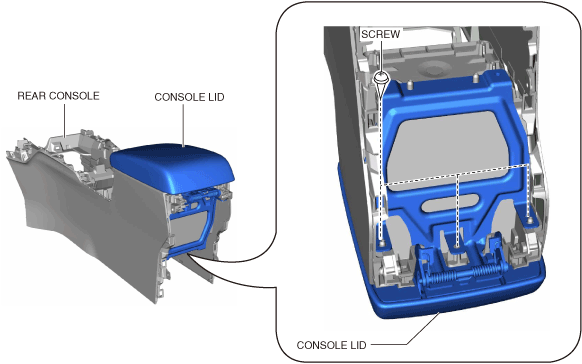
3.  Remove the bolts and screws.

ac5uuw00006708

4.  Remove rear console bracket No.2.

5.  Remove the screws.

ac5uuw00006709

6.  Open the console lid.

ac5uuw00006710

7.  Move the console lid in the direction of arrow (1) shown in the figure, and detach the pins.

8.  Remove the console lid in the direction of arrow (2) shown in the figure.

9.  Install in the reverse order of removal.