DASHBOARD GARNISH REMOVAL/INSTALLATION
id091700804700
1. Remove the following parts:
- (1) A-pillar lower trim (driver’s side) (See A-PILLAR LOWER TRIM REMOVAL/INSTALLATION.)
- (2) A-pillar trim (driver’s side) (See A-PILLAR TRIM REMOVAL/INSTALLATION.)
- (3) Front scuff plate inner (driver’s side) (See FRONT SCUFF PLATE REMOVAL/INSTALLATION.)
- (4) Front side trim (driver’s side) (See FRONT SIDE TRIM REMOVAL/INSTALLATION.)
- (5) Console panel (See CONSOLE PANEL REMOVAL/INSTALLATION.)
- (6) Console (See CONSOLE REMOVAL/INSTALLATION.)
- (7) Bonnet release lever (See BONNET LATCH AND RELEASE LEVER REMOVAL/INSTALLATION.)
- (8) Lower panel (See LOWER PANEL REMOVAL/INSTALLATION.)
- (9) Meter hood (See METER HOOD REMOVAL/INSTALLATION.)
- (10) Instrument cluster (See INSTRUMENT CLUSTER REMOVAL/INSTALLATION.)
- (11) Center panel (See CENTER PANEL REMOVAL/INSTALLATION.)
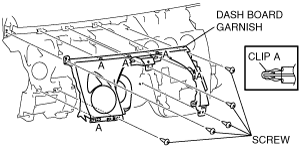
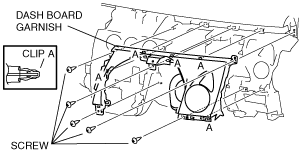
2. Remove the screws.
L.H.D.
R.H.D.
3. Pull the dashboard garnish outward and detach clips A.
4. Install in the reverse order of removal.