Note
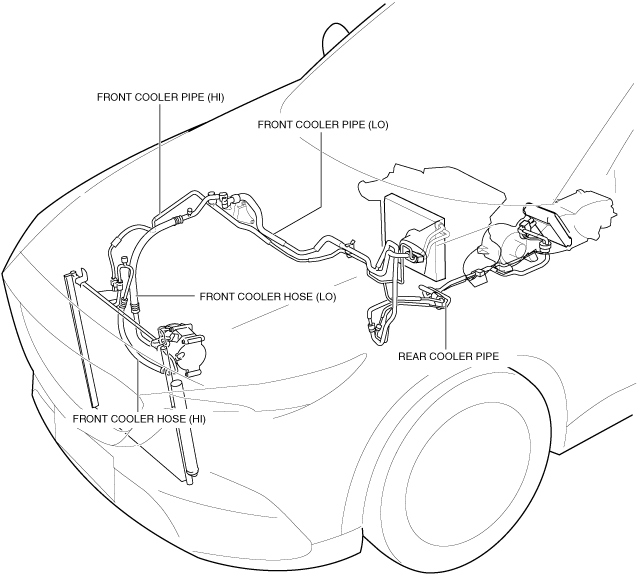
• The refrigerant line consists of the following parts.
ac8wzw00000172
|
REFRIGERANT LINE REMOVAL/INSTALLATION [SKYACTIV-D 2.2]
id071100803034
Replacement Part
|
O-ring (front cooler hose (LO))
Quantity: 2
Location of use: Front cooler hose (LO)
|
O-ring (front cooler hose (HI))
Quantity: 2
Location of use: Front cooler hose (HI)
|
O-ring (front cooler pipe (LO))
Quantity: 4
Location of use: Front cooler pipe (LO)
|
|
O-ring (front cooler pipe (HI))
Quantity: 6
Location of use: Front cooler pipe (HI)
|
O-ring (rear cooler pipe)
Quantity: 4
Location of use: Rear cooler pipe
|
—
|
ac8wzw00000172
|
Front cooler hose (LO)
1. Disconnect the negative battery terminal. (See NEGATIVE BATTERY TERMINAL DISCONNECTION/CONNECTION.)
2. Discharge the refrigerant. (See REFRIGERANT RECOVERY.)(See REFRIGERANT CHARGING.)
3. Remove the engine cover. (See ENGINE COVER REMOVAL/INSTALLATION [SKYACTIV-D 2.2].)
4. Remove the bolt. (See Refrigerant line removal note.)
ac8wzw00000173
|
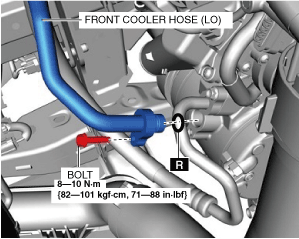
5. Disconnect the front cooler hose (LO). Do not allow compressor oil to spill.
6. Remove the bolt. (See Refrigerant line removal note.)
ac8wzw00000174
|
7. Remove the front cooler hose (LO). Do not allow compressor oil to spill.
8. Install in the reverse order of removal. (See Refrigerant line installation note (1).)(See Refrigerant line installation note (2).)
9. Perform the refrigerant system performance test. (See REFRIGERANT SYSTEM PERFORMANCE TEST.)
Front cooler hose (HI)
1. Disconnect the negative battery terminal. (See NEGATIVE BATTERY TERMINAL DISCONNECTION/CONNECTION.)
2. Discharge the refrigerant. (See REFRIGERANT RECOVERY.)(See REFRIGERANT CHARGING.)
3. Remove the engine cover. (See ENGINE COVER REMOVAL/INSTALLATION [SKYACTIV-D 2.2].)
4. Remove the bolt. (See Refrigerant line removal note.)
ac8wzw00000175
|
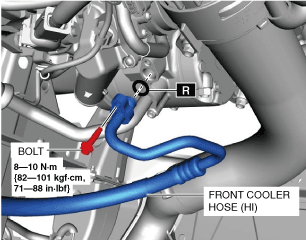
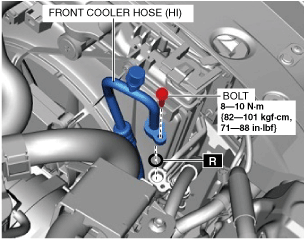
5. Disconnect the front cooler hose (HI). Do not allow compressor oil to spill.
6. Remove the bolt. (See Refrigerant line removal note.)
ac8wzw00000176
|
7. Remove the front cooler hose (HI). Do not allow compressor oil to spill.
8. Install in the reverse order of removal. (See Refrigerant line installation note (1).)(See Refrigerant line installation note (2).)
9. Perform the refrigerant system performance test. (See REFRIGERANT SYSTEM PERFORMANCE TEST.)
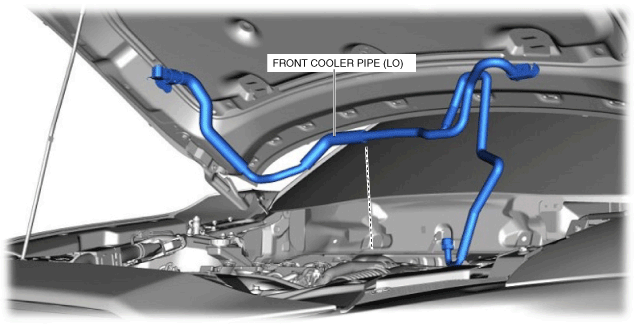
Front cooler pipe (LO)
1. Disconnect the negative battery terminal. (See NEGATIVE BATTERY TERMINAL DISCONNECTION/CONNECTION.)
2. Discharge the refrigerant. (See REFRIGERANT RECOVERY.)(See REFRIGERANT CHARGING.)
3. Remove the following parts:
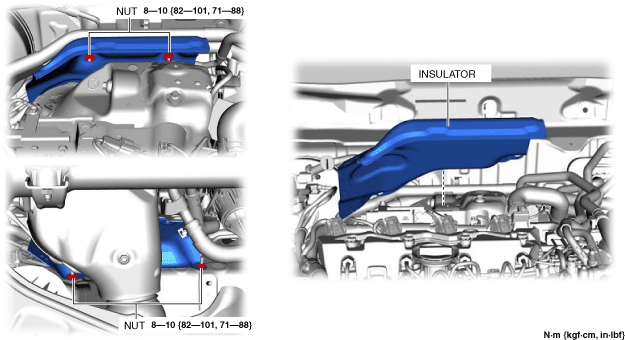
4. Remove the nuts.
ac8wzw00000177
|
5. Remove the insulator.
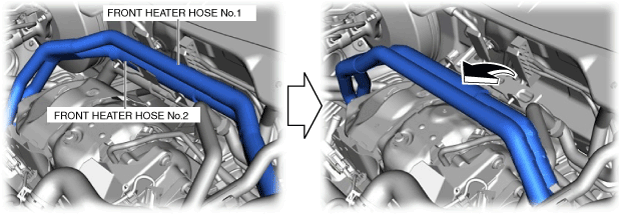
6. Set the front heater hose No.1 and No.2 out of the way as shown in the figure.
ac8wzw00000178
|
7. Remove the bolt. (See Refrigerant line removal note.)
ac8wzw00000174
|
8. Disconnect the front cooler hose (LO). Do not allow compressor oil to spill.
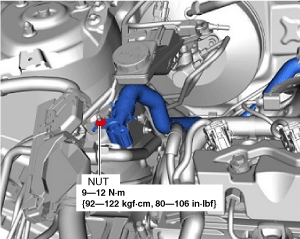
9. Remove the nut.
ac8wzw00000179
|
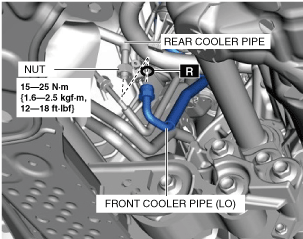
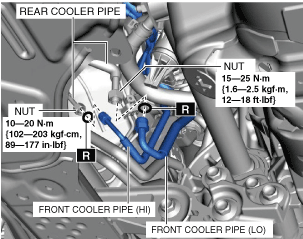
10. Loosen the nut.
ac8wzw00000180
|
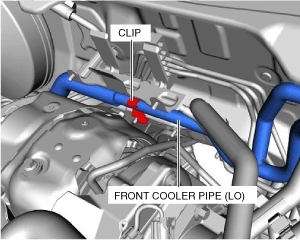
11. Disconnect the rear cooler pipe. Do not allow compressor oil to spill.
12. Remove the front cooler pipe (LO) from the clip.
ac8wzw00000181
|
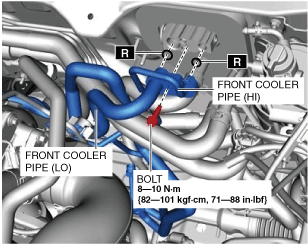
13. Remove the bolt. (See Refrigerant line removal note.)
ac8wzw00000182
|
14. Disconnect the front cooler pipe (HI) and front cooler pipe (LO). Do not allow compressor oil to spill.
15. Remove the front cooler pipe (LO). Do not allow compressor oil to spill.
ac8wzw00000183
|
16. Install in the reverse order of removal. (See Refrigerant line installation note (1).)(See Refrigerant line installation note (2).)
17. Perform the refrigerant system performance test. (See REFRIGERANT SYSTEM PERFORMANCE TEST.)
Front cooler pipe (HI)
1. Disconnect the negative battery terminal. (See NEGATIVE BATTERY TERMINAL DISCONNECTION/CONNECTION.)
2. Discharge the refrigerant. (See REFRIGERANT RECOVERY.)(See REFRIGERANT CHARGING.)
3. Remove the following parts:
4. Remove the nuts.
ac8wzw00000177
|
5. Remove the insulator.
6. Set the front heater hose No.1 and No.2 out of the way as shown in the figure.
ac8wzw00000178
|
7. Remove the bolt. (See Refrigerant line removal note.)
ac8wzw00000174
|
8. Disconnect the front cooler hose (LO). Do not allow compressor oil to spill.
9. Remove the nut.
ac8wzw00000179
|
10. Loosen the nuts.
ac8wzw00000184
|
11. Disconnect the rear cooler pipe. Do not allow compressor oil to spill.
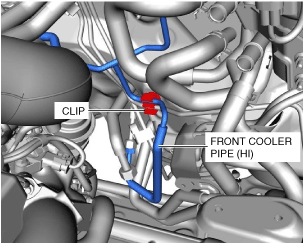
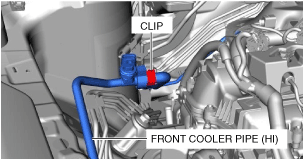
12. Remove the front cooler pipe (HI) from the clip.
ac8wzw00000185
|
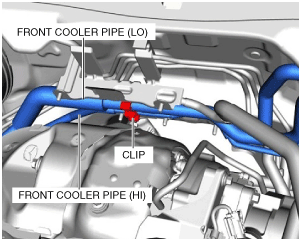
13. Remove the front cooler pipe (LO) and front cooler pipe (HI) from the clip.
ac8wzw00000186
|
14. Remove the bolt. (See Refrigerant line removal note.)
ac8wzw00000182
|
15. Disconnect the front cooler pipe (HI) and front cooler pipe (LO). Do not allow compressor oil to spill.
16. Remove the front cooler pipe (LO). Do not allow compressor oil to spill.
ac8wzw00000183
|
17. Disconnect the connector.
ac8wzw00000187
|
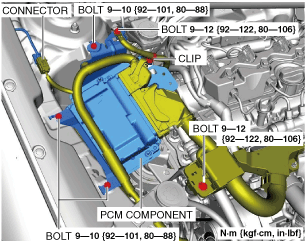
18. Remove the bolts.
19. Remove the clip.
20. Set the PCM component out of the way.
21. Disconnect the connector.
ac8wzw00000188
|
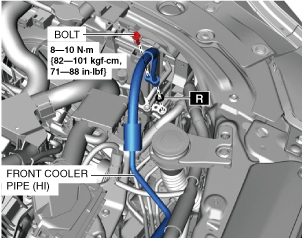
22. Remove the bolt. (See Refrigerant line removal note.)
ac8wzw00000189
|
23. Disconnect the front cooler pipe (HI). Do not allow compressor oil to spill.
24. Remove the front cooler pipe (HI) from the clip.
ac8wzw00000190
|
25. Remove the front cooler pipe (HI). Do not allow compressor oil to spill.
ac8wzw00000191
|
26. Install in the reverse order of removal. (See Refrigerant line installation note (1).)(See Refrigerant line installation note (2).)
27. Perform the refrigerant system performance test. (See REFRIGERANT SYSTEM PERFORMANCE TEST.)
Rear cooler pipe
1. Disconnect the negative battery terminal. (See NEGATIVE BATTERY TERMINAL DISCONNECTION/CONNECTION.)
2. Discharge the refrigerant. (See REFRIGERANT RECOVERY.)(See REFRIGERANT CHARGING.)
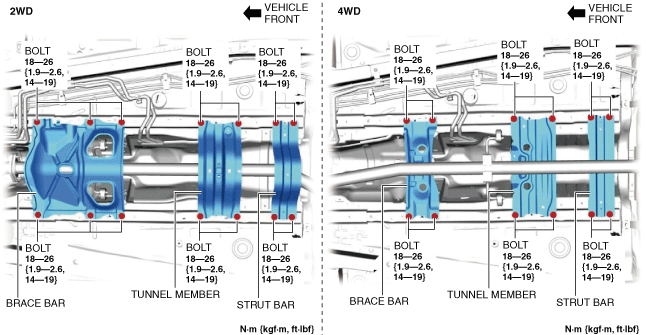
3. Remove the following parts:
ac8wzw00000192
|
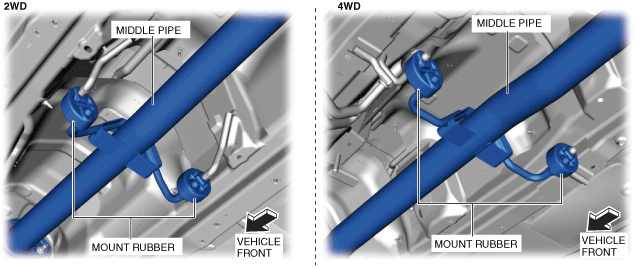
4. Remove the middle pipe from the mount rubber.
ac8wzw00000193
|
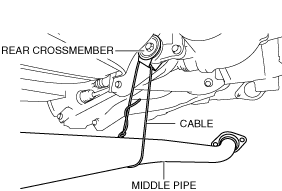
5. Disconnect the middle pipe from the main silencer. (See EXHAUST SYSTEM REMOVAL/INSTALLATION [SKYACTIV-D 2.2].)
6. Suspend the middle pipe using a cable as shown in the figure.
ac8wzw00000194
|
7. Remove the propeller shaft. (4WD) (See PROPELLER SHAFT REMOVAL/INSTALLATION.)
8. Remove the Insulator (front) (See EXHAUST SYSTEM REMOVAL/INSTALLATION [SKYACTIV-D 2.2].)
9. Loosen the nut and disconnect the front cooler pipe (HI). Do not allow compressor oil to spill.
ac8wzw00000184
|
10. Loosen the nut and disconnect the front cooler pipe (LO). Do not allow compressor oil to spill.
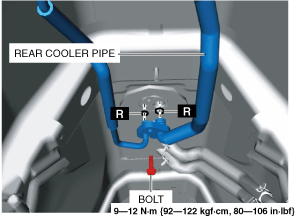
11. Remove the bolt. (See Refrigerant line removal note.)
ac9uuw00007592
|
12. Disconnect the rear cooler pipe. Do not allow compressor oil to spill.
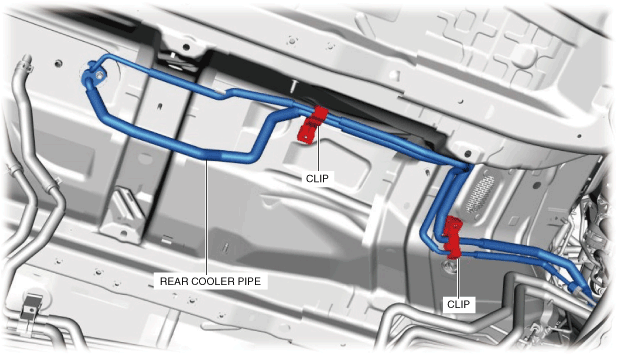
13. Remove the clips.
ac8wzw00000195
|
14. Remove the rear cooler pipe. Do not allow compressor oil to spill.
15. Install in the reverse order of removal. (See Refrigerant line installation note (1).)(See Refrigerant line installation note (2).)
16. Perform the refrigerant system performance test. (See REFRIGERANT SYSTEM PERFORMANCE TEST.)
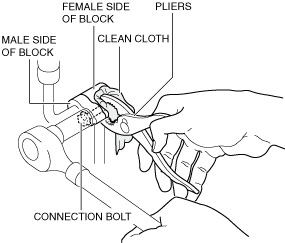
Refrigerant line removal note
1. Disconnect the block joint type pipes by grasping the female side of the block with pliers or similar tool and holding firmly, then tighten the connection bolt or nut.
ac9uuw00007569
|
Refrigerant line installation note (1)
1. Apply compressor oil to the O-rings and connect the joints.
2. Tighten the joint bolt by hand.
3. Connect the block joint type pipes by grasping the female side of the block with pliers or similar tool and holding firmly, then tighten the connection bolt or nut.
ac9uuw00007569
|
Refrigerant line installation note (2)
1. After replacing the refrigerant line, add compressor oil to the refrigeration cycle.
|
Replaced refrigerant line |
Supplemental compressor oil amount (approx. quantity) |
|---|---|
|
Front Cooler Hose (LO)
|
2 ml {2 cc, 0.07 US fl oz}
|
|
Front Cooler Hose (HI)
|
1 ml {1 cc, 0.03 US fl oz}
|
|
Front Cooler Pipe (LO)
|
2 ml {2 cc, 0.07 US fl oz}
|
|
Front Cooler Pipe (HI)
|
2 ml {2 cc, 0.07 US fl oz}
|
|
Rear Cooler Pipe
|
4 ml {4 cc, 0.1 US fl oz}
|