REAR BUMPER REINFORCEMENT REMOVAL/INSTALLATION [(E)]
id0910000415x2
1. Disconnect the negative lead-acid battery terminal. (See NEGATIVE LEAD-ACID BATTERY TERMINAL DISCONNECTION/CONNECTION.)
2. Remove the following parts:
- (1) Rear package tray (See REAR PACKAGE TRAY REMOVAL/INSTALLATION.)
-
- (2) Trunk covering (See TRUNK COVERING REMOVAL/INSTALLATION.)
-
- (3) Trunk board (See TRUNK BOARD REMOVAL/INSTALLATION.)
-
- (4) Trunk end trim (See TRUNK END TRIM REMOVAL/INSTALLATION.)
-
- (5) Trunk side upper trim (See TRUNK SIDE UPPER TRIM REMOVAL/INSTALLATION.)
-
3. Set the trunk side trim aside. (See TRUNK SIDE TRIM REMOVAL/INSTALLATION.)
4. Remove the following parts:
- (1) Trunk side insulator (See TRUNK SIDE INSULATOR REMOVAL/INSTALLATION.)
-
- (2) Rear combination lights (See REAR COMBINATION LIGHT REMOVAL/INSTALLATION.)
-
- (3) Rear over fender (See REAR OVER FENDER REMOVAL/INSTALLATION.)
-
- (4) Rear splash shield (See SPLASH SHIELD REMOVAL/INSTALLATION.)
-
- (5) Rear bumper (See REAR BUMPER REMOVAL/INSTALLATION.)
-
-
Caution
-
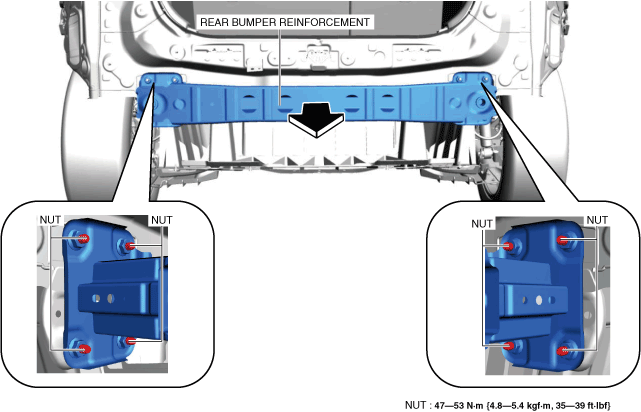
• If all the installation nuts for the rear bumper reinforcement are removed without supporting the rear bumper reinforcement, the rear bumper reinforcement may fall and be damaged. Remove the rear bumper reinforcement using two people, one person supports the rear bumper reinforcement.
5. Remove the nuts.
6. Remove the rear bumper reinforcement in the direction of the arrow shown in the figure.
7. Install in the reverse order of removal.
8. Perform the rear side radar sensor aiming. (See REAR SIDE RADAR SENSOR AIMING.)