EXTRACTOR CHAMBER REMOVAL/INSTALLATION


id091600044500

1.  Disconnect the negative lead-acid battery terminal. (See NEGATIVE LEAD-ACID BATTERY TERMINAL DISCONNECTION/CONNECTION.)

2.  Remove the following parts:

(1)  Rear package tray (See REAR PACKAGE TRAY REMOVAL/INSTALLATION.)
(2)  Trunk covering (See TRUNK COVERING REMOVAL/INSTALLATION.)
(3)  Trunk board (See TRUNK BOARD REMOVAL/INSTALLATION.)
(4)  Trunk end trim (See TRUNK END TRIM REMOVAL/INSTALLATION.)
(5)  Trunk side upper trim (See TRUNK SIDE UPPER TRIM REMOVAL/INSTALLATION.)

3.  Set the trunk side trim aside. (See TRUNK SIDE TRIM REMOVAL/INSTALLATION.)

4.  Remove the following parts:
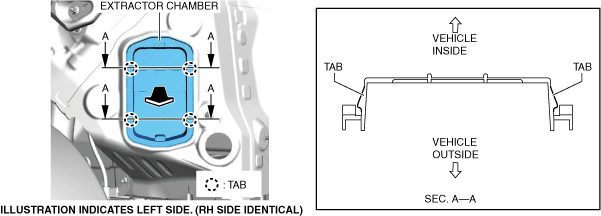
(1)  Trunk side insulator (See TRUNK SIDE INSULATOR REMOVAL/INSTALLATION.)
(2)  Rear combination light (See REAR COMBINATION LIGHT REMOVAL/INSTALLATION.)
(3)  Rear over fender (See REAR OVER FENDER REMOVAL/INSTALLATION.)
(4)  Rear splash shield (See SPLASH SHIELD REMOVAL/INSTALLATION.)
(5)  Rear bumper (See REAR BUMPER REMOVAL/INSTALLATION.)

5.  Detach the tabs.

a30zzw00000615

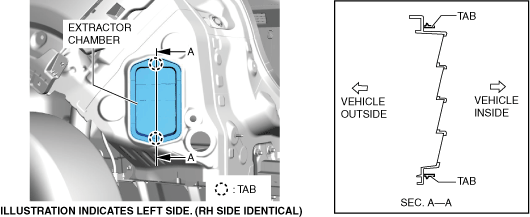
6.  While removing the tabs, remove the extractor chamber in the direction of the arrow shown in the figure.

a30zzw00000616

7.  Install in the reverse order of removal.

8.  Perform radar sensor aiming. (See REAR SIDE RADAR SENSOR AIMING.)