 |
a30zzw00007335
RADIATOR REMOVAL/INSTALLATION
id301200000800
[Coolant Draining Procedure
Replacement part
|
Gasket
Quantity: 2
Location of use: Drain plug
|
Clip
Quantity: 3
Location of use: Insulator
|
1. Load the vehicle on the auto lift so that it can be lifted up.
2. Remove the seal cover. (See SEAL COVER REMOVAL/INSTALLATION.)
3. Remove the cooling system cap.
4. Remove front under cover No.2. (See FRONT UNDER COVER No.2 REMOVAL/INSTALLATION.)
5. Implement [Coolant Draining Procedure] for the coolant replacement. (See COOLANT REPLACEMENT.)
Radiator Removal/Installation
1. Disconnect the negative lead-acid battery terminal. (See NEGATIVE LEAD-ACID BATTERY TERMINAL DISCONNECTION/CONNECTION.)
2. Remove front under cover No.1. (See FRONT UNDER COVER No.1 REMOVAL/INSTALLATION.)
3. Remove the cooling fan motor. (See COOLING FAN MOTOR REMOVAL/INSTALLATION.)
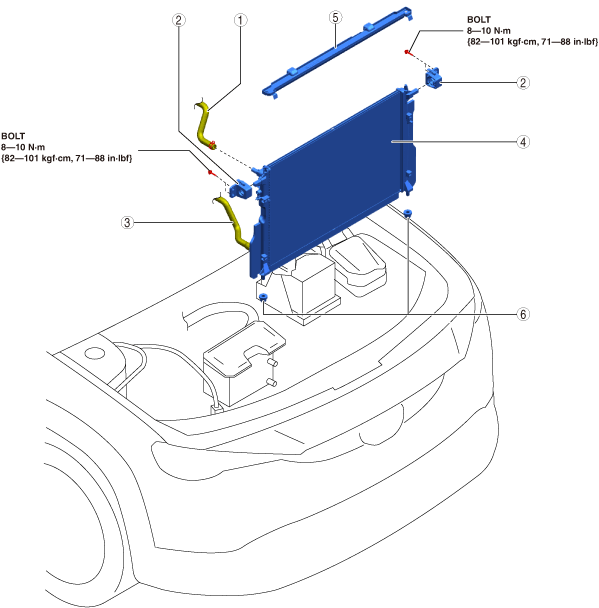
4. Remove using the procedure shown in the figure.
a30zzw00007335
|
|
1
|
Upper radiator hose
|
|
2
|
Radiator mount bracket
|
|
3
|
Lower radiator hose
|
|
4
|
Radiator
(See Radiator Removal Note.)
|
|
5
|
Radiator seal
|
|
6
|
Lower mount rubber
|
5. Install in the reverse order of removal.
Coolant Replenishment Procedure
Air Bleeding Procedure
1. Implement [Air Bleeding Procedure] for the coolant replacement. (See COOLANT REPLACEMENT.)
2. Inspect each area for coolant leakage. (See COOLANT LEAKAGE INSPECTION.)
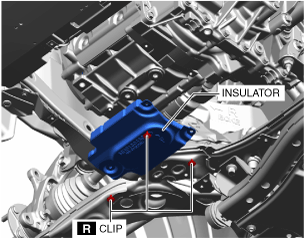
3. Install the insulator.
a30zzw00007336
|
4. Install front under cover No.2. (See FRONT UNDER COVER No.2 REMOVAL/INSTALLATION.)
5. Lower the vehicle to the ground and adjust the coolant amount to the F line on the coolant reserve tank.
6. Install the seal cover. (See SEAL COVER REMOVAL/INSTALLATION.)
Radiator Removal Note
1. To prevent damage to the radiator core, protect it by covering the radiator surface with cardboard.
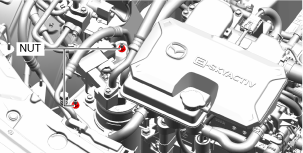
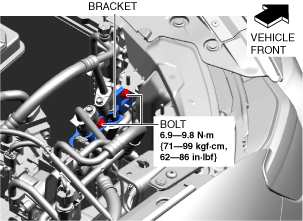
2. Remove the nuts shown in the figure and remove the accumulator and the bracket as a single unit. (See ACCUMULATOR REMOVAL/INSTALLATION.)
a30zzw00004377
|
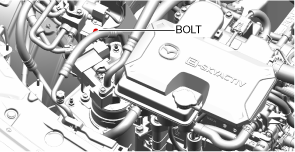
3. Remove the bolt shown in the figure and remove the heat pump unit No.2 bracket. (See HEAT PUMP CONTROL UNIT REMOVAL/INSTALLATION [FULL-AUTO AIR CONDITIONER].)
a30zzw00004378
|
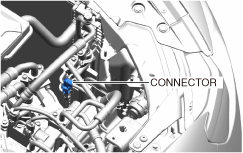
4. Disconnect the connector shown in the figure.
a30zzw00004379
|
5. Lift up the radiator and remove it from the radiator installation holes on the shroud panel.
6. Move the radiator and condenser to the electric motor side.
7. Remove the bolts shown in the figure and remove the bracket.
a30zzw00004381
|
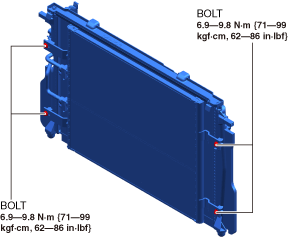
8. Remove the bolts shown in the figure and remove the radiator from the condenser.
a30zzw00004380
|
9. Remove the radiator from top side of the vehicle.