FLOOR COVERING REMOVAL/INSTALLATION
id091700803000
1. Remove the battery cover.
2. Disconnect the negative battery cable. (See BATTERY REMOVAL/INSTALLATION [L8, LF].)
3. Remove the following parts:
-
(1) Seat (See SEAT REMOVAL/INSTALLATION.)
-
(2) Console (See CONSOLE REMOVAL/INSTALLATION.)
-
(3) Side wall (See SIDE WALL REMOVAL/INSTALLATION
-
(4) Console panel (See CONSOLE PANEL REMOVAL/INSTALLATION.)
-
(5) Foot rest
-
(6) Quarter trim (See QUARTER TRIM REMOVAL/INSTALLATION.)
-
(7) Scuff plate (SCUFF PLATE REMOVAL/INSTALLATION.)
-
(8) Front side trim (See FRONT SIDE TRIM REMOVAL/INSTALLATION.)
-
(9) Tire house trim (See TIRE HOUSE TRIM REMOVAL/INSTALLATION.)
-
(10) Aeroboard (See AEROBOARD REMOVAL/INSTALLATION.)
-
(11) Seat back bar garnish (front) (See SEAT BACK BAR GARNISH REMOVAL/INSTALLATION.)
-
(12) Back trim (See BACK TRIM REMOVAL/INSTALLATION.)
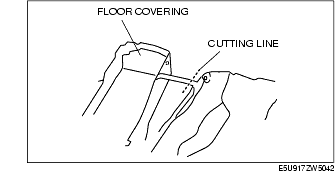
4. Cut away the floor covering as shown in the figure.
-
Note
-
• The cut part needs to match up when installing the floor covering.
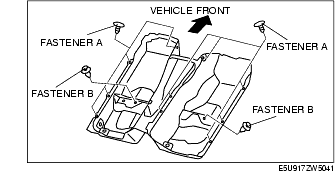
5. Remove the fasteners.
6. Remove the floor covering.
7. Install in the reverse order of removal.
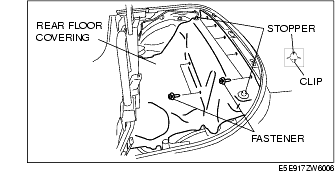
Rear Floor covering (Power Retractable Hardtop)
1. Fully open the deck panel.
2. Remove the side shelf. (See SIDE SHELF REMOVAL/INSTALLATION.)
3. Remove the stoppers.
4. Remove the fasteners.
5. Remove the rear floor covering.
6. Install in the reverse order of removal.