FLYWHEEL INSPECTION [J65M-R]
id0510008001a2
-
Caution
-
• Do not rework the dual-mass flywheel if it is distorted.
• Do not clean the dual-mass flywheel with any kind of fluid. Clean the dual-mass flywheel with a dry cloth only.
• Do not clean the gap between the primary and secondary mass. Only clean the bolt connection surface and the clutch surface.
1. Remove the battery cover. (See BATTERY REMOVAL/INSTALLATION [MZ-CD 1.6 (Y6)].)
2. Disconnect the negative battery cable. (See BATTERY REMOVAL/INSTALLATION [MZ-CD 1.6 (Y6)].)
3. Remove the following parts:
- (1) Battery, battery tray (See BATTERY REMOVAL/INSTALLATION [MZ-CD 1.6 (Y6)].)
- (2) Air cleaner component (See INTAKE-AIR SYSTEM REMOVAL/INSTALLATION [MZ-CD 1.6 (Y6)].)
- (3) Inter cooler pipe bracket (See INTAKE-AIR SYSTEM REMOVAL/INSTALLATION [MZ-CD 1.6 (Y6)].)
- (4) Catalytic converter bracket (See EXHAUST SYSTEM REMOVAL/INSTALLATION [MZ-CD 1.6 (Y6)].)
- (5) Front tires (See GENERAL PROCEDURES (SUSPENSION).)
- (6) Splash shield (See SPLASH SHIELD REMOVAL/INSTALLATION.)
- (7) Aerodynamic under cover No.2 (See AERODYNAMIC UNDER COVER NO.2 REMOVAL/INSTALLATION.)
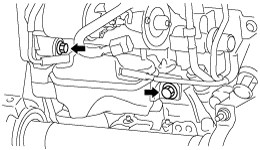
4. Cut off the vacuum chamber installation bolt and set the vacuum chamber aside so that it does not interfere with the servicing.
5. Remove the starter. (See STARTER REMOVAL/INSTALLATION [MZ-CD 1.6 (Y6)].)
6. Drain the transaxle oil into a suitable container. (See TRANSAXLE OIL REPLACEMENT [J65M-R].)
7. Remove the manual transaxle. (See MANUAL TRANSAXLE REMOVAL/INSTALLATION [J65M-R].)
8. Remove the clutch cover. (See CLUTCH UNIT REMOVAL/INSTALLATION [J65M-R].)
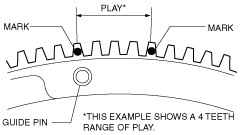
9. Inspect the rotation of the dual-mass flywheel for play.
- (1) Lock the dual-mass flywheel using the SST (49 E011 1A0).
- (2) Rotate the secondary flywheel clockwise by hand until resistance can be felt.
- (3) Mark the guide pin position on the ring gear of the flywheel.
- (4) Rotate the secondary flywheel counterclockwise by hand until resistance can be felt.
- (5) Mark the guide pin position on the ring gear of the primary flywheel again.
- (6) Verify that the play is within the range of 4 teeth.
-
-
-
Caution
-
• It may not be possible to rotate the secondary flywheel due to the functionality of the dual-mass flywheel.
In this case, the dual-mass flywheel can be considered normal by reason of the play being within the range of 4 teeth.
10. Remove the dual-mass flywheel. (See CLUTCH UNIT REMOVAL/INSTALLATION [J65M-R].)
-
Note
-
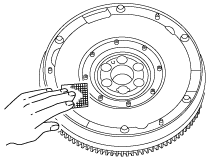
• Correct slight scratches and discoloration using sandpaper.
• Inspect the runout of the surface that contacts the clutch disc with the dual-mass flywheel installed to the crankshaft.
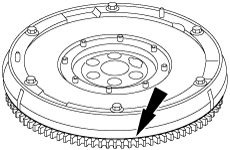
11. Inspect the dual-mass flywheel.
-
― Cracks
― Worn ring gear teeth
― Chipped or cracked ring gear teeth
― Surface that contacts the clutch disc for scratches, nicks, and discoloration.
-
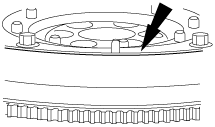
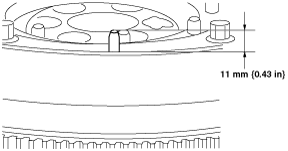
12. Inspect for locating dowels touching the primary mass of the dual-mass flywheel.
-
Caution
-
• Make sure that the three locating dowels are installed.
-
• If the locating dowels are touching the primary mass of the dual-mass flywheel, replace the dual-mass flywheel with a new one.
13. Visually inspect the secondary mass.
-
14. Visually inspect the ring gear on the dual-mass flywheel.
-
15. Inspect the welded area of the dual-mass flywheel for grease leakage.
-
16. Inspect the dual-mass flywheel for the amount of guide pin projection.
-
17. Inspect the dual-mass flywheel for cracks.
-
18. Install in the reverse order of removal.
19. Add the specified amount of specified transaxle oil. (See TRANSAXLE OIL REPLACEMENT [J65M-R].)
20. Perform the clutch fluid line air bleeding. (See CLUTCH FLUID AIR BLEEDING/REPLACEMENT.)
-
Note
-