SUNROOF UNIT REMOVAL/INSTALLATION
id091500800700
-
Caution
-
• If the sunshade is forced close while the sunroof is open, the sunshade could be damaged.
1. Disconnect the negative battery cable.
2. Remove the following parts:
- (1) Sunroof seaming welt
- (2) A-pillar trim (See A-PILLAR TRIM REMOVAL/INSTALLATION.)
- (3) Front scuff plate (See FRONT SCUFF PLATE REMOVAL/INSTALLATION.)
- (4) Rear scuff plate (See REAR SCUFF PLATE REMOVAL/INSTALLATION.)
- (5) Upper anchor of the front seat belt (See FRONT SEAT BELT REMOVAL/INSTALLATION.)
- (6) B-pillar lower trim (See B-PILLAR LOWER TRIM REMOVAL/INSTALLATION.)
- (7) B-pillar upper trim (See REAR SEAT CUSHION REMOVAL/INSTALLATION.)
- (8) Rear seat cushion (See REAR SEAT BACK REMOVAL/INSTALLATION.)
- (9) Tire house trim (See TIRE HOUSE TRIM REMOVAL/INSTALLATION.)
- (10) Trunk end trim (See TRUNK END TRIM REMOVAL/INSTALLATION.)
- (11) Trunk side upper trim (5HB) (See TRUNK SIDE UPPER TRIM REMOVAL/INSTALLATION.)
- (12) Trunk side trim (See TRUNK SIDE TRIM REMOVAL/INSTALLATION.)
- (13) C-pillar trim (See C-PILLAR TRIM REMOVAL/INSTALLATION.)
- (14) Map light (See MAP LIGHT REMOVAL/INSTALLATION.)
- (15) Assist handle (See ASSIST HANDLE REMOVAL/INSTALLATION.)
- (16) Sunvisor (See SUNVISOR REMOVAL/INSTALLATION.)
- (17) Headliner (See HEADLINER REMOVAL/INSTALLATION.)
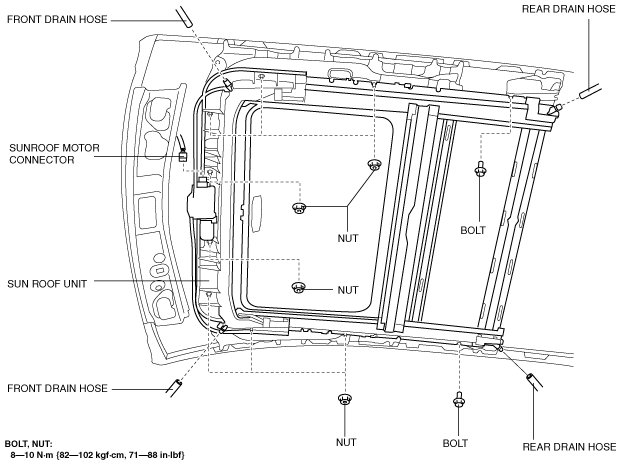
3. Disconnect the front and rear drain hose from the sunroof frame.
4. Disconnect the sunroof motor connector.
5. Remove the bolts.
6. Remove the nuts, and then remove the sunroof unit.
7. Install in the reverse order of removal.
8. Adjust the glass panel. (See GLASS PANEL ADJUSTMENT.)