CLIMATE CONTROL UNIT INSTALLATION[MANUAL AIR CONDITIONER]
id0740a2801900
1. Install the wire clamps.
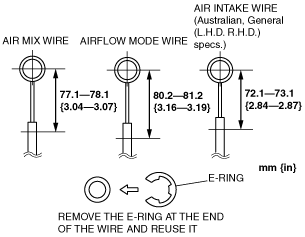
2. Assemble e-ring as shown in the figure.
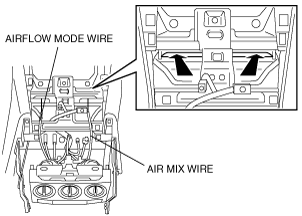
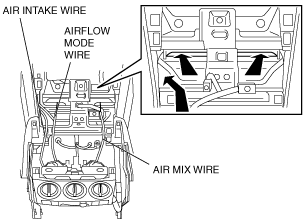
3. Pass each wire through the following routes and connect to A/C unit.
European (L.H.D. U.K.) specs.
Australian, General (L.H.D. R.H.D.) specs.
4. Connect the climate control unit connectors.
5. Adjust the climate control unit wires. (See CLIMATE CONTROL UNIT WIRE ADJUSTMENT.)
6. Install the following parts:
- (1) Steering shaft (R.H.D., MTX) (See STEERING WHEEL AND COLUMN REMOVAL/INSTALLATION.)
-
- (2) Instrument cluster (R.H.D., MTX) (See INSTRUMENT CLUSTER REMOVAL/INSTALLATION.)
-
- (3) Meter hood (R.H.D., MTX) (See METER HOOD REMOVAL/INSTALLATION.)
-
- (4) Column cover (R.H.D., MTX) (See COLUMN COVER REMOVAL/INSTALLATION.)
-
- (5) Driver-side air bag module (R.H.D., MTX) (See METER HOOD REMOVAL/INSTALLATION.)
-
- (6) Console (See CONSOLE REMOVAL/INSTALLATION.)
-
- (7) PJB and PJB bracket. (See PASSENGER JUNCTION BOX (PJB) REMOVAL/INSTALLATION.)
-
- (8) Glove compartment (See GLOVE COMPARTMENT REMOVAL/INSTALLATION.)
-
- (9) Decoration panel (See DECORATION PANEL REMOVAL/INSTALLATION.)
-
- (10) Lower panel (See LOWER PANEL REMOVAL/INSTALLATION.)
-
- (11) Front side trim (See FRONT SIDE TRIM REMOVAL/INSTALLATION.)
-
- (12) Front scuff plate (See FRONT SCUFF PLATE REMOVAL/INSTALLATION.)
-
- (13) Detach the bonnet release lever from the lower panel. (See BONNET LATCH AND RELEASE LEVER REMOVAL/INSTALLATION[L.H.D.].) (See BONNET LATCH AND RELEASE LEVER REMOVAL/INSTALLATION[R.H.D.].)
-
- (14) Ashtray panel
-
- (15) Climate control unit
-
- (16) Center panel unit (See CENTER PANEL UNIT REMOVAL/INSTALLATION.)
-
7. Connect the negative battery cable.