REAR WASHER HOSE REMOVAL/INSTALLATION
id091900801600
L.H.D.
1. Disconnect the negative battery cable.
2. Slightly bend back the mudguard (RH).
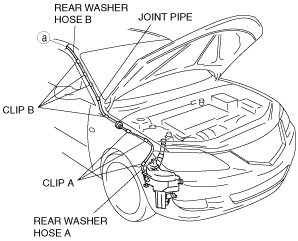
3. Disconnect the rear washer hose A from the washer tank.
4. Remove rear washer hose A from clips A.
5. Remove A-pillar trim. (See A-PILLAR TRIM REMOVAL/INSTALLATION.)
6. Remove the glove compartment. (See GLOVE COMPARTMENT REMOVAL/INSTALLATION.)
7. Remove the dashboard garnish. (See DASHBOARD GARNISH REMOVAL/INSTALLATION.)
8. Disconnect joint pipe, then remove the rear washer hose A.
9. Remove rear washer hose B from the clips B.
10. Remove the following parts:
- (1) Upper anchor of the front seat belt (See FRONT SEAT BELT REMOVAL/INSTALLATION.)
-
- (2) Front scuff plate (See FRONT SCUFF PLATE REMOVAL/INSTALLATION.)
-
- (3) Rear scuff plate (See REAR SCUFF PLATE REMOVAL/INSTALLATION.)
-
- (4) B-pillar lower trim (See B-PILLAR LOWER TRIM REMOVAL/INSTALLATION.)
-
- (5) B-pillar upper trim (See B-PILLAR UPPER TRIM REMOVAL/INSTALLATION.)
-
- (6) Rear seat (See REAR SEAT REMOVAL/INSTALLATION.)
-
- (7) Tire house trim (See TIRE HOUSE TRIM REMOVAL/INSTALLATION.)
-
- (8) Trunk side upper trim (See TRUNK SIDE UPPER TRIM REMOVAL/INSTALLATION.)
-
- (9) C-pillar trim (See C-PILLAR TRIM REMOVAL/INSTALLATION.)
-
- (10) Map light (See MAP LIGHT REMOVAL/INSTALLATION.)
-
- (11) Interior light (See INTERIOR LIGHT REMOVAL/INSTALLATION.)
-
- (12) Sunvisor (See SUNVISOR REMOVAL/INSTALLATION.)
-
- (13) Assist handle (See ASSIST HANDLE REMOVAL/INSTALLATION.)
-
11. Disconnect the joint pipe B.
12. Remove the headliner. (See HEADLINER REMOVAL/INSTALLATION.)
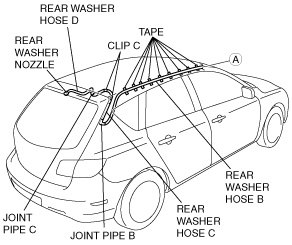
13. Remove rear washer hose B and the tapes.
14. Remove clips C from the body.
15. Disconnect the joint pipe C, then remove rear washer hose C.
16. Remove rear washer hose D from the rear washer nozzle.
17. Install in the reverse order of removal.
R.H.D.
1. Disconnect the negative battery cable.
2. Slightly bend back the mudguard (RH).
3. Disconnect the rear washer hose A from the washer tank.
4. Remove rear washer hose A from clips A.
5. Remove A-pillar trim. (See A-PILLAR TRIM REMOVAL/INSTALLATION.)
6. Disconnect joint pipe, then remove the rear washer hose A.
7. Remove rear washer hose B from the clips B.
8. Remove the following parts:
- (1) Front scuff plate (See FRONT SCUFF PLATE REMOVAL/INSTALLATION.)
-
- (2) Front side trim (See FRONT SIDE TRIM REMOVAL/INSTALLATION.)
-
- (3) Lower panel (See LOWER PANEL REMOVAL/INSTALLATION.)
-
- (4) Decoration panel (See DECORATION PANEL REMOVAL/INSTALLATION.)
-
- (5) Dashboard center panel (See DASHBOARD CENTER PANEL REMOVAL/INSTALLATION.)
-
- (6) Meter hood (See METER HOOD REMOVAL/INSTALLATION.)
-
- (7) Instrument cluster (See INSTRUMENT CLUSTER REMOVAL/INSTALLATION.)
-
- (8) Upper anchor of the front seat belt (See FRONT SEAT BELT REMOVAL/INSTALLATION.)
-
- (9) Rear scuff plate (See REAR SCUFF PLATE REMOVAL/INSTALLATION.)
-
- (10) B-pillar lower trim (See B-PILLAR LOWER TRIM REMOVAL/INSTALLATION.)
-
- (11) B-pillar upper trim (See B-PILLAR UPPER TRIM REMOVAL/INSTALLATION.)
-
- (12) Rear seat (See REAR SEAT REMOVAL/INSTALLATION.)
-
- (13) Tire house trim (See TIRE HOUSE TRIM REMOVAL/INSTALLATION.)
-
- (14) Trunk side upper trim (See TRUNK SIDE UPPER TRIM REMOVAL/INSTALLATION.)
-
- (15) C-pillar trim (See C-PILLAR TRIM REMOVAL/INSTALLATION.)
-
- (16) Map light (See MAP LIGHT REMOVAL/INSTALLATION.)
-
- (17) Interior light (See INTERIOR LIGHT REMOVAL/INSTALLATION.)
-
- (18) Sunvisor (See SUNVISOR REMOVAL/INSTALLATION.)
-
- (19) Assist handle (See ASSIST HANDLE REMOVAL/INSTALLATION.)
-
9. Disconnect the joint pipe B.
10. Remove the headliner. (See HEADLINER REMOVAL/INSTALLATION.)
11. Remove rear washer hose B and the tapes.
12. Remove clips C from the body.
13. Disconnect the joint pipe C, then remove rear washer hose C.
14. Remove rear washer hose D from the rear washer nozzle.
15. Install in the reverse order of removal.