|
am3zzw00012106
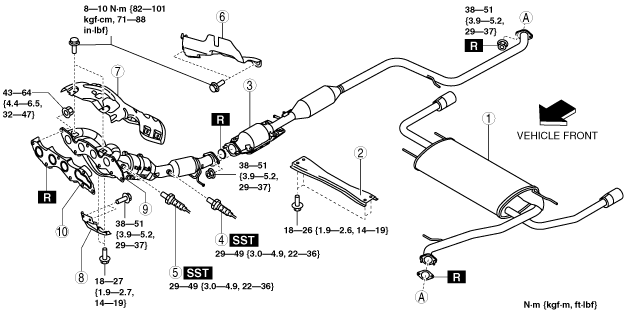
EXHAUST SYSTEM REMOVAL/INSTALLATION [MZR 2.0, MZR 2.5]
id0115d4800200
1. Remove the battery cover. (See BATTERY REMOVAL/INSTALLATION [MZR 2.0, MZR 2.5].)
2. Disconnect the negative battery cable. (See BATTERY REMOVAL/INSTALLATION [MZR 2.0, MZR 2.5].)
3. Remove the plug hole plate. (See PLUG HOLE PLATE REMOVAL/INSTALLATION [MZR 2.0, MZR 2.5].)
4. Remove in the order indicated in the table.
5. Remove the exhaust system insulator. (See Exhaust System Insulator Removal/installation Note.)
6. Install in the reverse order of removal.
MZR 2.0
am3zzw00012106
|
|
1
|
Tunnel member
|
|
2
|
Main silencer
|
|
3
|
HO2S
|
|
4
|
A/F sensor
|
|
5
|
Exhaust manifold insulator
|
|
6
|
insulator
|
|
7
|
Exhaust manifold bracket
|
|
8
|
Exhaust manifold
|
|
9
|
Exhaust manifold gasket
|
MZR 2.5
am3zzw00012107
|
|
1
|
Main silencer
|
|
2
|
Tunnel member (rear)
|
|
3
|
TWC
|
|
4
|
HO2S
|
|
5
|
A/F sensor
|
|
6
|
insulator
|
|
7
|
Exhaust manifold insulator
|
|
8
|
Exhaust manifold bracket
|
|
9
|
Exhaust manifold
|
|
10
|
Exhaust manifold gasket
|
Exhaust System Insulator Removal/installation Note
1. Remove the exhaust system insulator in the order shown in the figure.
2. Install in the reverse order of removal.
MZR 2.0
am3zzw00012108
|
|
1
|
Insulator (rear No.1)
|
|
2
|
Insulator (rear No.2)
|
|
3
|
Insulator (middle No.1)
|
|
4
|
Insulator (middle No.2)
|
|
5
|
Insulator (front)
|
MZR 2.5
am3zzw00012109
|
|
1
|
Insulator (rear No.1)
|
|
2
|
Insulator (rear No.2)
|
|
3
|
Insulator (rear No.3)
|
|
4
|
Insulator (middle No.1)
|
|
5
|
Insulator (middle No.2)
|
|
6
|
Insulator (front)
|
Insulator (Rear No.1, No.2, No.3) Removal Note
1. Push out the mandrel using a hammer and punch (2—2.8 mm {0.08—0.11 in} diameter).
am3zzw00007796
|
2. Remove the flange using a drill (5 mm {0.20 in} drill bit).
ar8uuw00001479
|
Main Silencer Removal Note (Only If Tailpipe Is Not Cut Off)
1. Remove the following parts:
2. Remove the main silencer.
Exhaust Manifold Removal Note
1. Remove the windshield wiper arm and blade. (See WINDSHIELD WIPER ARM AND BLADE REMOVAL/INSTALLATION.)
2. Remove the cowl grill. (See COWL GRILLE REMOVAL/INSTALLATION.)
3. Remove the windshield wiper motor. (See WINDSHIELD WIPER MOTOR REMOVAL/INSTALLATION.)
4. Remove the cowl panel. (See COWL PANEL REMOVAL/INSTALLATION.)
5. Support the flexible pipe with a support wrap or splint as shown in the figure.
am3zzw00008536
|
6. Remove the exhaust manifold.
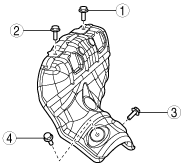
Exhaust Manifold Installation Note
1. Temporarily tighten the exhaust manifold installation nuts.
2. Tighten the exhaust manifold new installation nuts in the order shown in the figure.
am6xuw00001404
|
Exhaust Manifold Insulator Installation Note
1. Temporarily tighten the exhaust manifold insulator.
2. Tighten the exhaust manifold insulator in the order shown in the figure.
MZR 2.0
am3uuw00002495
|
MZR 2.5
am3uuw00002496
|