 |
am3zzw00006712
RECEIVER/DRIER REMOVAL/INSTALLATION
id071100801400
Type A
1. Disconnect the negative battery cable. (See BATTERY REMOVAL/INSTALLATION [MZR 1.5, MZR 1.6].) (See BATTERY REMOVAL/INSTALLATION [MZR 2.0, MZR 2.5].) (See BATTERY REMOVAL/INSTALLATION [MZR 2.0 DISI i-stop].) (See BATTERY REMOVAL/INSTALLATION [MZR 2.3 DISI Turbo].) (See BATTERY REMOVAL/INSTALLATION [SKYACTIV-G 2.0].) (See BATTERY REMOVAL/INSTALLATION [MZ-CD 1.6].) (See BATTERY REMOVAL/INSTALLATION [MZR-CD 2.2].)
2. Discharge the refrigerant. (See REFRIGERANT CHARGING.)
3. Remove the aerodynamic under cover NO.2. (See AERODYNAMIC UNDER COVER NO.2 REMOVAL/INSTALLATION.)
4. Remove the aerodynamic under cover NO.1. (See AERODYNAMIC UNDER COVER NO.1 REMOVAL/INSTALLATION.)
5. Remove the front bumper. (See FRONT BUMPER REMOVAL/INSTALLATION.)
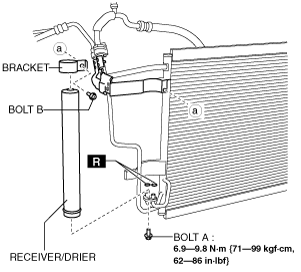
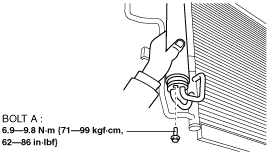
6. Disconnect the block joint type pipes by grasping female side of the block with hand holding firmly then loosen the connection bolt A.
am3zzw00006712
|
7. Remove the bolt B.
Except MZ-CD 1.6
am3zzw00006713
|
MZ-CD 1.6
am3zzw00006714
|
8. Remove the bracket.
9. Remove the receiver/drier. Do not allow compressor oil to spill.
10. Install in the reverse order of removal.
11. Perform the refrigerant system performance test. (See REFRIGERANT SYSTEM PERFORMANCE TEST.)
Type B
General (L.H.D.) specs.
1. Disconnect the negative battery cable. (See BATTERY REMOVAL/INSTALLATION [MZR 1.5, MZR 1.6].)
2. Discharge the refrigerant. (See REFRIGERANT CHARGING.)
3. Remove the aerodynamic under cover No.2. (See AERODYNAMIC UNDER COVER NO.2 REMOVAL/INSTALLATION.)
4. Remove the aerodynamic under cover No.1. (See AERODYNAMIC UNDER COVER NO.1 REMOVAL/INSTALLATION.)
5. Remove the front bumper. (See FRONT BUMPER REMOVAL/INSTALLATION.)
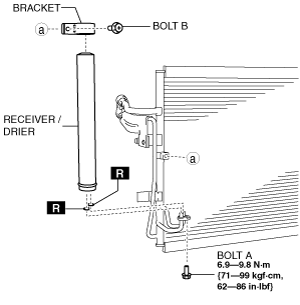
6. Disconnect the block joint type pipes by grasping female side of the block with hand holding firmly then loosen the connection bolt A.
am3zzw00012338
|
7. Remove the bolt B.
am3uuw00004015
|
8. Remove the bracket.
9. Remove the receiver/drier. Do not allow compressor oil to spill.
am3uuw00004016
|
10. Install in the reverse order of removal.
11. Perform the refrigerant system performance test. (See REFRIGERANT SYSTEM PERFORMANCE TEST.)