|
am6zzw00005747
FUEL TANK REMOVAL/INSTALLATION [MZR-CD 2.2]
id0114f2801600
1. Level the vehicle.
2. Complete the “BEFORE SERVICE PRECAUTION”. (See BEFORE SERVICE PRECAUTION [MZR-CD 2.2].)
3. Disconnect the negative battery cable. (See BATTERY REMOVAL/INSTALLATION [MZR-CD 2.2].)
4. Drain the fuel using the following procedure.
5. Perform the following procedure.
6. Remove the fuel gauge sender unit. (See FUEL GAUGE SENDER UNIT REMOVAL/INSTALLATION [MZR-CD 2.2].)
7. Remove the middle pipe. (See EXHAUST SYSTEM REMOVAL/INSTALLATION [MZR-CD 2.2].)
8. Remove the floor under cover. (See FLOOR UNDER COVER REMOVAL/INSTALLATION.)
9. Remove the rear trailing link cover. (See REAR TRAILING LINK REMOVAL/INSTALLATION.)
10. Set the rear parking brake cable out of the way. (See REAR PARKING BRAKE CABLE REMOVAL/INSTALLATION.)
11. Remove in the order indicated in the table.
12. Install in the reverse order of removal.
13. Complete the “AFTER SERVICE PRECAUTION”. (See AFTER SERVICE PRECAUTION [MZR-CD 2.2].)
am6zzw00005747
|
|
1
|
Fuel tank strap
|
|
2
|
Fuel tank
|
|
3
|
Joint hose
(See Joint Hose Installation Note.)
|
|
4
|
Breather hose
|
|
5
|
Protector
(See Protector Installation Note.)
|
|
6
|
Insulator
(See Insulator Removal Note.)
|
|
7
|
Fuel-filler cap
|
|
8
|
Dust cover
|
|
9
|
Fuel-filler pipe
|
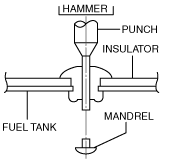
Insulator Removal Note
1. Push out the mandrel using a hammer and punch (2—2.8 mm {0.08—0.11 in} diameter).
am6zzw00004372
|
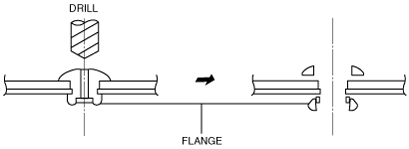
2. Remove the flange using a drill (5 mm {0.20 in} drill bit).
am6zzw00003432
|
Fuel-filler Pipe Removal Note
1. Remove the rear tire (LH). (WGN) (See GENERAL PROCEDURES (SUSPENSION).)
2. Remove the splash shield (LH). (See SPLASH SHIELD REMOVAL/INSTALLATION.)
3. Set the mudguard (LH) out of the way. (See REAR MUDGUARD REMOVAL/INSTALLATION.)
4. Remove the fuel-filler pipe.
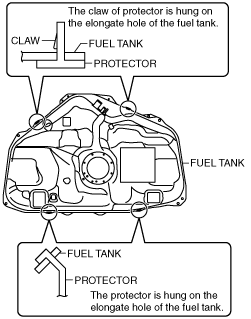
Protector Installation Note
1. Install the protector as shown in the figure.
am6zzw00005748
|
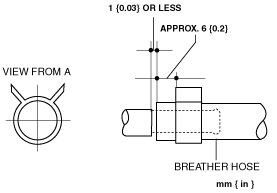
Breather Hose Installation Note
1. Install the breather hose as shown in the figure.
am6zzw00005749
|
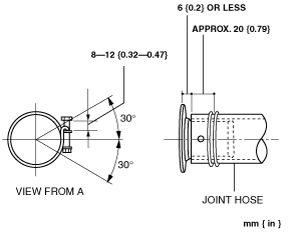
Joint Hose Installation Note
1. Install the joint hose as shown in the figure.
am6zzw00003750
|