INSTRUMENT CLUSTER DISASSEMBLY/ASSEMBLY
id092200801600
-
Caution
-
• Do not drop the instrument cluster or damage the printed board. This will lead to a system malfunction.
1. Perform the instrument cluster configuration when replacing it. (See INSTRUMENT CLUSTER CONFIGURATION.)
2. Disconnect the negative battery cable.
3. Remove the following parts:
- (1) Front scuff plate (Driver side) (See FRONT SCUFF PLATE REMOVAL/INSTALLATION.)
- (2) Front side trim (Driver side) (See FRONT SIDE TRIM REMOVAL/INSTALLATION.)
- (3) Upper panel (See UPPER PANEL REMOVAL/INSTALLATION.)
- (4) Decoration panel (Driver side) (See DECORATION PANEL REMOVAL/INSTALLATION.)
- (5) Bonnet release lever (See BONNET LATCH AND RELEASE LEVER REMOVAL/INSTALLATION.)
- (6) Lower panel (See LOWER PANEL REMOVAL/INSTALLATION.)
- (7) Meter hood (See METER HOOD REMOVAL/INSTALLATION.)
- (8) Instrument cluster (See INSTRUMENT CLUSTER REMOVAL/INSTALLATION.)
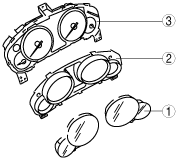
4. Disassemble in the order indicated in the table.
|
1
|
Lens
|
|
2
|
Cover
|
|
3
|
Instrument cluster unit
|
5. Assemble in the reverse order of disassembly.