1. Component views
Transmission (RZ4E, 2WD models)
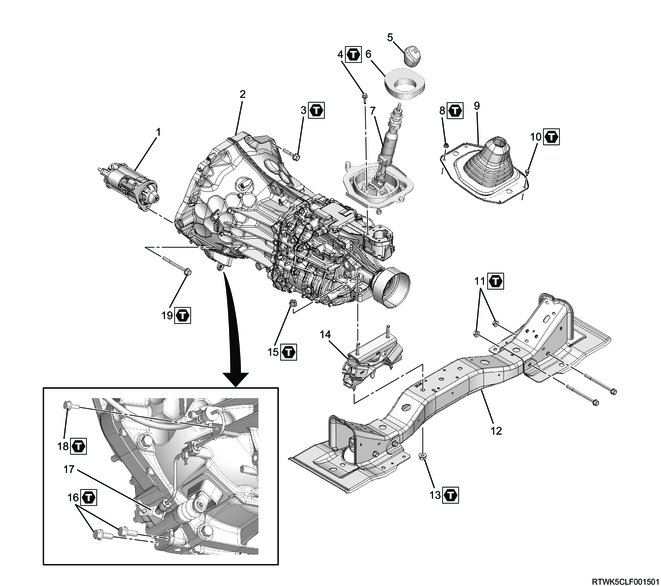
Part name
- Starter motor
- Transmission
- Bolt
- Bolt
- Shift knob
- Insulator
- Shift lever
- Nut
- Grommet
- Bolt
- Nut
- Transmission crossmember
- Nut
- Cushion rubber
- Nut
- Bolt
- Slave cylinder
- Bolt
- Bolt
Tightening torque
3: 76 N・m { 7.7 kgf・m / 56 lb・ft } Engine-Transmission fixing bolt
4: 19 N・m { 1.9 kgf・m / 14 lb・ft }
8: 7 N・m { 0.7 kgf・m / 62 lb・in }
10: 9 N・m { 0.9 kgf・m / 80 lb・in }
11: 67 N・m { 6.8 kgf・m / 593 lb・in }
13: 140 N・m { 14.3 kgf・m / 103 lb・ft }
15: 97 N・m { 9.9 kgf・m / 72 lb・ft }
16: 43 N・m { 4.4 kgf・m / 32 lb・ft }
18: 25 N・m { 2.5 kgf・m / 18 lb・ft }
19: 97 N・m { 9.9 kgf・m / 72 lb・ft } Starter fixing bolt
Transmission (RZ4E, 4WD models)
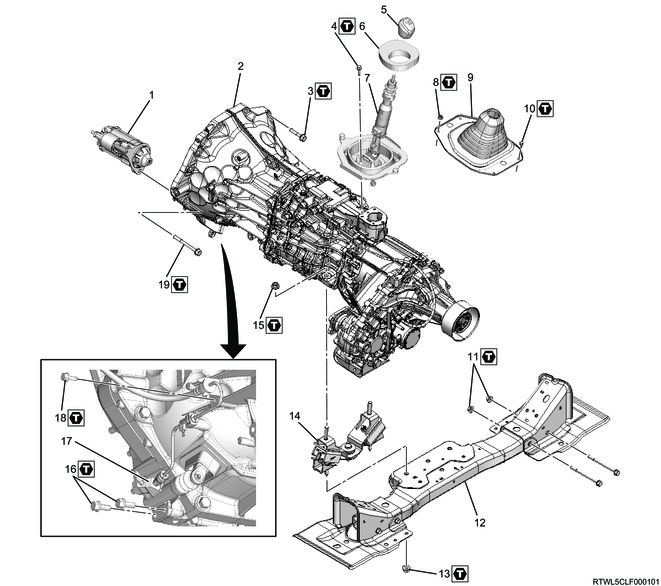
Part name
- Starter motor
- Transmission
- Bolt
- Bolt
- Shift knob
- Insulator
- Shift lever
- Nut
- Grommet
- Bolt
- Nut
- Transmission crossmember
- Nut
- Cushion rubber
- Nut
- Bolt
- Slave cylinder
- Bolt
- Bolt
Tightening torque
3: 76 N・m { 7.7 kgf・m / 56 lb・ft } Engine-Transmission fixing bolt
4: 19 N・m { 1.9 kgf・m / 14 lb・ft }
8: 7 N・m { 0.7 kgf・m / 62 lb・in }
10: 9 N・m { 0.9 kgf・m / 80 lb・in }
11: 67 N・m { 6.8 kgf・m / 593 lb・in }
13: 140 N・m { 14.3 kgf・m / 103 lb・ft }
15: 115 N・m { 11.7 kgf・m / 85 lb・ft }
16: 43 N・m { 4.4 kgf・m / 32 lb・ft }
18: 25 N・m { 2.5 kgf・m / 18 lb・ft }
19: 97 N・m { 9.9 kgf・m / 72 lb・ft } Starter fixing bolt
Transmission (4JJ3, 2WD models)
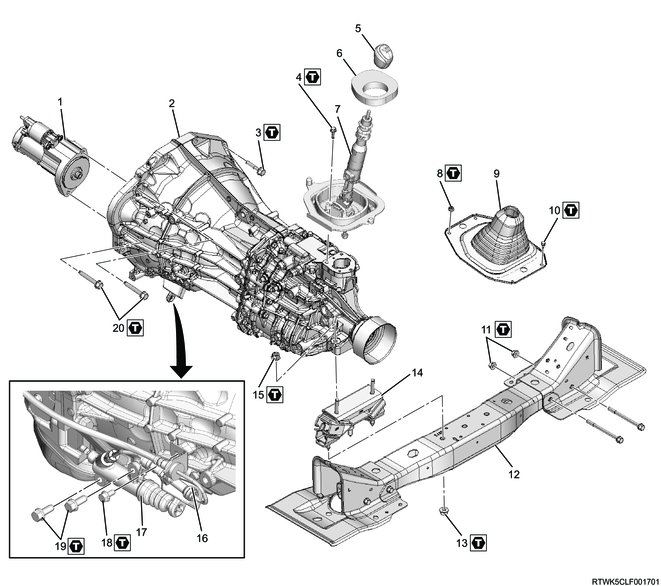
Part name
- Starter motor
- Transmission
- Bolt
- Bolt
- Shift knob
- Insulator
- Shift lever
- Nut
- Grommet
- Bolt
- Nut
- Transmission crossmember
- Nut
- Cushion rubber
- Nut
- Orifice
- Slave cylinder
- Bolt
- Bolt
- Bolt
Tightening torque
3: 76 N・m { 7.7 kgf・m / 56 lb・ft } Engine-Transmission fixing bolt
4: 19 N・m { 1.9 kgf・m / 14 lb・ft }
8: 7 N・m { 0.7 kgf・m / 62 lb・in }
10: 9 N・m { 0.9 kgf・m / 80 lb・in }
11: 67 N・m { 6.8 kgf・m / 49 lb・ft }
13: 140 N・m { 14.3 kgf・m / 103 lb・ft }
15: 97 N・m { 9.9 kgf・m / 72 lb・ft }
18: 25 N・m { 2.5 kgf・m / 18 lb・ft }
19: 43 N・m { 4.4 kgf・m / 32 lb・ft }
20: 97 N・m { 9.9 kgf・m / 72 lb・ft } Starter fixing bolt
Transmission (4JJ3, 4WD models)
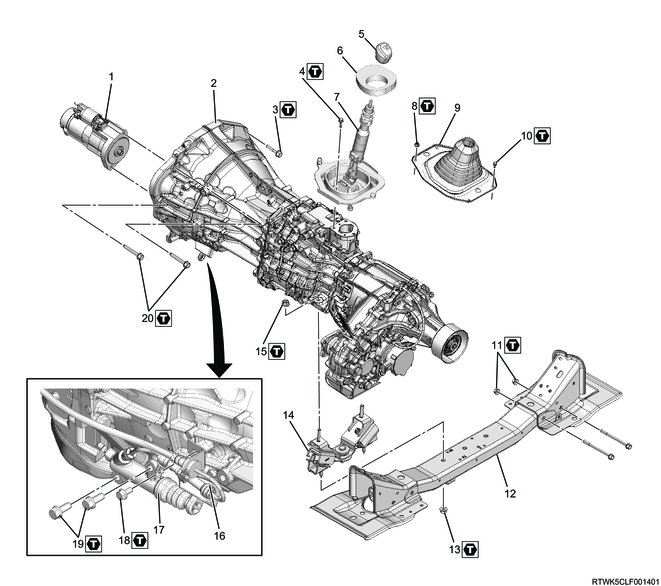
Part name
- Starter motor
- Transmission
- Bolt
- Bolt
- Shift knob
- Insulator
- Shift lever
- Nut
- Grommet
- Bolt
- Nut
- Transmission crossmember
- Nut
- Cushion rubber
- Nut
- Orifice
- Slave cylinder
- Bolt
- Bolt
- Bolt
Tightening torque
3: 76 N・m { 7.7 kgf・m / 56 lb・ft } Engine-Transmission fixing bolt
4: 19 N・m { 1.9 kgf・m / 14 lb・ft }
8: 7 N・m { 0.7 kgf・m / 62 lb・in }
10: 9 N・m { 0.9 kgf・m / 80 lb・in }
11: 67 N・m { 6.8 kgf・m / 593 lb・in }
13: 140 N・m { 14.3 kgf・m / 103 lb・ft }
15: 115 N・m { 11.7 kgf・m / 85 lb・ft }
18: 25 N・m { 2.5 kgf・m / 18 lb・ft }
19: 43 N・m { 4.4 kgf・m / 32 lb・ft }
20: 97 N・m { 9.9 kgf・m / 72 lb・ft } Starter fixing bolt
2. Transmission installation
1. RZ4E
1) Apply NICHIMOLY TC-5 or equivalent to the input shaft spline section.
Caution
- Take care not to excessively apply grease as doing so causes clutch slipping.
Standard: 0.3 to 1.0 g { 0.011 to 0.035 oz } Application amount
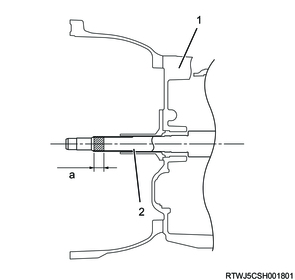
Legend
- Clutch housing
- Input shaft
Standard value
a: 15 to 25 mm { 0.59 to 0.98 in } Application area
2) Bring the transmission near the engine rear section.
Note
- Slowly operate the transmission jack to align the transmission front section with the engine rear section.
3) Slowly operate the transmission jack so that the transmission becomes parallel to the engine.
4) Align the input shaft spline section with the clutch driven plate spline section.
5) Install the transmission to the engine.
Note
- Tighten the transmission mounting bolt.
Tightening torque: 76 N・m { 7.7 kgf・m / 56 lb・ft } Engine-Transmission fixing bolt
Tightening torque: 97 N・m { 9.9 kgf・m / 72 lb・ft } Starter bolt

Legend
- Engine-Transmission fixing bolt
- Starter bolt
- Pin
Dimensions
a: 50 mm { 1.97 in }
b: 30 mm { 1.18 in }
c: 27 mm { 1.06 in }
d: 25 mm { 0.98 in }
e: 21 mm { 0.83 in }
f: 37 mm { 1.46 in }
g: 35 mm { 1.38 in }
h: 18 mm { 0.71 in }
i: 15 mm { 0.59 in }
j: 20 mm { 0.79 in }
k: 17 mm { 0.67 in }
l: 44.5 mm { 1.75 in }
2. 4JJ3
1) Apply NICHIMOLY TC-5 or equivalent to the input shaft spline section.
Caution
- Take care not to excessively apply grease as doing so causes clutch slipping.
Standard: 0.3 to 1.0 g { 0.011 to 0.035 oz } Application amount

Legend
- Clutch housing
- Input shaft
Standard value
a: 15 to 25 mm { 0.59 to 0.98 in } Application area
2) Bring the transmission near the engine rear section.
Note
- Slowly operate the transmission jack to align the transmission front section with the engine rear section.
3) Slowly operate the transmission jack so that the transmission becomes parallel to the engine.
4) Align the input shaft spline section with the clutch driven plate spline section.
5) Install the transmission to the engine.
Note
- Tighten the transmission mounting bolt.
Tightening torque: 76 N・m { 7.7 kgf・m / 56 lb・ft } Engine-Transmission fixing bolt
Tightening torque: 97 N・m { 9.9 kgf・m / 72 lb・ft } Starter fixing bolt
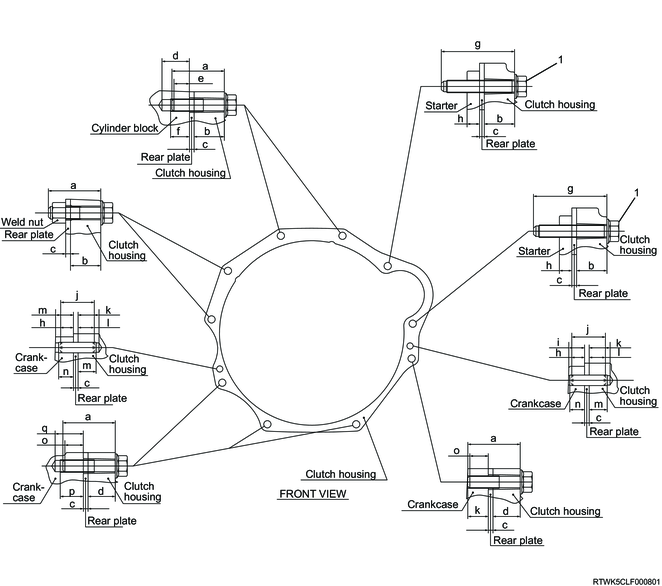
Legend
- Starter fixing bolt
Dimensions
a: 50 mm { 1.97 in }
b: 29 mm { 1.14 in }
c: 4.5 mm { 0.18 in }
d: 26 mm { 1.02 in }
e: 14.5 mm { 0.57 in }
f: 18 mm { 0.71 in }
g: 81.5 mm { 3.21 in }
h: 12 mm { 0.47 in }
i: 15 mm { 0.59 in }
j: 32 mm { 1.26 in }
k: 20 mm { 0.79 in }
l: 15.5 mm { 0.61 in }
m: 17 mm { 0.67 in }
n: 14 mm { 0.55 in }
o: 17.5 mm { 0.69 in }
p: 22 mm { 0.87 in }
q: 27 mm { 1.06 in }
3. Starter motor installation
4. Transmission crossmember installation
1. 2WD models
1) Temporarily tighten the cushion rubber to the transmission.
Caution
- Install so that the identification marking faces the rear side of the vehicle.
- "E2M" mark for RZ4E equipped models, M/T models
- "J2M" mark for 4JJ3 equipped models, M/T models
- The markings on the upper bracket cushion rubber and cushion rubber should face the rear side of the vehicle.
- Do not forget to install the upper bracket cushion rubber together with the cushion rubber as shown in the diagram and be careful not to the upper bracket cushion rubber fall off from the cushion rubber.
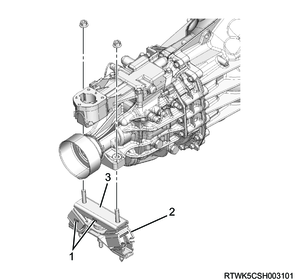
Legend
- Identification mark
- Cushion rubber
- Upper bracket cushion rubber
RZ4E equipped models
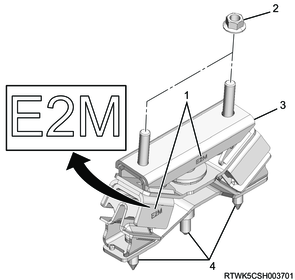
Legend
- Identification mark
- Nut: Fixing the cushion rubber and transmission
- Upper bracket cushion rubber
- Bolt: Fixing the cushion rubber and transmission cross member
4JJ3 equipped models
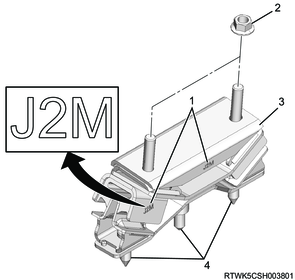
Legend
- Identification mark
- Nut: Fixing the cushion rubber and transmission
- Upper bracket cushion rubber
- Bolt: Fixing the cushion rubber and transmission cross member
2) Install the transmission crossmember to the frame.
Tightening torque: 67 N・m { 6.8 kgf・m / 49 lb・ft }
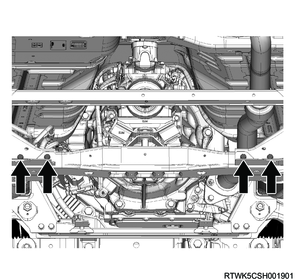
3) Temporarily tighten the cushion rubber to the transmission crossmember.
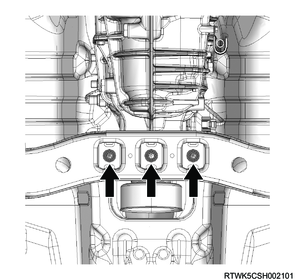
4) Final tighten the cushion rubber to the transmission.
Tightening torque: 97 N・m { 9.9 kgf・m / 72 lb・ft }
5) Final tighten the cushion rubber to the transmission crossmember.
Caution
- Always tighten nuts while transmission is securely seated on the frame to prevent nuts from loosening.
Tightening torque: 140 N・m { 14.3 kgf・m / 103 lb・ft }
6) Remove the jack from the transmission.
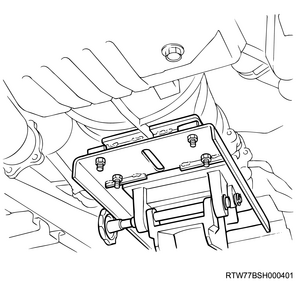
7) Remove the wire from the engine hanger and the hoist.
8) Remove special tool from the engine.
2. 4WD models
1) Temporarily tighten the cushion rubber to the transmission.
Caution
- Install so that the identification marking faces the rear side of the vehicle.
- "E4M" mark for RZ4E equipped models, M/T models
- "J4M" mark for 4JJ3 equipped models, M/T models
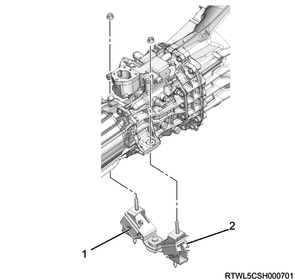
Legend
- Identification mark
- Cushion rubber
RZ4E equipped models
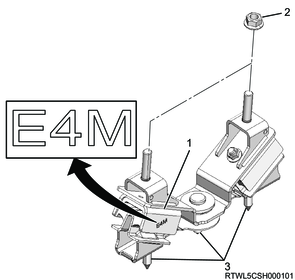
Legend
- Identification mark
- Nut: Fixing the cushion rubber and transmission
- Bolt: Fixing the cushion rubber and transmission cross member
4JJ3 equipped models
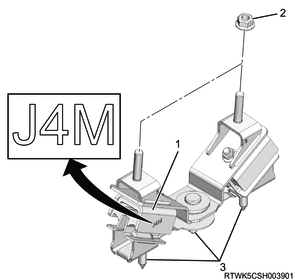
Legend
- Identification mark
- Nut: Fixing the cushion rubber and transmission
- Bolt: Fixing the cushion rubber and transmission cross member
2) Install the transmission crossmember to the frame.
Tightening torque: 67 N・m { 6.8 kgf・m / 49 lb・ft }
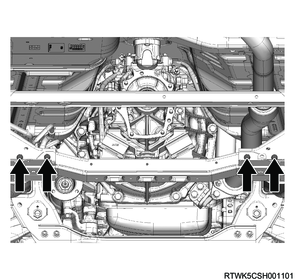
3) Temporarily tighten the cushion rubber to the transmission crossmember.
RZ4E

4JJ3
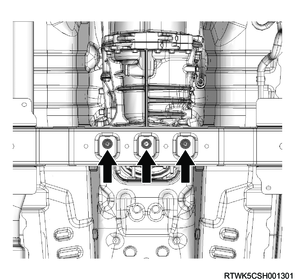
4) Final tighten the cushion rubber to the transmission.
Tightening torque: 115 N・m { 11.7 kgf・m }
5) Final tighten the cushion rubber to the transmission crossmember.
Caution
- Always tighten nuts while transmission is securely seated on the frame to prevent nuts from loosening.
Tightening torque: 140 N・m { 14.3 kgf・m / 103 lb・ft }
6) Remove the jack from the transmission.

7) Remove the wire from the engine hanger and the hoist.
8) Remove special tool from the engine.
5. Transfer installation
1. 4WD models
1) When replacing the following parts with new ones, refer to the diagram to press-fit the dowel pin to the transfer.
- Transfer
- Transfer case
Caution
- If the dowel pin is not press-fitted, press-fit the dowel pin to the transfer side.
RZ4E
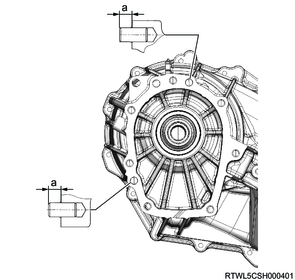
Dimensions
a: 9 mm { 0.35 in }
4JJ3
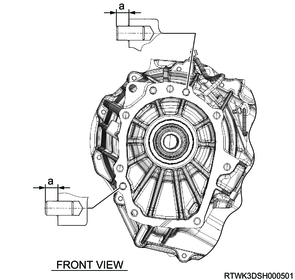
Dimensions
a: 9 mm { 0.35 in }
2) Apply BESCO L-2 grease or equivalent to the input shaft spline section.
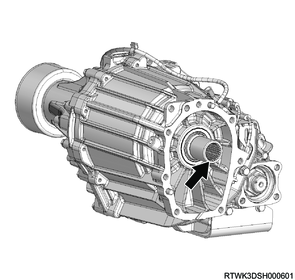
3) Install the transfer to the transmission.
Caution
- When assembling the transfer to the transmission, check that the dowel pins (2 pcs.) are press-fitted to the transfer side.
Tightening torque: 41 N・m { 4.2 kgf・m / 30 lb・ft }
RZ4E
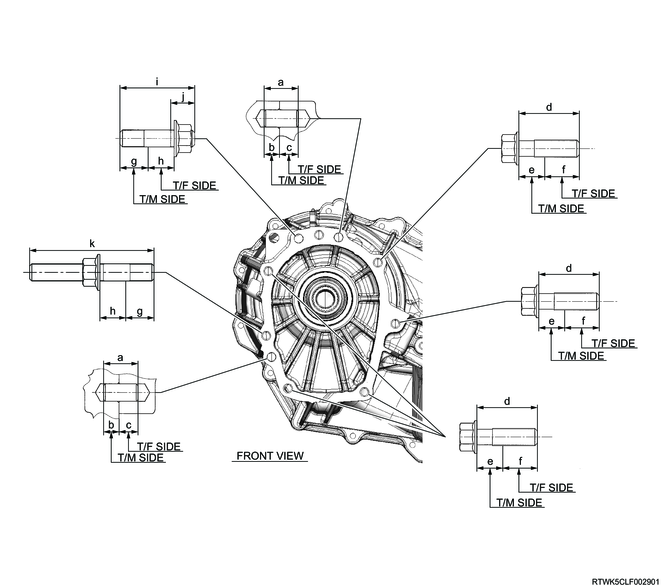
a: 20 mm { 0.79 in }
b: 9 mm { 0.35 in }
c: 11 mm { 0.43 in }
d: 35 mm { 1.38 in }
e: 15 mm { 0.59 in }
f: 20 mm { 0.79 in }
g: 16.5 mm { 0.65 in }
h: 15 mm { 0.59 in }
i: 43.5 mm { 1.71 in }
j: 14 mm { 0.55 in }
k: 72.5 mm { 2.85 in }
4JJ3

Dimensions
a: 20 mm { 0.79 in }
b: 9 mm { 0.35 in }
c: 11 mm { 0.43 in }
d: 35 mm { 1.38 in }
e: 15 mm { 0.59 in }
f: 20 mm { 0.79 in }
g: 16.5 mm { 0.65 in }
h: 15 mm { 0.59 in }
i: 43.5 mm { 1.71 in }
j: 14 mm { 0.55 in }
6. Slave cylinder connect
1. RZ4E
1) Install the oil hose and oil hose bracket as a set to the transmission.
Note
- With the oil hose bracket detent making contact with the rib section of the transmission, assemble them.
Tightening torque: 25 N・m { 2.5 kgf・m / 18 lb・ft }
2) Install the oil pipe and band clip to the transmission.
3) Install the slave cylinder to the transmission.
Tightening torque: 43 N・m { 4.4 kgf・m / 32 lb・ft }
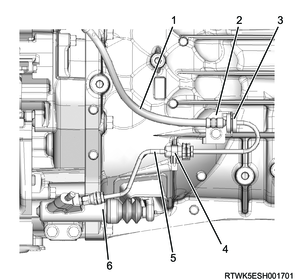
Legend
- Oil hose
- Oil hose bracket
- Bushing
- Clip
- Oil pipe
- Slave cylinder
2. 4JJ3
1) Install the oil hose and oil hose bracket as a set to the transmission.
Note
- With the oil hose bracket detent making contact with the rib section of the transmission, assemble them.
Tightening torque: 25 N・m { 2.5 kgf・m / 18 lb・ft }
2) Install the oil pipe and band clip to the transmission.
3) Install the slave cylinder to the transmission.
Tightening torque: 43 N・m { 4.4 kgf・m / 32 lb・ft }
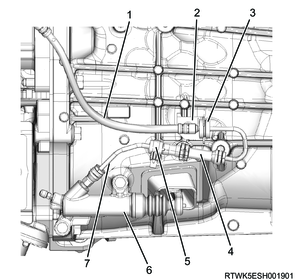
Legend
- Oil hose
- Oil hose bracket
- Bushing
- Orifice
- Clip
- Slave cylinder
- Oil pipe
7. Front propeller shaft installation
1. 4WD
Refer to "3.Driveline, Axle 3C.Drive Shaft System front propeller shaft installation".
8. Rear propeller shaft installation
9. Engine harness connect
1. 2WD models
1) Install the harness clip to the transmission and harness bracket.
Note
- Connect the harness connector in the transmission and install the clip.
2) Connect the connectors of the following parts to the engine harness.
- Neutral switch connector
- Backup light switch connector
- Vehicle speed sensor connector (Models without ABS)
Caution
- When connecting the connectors, take care not to mistake them.
2WD models (Models without ABS)
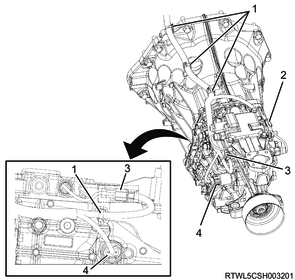
Legend
- Clip
- Backup light switch connector
- Neutral switch connector
- Vehicle speed sensor connector
2WD models (Models with ABS)
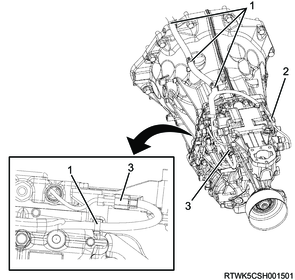
Legend
- Clip
- Backup light switch connector
- Neutral switch connector
2. 4WD models
1) Install the harness clip to the transmission and harness bracket.
Note
- Connect the harness connector in the transmission and install the clip.
2) Connect the connectors of the following parts to the engine harness.
- Transmission side neutral switch
- Backup light switch
- Actuator
- 2-4 switch
- Transfer side neutral switch
- Vehicle speed sensor (Models without ABS)
Caution
- When connecting the connectors, take care not to mistake them.
Transmission side (RZ4E)

Legend
- Clip
- Neutral switch connector
- Backup light switch connector
Transmission side (4JJ3)
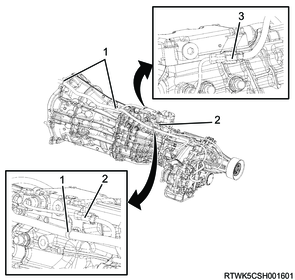
Legend
- Clip
- Neutral switch connector
- Backup light switch connector
Transfer side
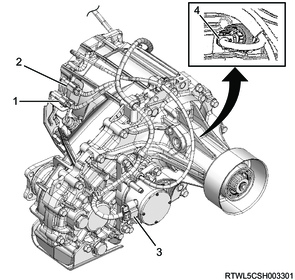
Legend
- Neutral switch connector
- 2-4 switch connector
- Actuator connector
- Vehicle speed sensor connector (Models without ABS)
10. Cowl panel installation
1) Install the cowl panel to vehicle.

11. Wiper linkage installation
12. Engine cover installation
1) Install the engine cover to the engine.
RZ4E
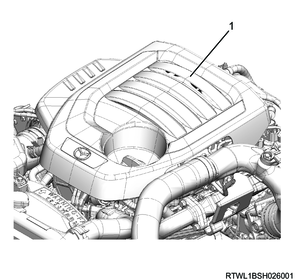
Legend
- Engine cover
4JJ3

Legend
- Engine cover
13. Engine hood installation
1) Align the hinge to the marking position placed during removal, and temporarily secure.
2) Adjust the clearance between the engine hood and the fender to the standard value.
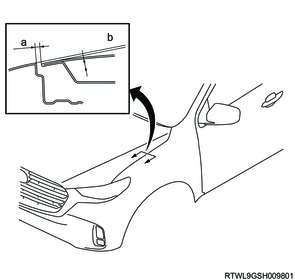
Dimensions
a. Clearance: 4.0 mm {0.16 in}
b. Height, level difference: -1.5 mm {-0.06 in}
3) Final tighten the hinge bolt to the engine hood.
Tightening torque: 6.5 N・m { 0.7 kgf・m / 58 lb・in }
14. Engine hood adjustment
1) Turn the hood rest to adjust its height, and adjust the level difference against the engine hood.
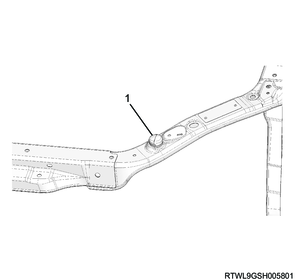
Legend
- Hood rest
15. Shift lever installation
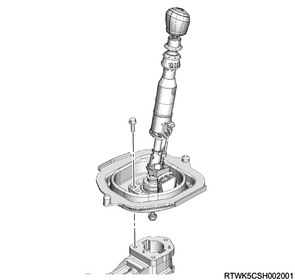
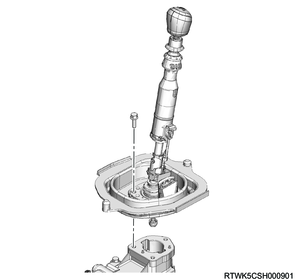
1) Install the shift lever to the transmission.
Note
- Firmly align the knock pin position.
Tightening torque: 19 N・m { 1.9 kgf・m / 14 lb・ft }
RZ4E
4JJ3
16. Grommet installation
1) Install the insulator to the shift lever.
Note
- Install with the slit facing the right side of the vehicle.
- Check whether there is a step on the slit section.
2) Install the grommet to the floor panel.
Tightening torque: 9 N・m { 0.9 kgf・m / 80 lb・in } Bolt
Tightening torque: 7 N・m { 0.7 kgf・m / 62 lb・in } Nut
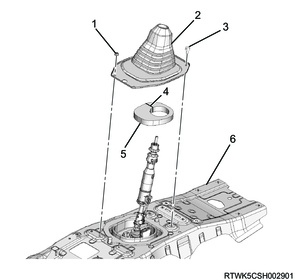
Legend
- Nut
- Grommet
- Bolt
- Slit
- Insulator
- Floor panel
17. Floor mat installation
1. Bench seat or console tray specifications (Vinyl floor mat specifications)
1) Install the floor mat to the body.
18. Floor carpet installation
1. Bench seat or console tray specifications (Except vinyl floor mat specifications)
1) Install the floor carpet to the body.
19. Console box installation
1. Except bench seat specifications
Refer to "9.Body, Cab, Accessories 9L.Exterior, Interior Trim console box installation".
20. Center console installation
1. Bench seat or console tray specifications
1) Install the extension to the center console and floor.
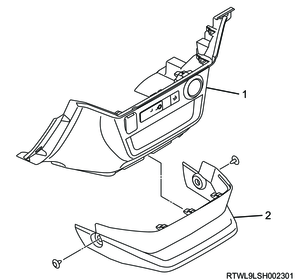
Legend
- Center console
- Extension
21. Parking brake cover installation
1. Bench seat specifications
1) Install the parking brake cover to the floor mat.
22. Center pillar lower trim cover installation
1. Bench seat or console tray specifications (Crew cab)
1) Install the center pillar lower trim cover to the center pillar.
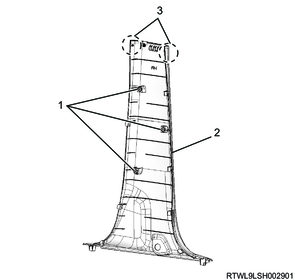
Legend
- Clip
- Center pillar lower trim cover
- Claw section
2) Install the seat belt lower anchor bolt to the center pillar.
Tightening torque: 46 N・m { 4.7 kgf・m / 34 lb・ft }
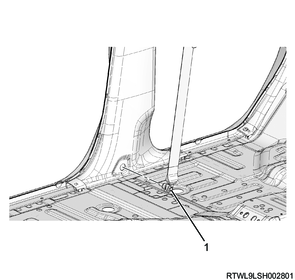
Legend
- Seat belt lower anchor bolt
23. Dash side trim pad installation
1. Bench seat or console tray specifications
1) Install the dash side trim pad to the body.
Right side
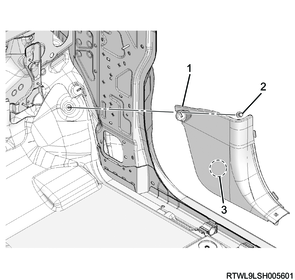
Legend
- Dash side trim pad
- Retainer
- Clip
Left side
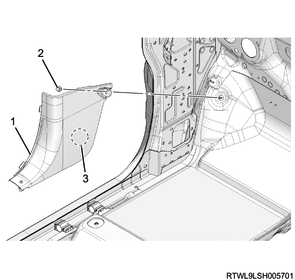
Legend
- Dash side trim pad
- Retainer
- Clip
24. Rear end trim cover installation
1. Bench seat or console tray specifications (Except extend cab)
1) Install the rear end trim cover to the body panel.
Regular cab

Legend
- Rear end trim cover
- Hook hole
- Push clip
Crew cab
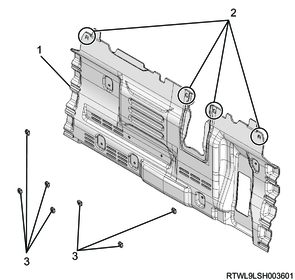
Legend
- Rear end trim cover
- Hook hole
- Push clip
2. Bench seat or console tray specifications (Extend cab)
1) Install the rear pillar upper trim cover to the rear pillar.
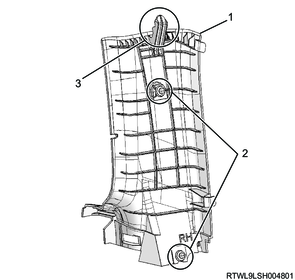
Legend
- Rear pillar upper trim cover
- Clip
- Hook
2) Install the seat belt upper anchor bolt to the rear pillar.
Tightening torque: 46 N・m { 4.7 kgf・m / 34 lb・ft }
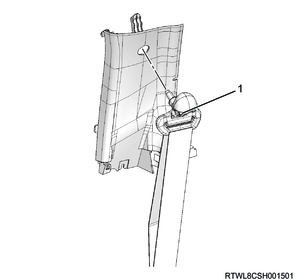
Legend
- Seat belt upper anchor bolt
3) Install the rear pillar lower trim cover to the rear pillar.
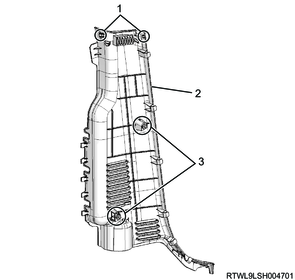
Legend
- Claw section
- Rear pillar lower trim cover
- Clip
4) Install the seat belt lower anchor bolt to the floor panel.
Tightening torque: 46 N・m { 4.7 kgf・m / 34 lb・ft }
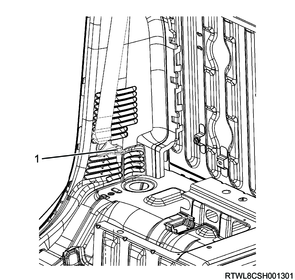
Legend
- Seat belt lower anchor bolt
5) Install the rear end trim cover to the body panel.
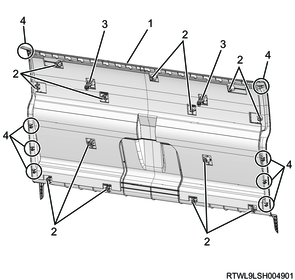
Legend
- Rear end trim cover
- Clip
- Hook
- Claw section
25. Rear pillar trim cover installation
1. Bench seat or console tray specifications (Regular cab)
1) Install the rear pillar lower trim cover to the rear pillar.
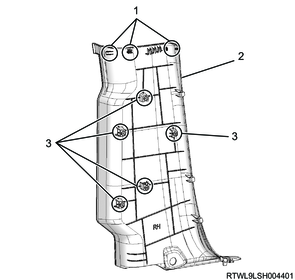
Legend
- Claw section
- Rear pillar lower trim cover
- Clip
2) Install the seat belt lower anchor bolt to the rear pillar.
Tightening torque: 46 N・m { 4.7 kgf・m / 34 lb・ft }
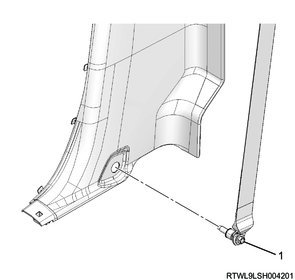
Legend
- Seat belt lower anchor bolt
2. Bench seat or console tray specifications (Crew cab)
1) Install the rear pillar lower trim cover to the rear pillar.
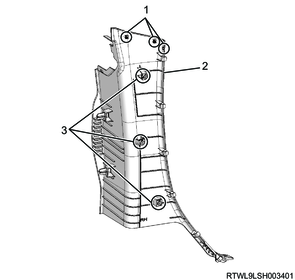
Legend
- Claw section
- Rear pillar lower trim cover
- Clip
26. Rear end upper trim cover installation
1. Bench seat or console tray specifications (Regular cab)
1) Install the rear end upper trim cover to the body panel.

Legend
- Claw section
- Rear end upper trim cover
- Clip
- Hook
2. Bench seat or console tray specifications (Crew cab)
1) Install the rear end upper trim cover to the body panel.
Caution
- For models with center top tethers (bracket type), install while bending the end of the rear end upper trim to an extent that it will not get damaged.
Models with center top tethers (bracket type)
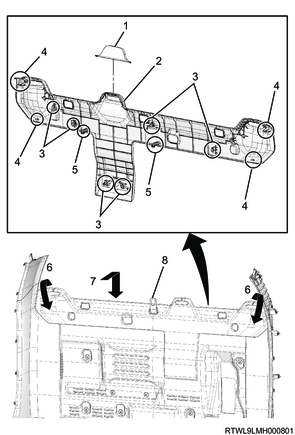
Legend
- Seat belt guide cover
- Rear end upper trim cover
- Clip
- Claw section
- Hook
- Bend the end of the rear end upper trim cover.
- Install the rear end upper trim.
- Center top tether (Bracket type)
Models without center top tethers (bracket type)

Legend
- Seat belt guide cover
- Rear end upper trim cover
- Clip
- Claw section
- Hook
27. Rear door finisher installation
1. Bench seat or console tray specifications (Crew cab)
1) Install the rear door finisher to the body.
28. Rear sill plate installation
1. Bench seat or console tray specifications (Crew cab)
1) Install the rear sill plate to the floor.
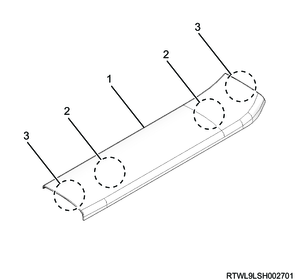
Legend
- Rear sill plate
- Clip
- Claw section
29. Front door finisher installation
1. Bench seat or console tray specifications
1) Install the front door finisher to the body.
30. Front sill plate installation
1. Bench seat or console tray specifications
1) Install the front sill plate to the floor.
Regular cab, crew cab
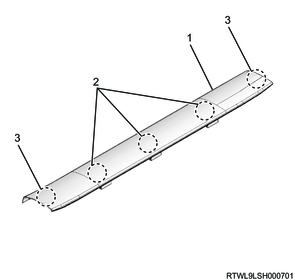
Legend
- Front sill plate
- Clip
- Claw section
Extend cab
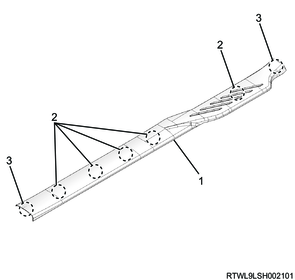
Legend
- Front sill plate
- Clip
- Claw section
31. Rear seat installation
1. Bench seat or console tray specifications (Crew cab)
Refer to "9.Body, Cab, Accessories 9I.Seats rear seat installation".
32. Passenger seat installation
1. Bench seat or console tray specifications
Refer to "9.Body, Cab, Accessories 9I.Seats passenger seat installation".
33. Driver seat installation
1. Bench seat or console tray specifications
Refer to "9.Body, Cab, Accessories 9I.Seats driver seat installation".
34. Transmission oil filling
1) Tighten the drain plug to the specified torque.
Caution
- Do not reuse the O-ring.
Tightening torque: 39 N・m { 4.0 kgf・m / 29 lb・ft }
2) Remove the filler plug.
3) Add transmission oil through the filler plug hole up to the lower edge of the hole.
RZ4E
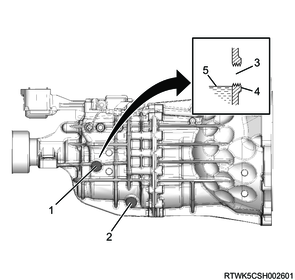
Legend
- Filler plug
- Drain plug
- Filler plug hole
- Lower surface of the hole
- Oil surface
4JJ3
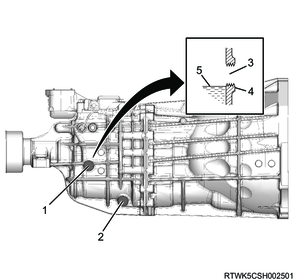
Legend
- Filler plug
- Drain plug
- Filler plug hole
- Lower surface of the hole
- Oil surface
Refer to the following for the transmission oil brand.
Refer to "201.General Information 14B.Vehicle Information recommended fluids, lubricants and diesel fuels".
2.8 L { 0.74 US gal / 0.62 Imp.gal } Oil capacity [reference value]
4) Tighten the filler plug to the specified torque.
Caution
- Do not reuse the O-ring.
- If the transmission is disassembled and reassembled, perform a test run after refilling with transmission oil. Add the oil through the filler plug hole up to the lower edge of the hole.
Tightening torque: 39 N・m { 4.0 kgf・m / 29 lb・ft }
35. Transmission air deflector installation
1) Install the transmission air deflector to the frame.
Tightening torque: 20 N・m { 2.0 kgf・m / 15 lb・ft }
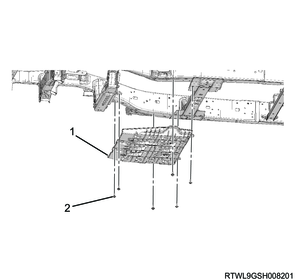
Legend
- Transmission air deflector
- Bolt
36. Preliminary and post procedures
1. Post procedures
1) Connect the battery cable to the battery negative terminal.
2) Referring to the following, perform the setting of the front door power window switch with AUTO UP/AUTO DOWN function.
Refer to "9.Body, Cab, Accessories 9T.Glass, Windows, Mirrors front door power window switch setting".
3) Close the engine hood.