1. Cushion rubber installation
1. 4WD models
1) Install the cushion rubber to the transmission.
Caution
- Install so that the identification marking faces the rear side of the vehicle.
- ''J4A'' mark for 4JJ3 equipped models, AT model
- ''E4A'' mark for RZ4E-TC equipped models, AT model
Tightening torque: 115 N・m { 11.7 kgf・m / 85 lb・ft } Nut: Fixing the cushion rubber and transmission
Tightening torque: 140 N・m { 14.3 kgf・m / 103 lb・ft } Bolt: Fixing the cushion rubber and the transmission cross member
4JJ3 equipped models
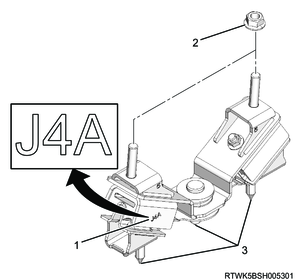
Legend
- Identification mark
- Nut: Fixing the cushion rubber and transmission
- Bolt: Fixing the cushion rubber and the transmission cross member
RZ4E-TC equipped models
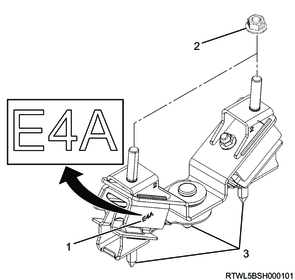
Legend
- Identification mark
- Nut: Fixing the cushion rubber and transmission
- Bolt: Fixing the cushion rubber and the transmission cross member
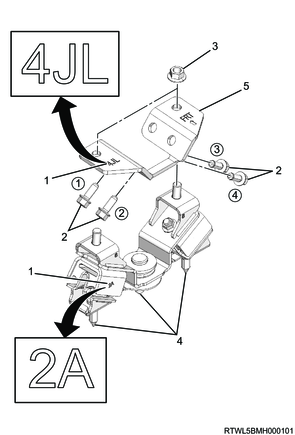
2. 2WD models
1) Install the rear engine mounting bracket to the transmission.
Caution
- Install the rear engine mounting bracket following the marking of each model.
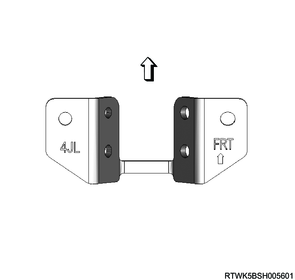
- ''4JL'' mark for 4JJ3 equipped models
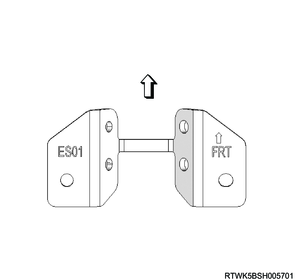
- ''ES01'' mark for RZ4E-TC equipped models
- Install the rear engine mounting bracket following the direction of the vehicle shown in the diagram.
4JJ3 equipped models
RZ4E-TC equipped models
2) Temporarily tighten the mounting bolt of the rear engine mounting bracket into the transmission after tightening the mounting bolts following the order shown in the diagram.
3) Final tighten the mounting bolt of the rear engine mounting bracket in the order shown in the diagram.
Tightening torque: 51 N・m { 5.2 kgf・m / 38 lb・ft }
Warning
- Be careful not to switch the rear engine mounting bracket of each model.
- Do not tighten the mounting bolt of the rear engine mounting bracket in the wrong order, because it may break the transmission case.
4) Install the cushion rubber to the rear engine mounting bracket.
Caution
- Install so that the identification marking faces the rear side of the vehicle.
- ''2A'' mark for 2WD, AWR6B45 equipped models
Tightening torque: 51 N・m { 5.2 kgf・m / 38 lb・ft } Bolt: Fixing the rear engine mounting bracket and transmission
Tightening torque: 97 N・m { 9.9 kgf・m / 72 lb・ft } Nut: Fixing the cushion rubber and rear engine mounting bracket
Tightening torque: 140 N・m { 14.3 kgf・m / 103 lb・ft } Bolt: Fixing the cushion rubber to transmission cross member
4JJ3 equipped models
Legend
- Identification mark
- Bolt: Fixing the rear engine mounting bracket and transmission
- Nut: Fixing the cushion rubber and rear engine mounting bracket
- Bolt: Fixing the cushion rubber to transmission cross member
- Rear engine mounting bracket
RZ4E-TC equipped models

Legend
- Identification mark
- Bolt: Fixing the rear engine mounting bracket and transmission
- Nut: Fixing the cushion rubber and rear engine mounting bracket
- Bolt: Fixing the cushion rubber to transmission cross member
- Rear engine mounting bracket
2. Transmission installation
1) Slowly operate the transmission jack so that the front of transmission aligns with the rear of the engine.
2) Slowly operate the transmission jack so that the transmission becomes parallel to the engine.
3) Install the transmission to the engine.
Caution
- Install the breather hose clip bracket together.
- When installing the breather hose clip bracket, do not allow the engine harness to get caught.
Tightening torque: 76 N・m { 7.7 kgf・m / 56 lb・ft } Except for starter mounting bolt
Tightening torque: 97 N・m { 9.9 kgf・m / 72 lb・ft } Starter mounting bolt
4JJ3 equipped models

Dimensions
a: 26 mm { 1.02 in }
b: 50 mm { 1.97 in }
c: 14.5 mm { 0.57 in }
d: 18 mm { 0.71 in }
e: 4.5 mm { 0.18 in }
f: 29 mm { 1.14 in }
g: 3.6 mm { 0.14 in }
h: 40 mm { 1.57 in }
i: 60 mm { 2.36 in }
j: 20 mm { 0.79 in }
k: 32 mm { 1.26 in }
l: 22 mm { 0.87 in }
m: 15 mm { 0.59 in }
n: 12 mm { 0.47 in }
o: 15.5 mm { 0.61 in }
p: 14 mm { 0.55 in }
q: 19 mm { 0.75 in }
r: 17.5 mm { 0.69 in }
s: 27 mm { 1.06 in }
t: 17 mm { 0.67 in }
u: 10.9 mm { 0.43 in }
RZ4E-TC equipped models

Dimensions
a: 50 mm { 1.97 in }
b: 35 mm { 1.38 in }
c: 18 mm { 0.71 in }
d: 15 mm { 0.59 in }
e: 40 mm { 1.57 in }
f: 17.4 mm { 0.69 in }
g: 30 mm { 1.18 in }
h: 25 mm { 0.98 in }
i: 29 mm { 1.14 in }
j: 3.6 mm { 0.14 in }
k: 21 mm { 0.83 in }
l: 17 mm { 0.67 in }
m: 44.5 mm { 1.75 in }
n: 100 mm { 3.94 in }
o: 26 mm { 1.02 in }
p: 24 mm { 0.94 in }
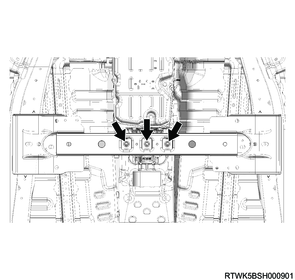
3. Transmission crossmember installation
1) Install the transmission crossmember to the frame.
Tightening torque: 67 N・m { 6.8 kgf・m / 49 lb・ft }
2) Connect the cushion rubber to the transmission crossmember.
Tightening torque: 140 N・m { 14.3 kgf・m / 103 lb・ft }
3) Remove the transmission jack from the transmission.
4) Remove the wire from the engine hanger and the hoist.
5) Remove special tool from the cylinder head.
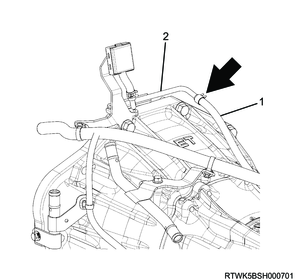
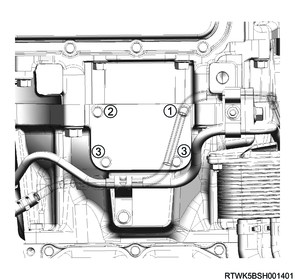
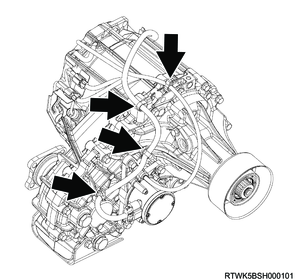
4. Breather hose connect
1) Connect the breather hose to the breather hose clip bracket.
4JJ3 equipped models
Legend
- Breather hose
- Breather hose clip bracket
RZ4E-TC equipped models
Legend
- Breather hose
- Breather hose clip bracket
5. Torque converter connect
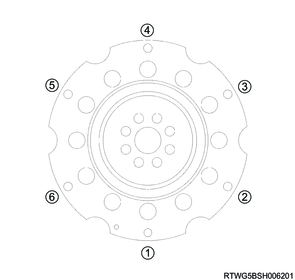
1) Install the flexible plate bolt to the torque converter in the order shown in the diagram.
Note
- Temporarily tighten the 1st bolt of the installation order as shown in the diagram, and then final tighten the 2nd to 6th bolt of the installation order.
- Final tighten the 1st bolt of the installation order as shown in the diagram.
Caution
- Do not reuse the flexible plate bolts.
- Do not damage the ATF cooler pipe.
Tightening torque: 54 N・m { 5.5 kgf・m / 40 lb・ft }
2) Install the lower cover to the transmission in the order shown in the diagram.
Note
- The lower cover does not have a back/front direction.
Tightening torque: 9 N・m { 0.9 kgf・m / 80 lb・in }
6. Starter motor installation
7. Automatic transmission control cable connect
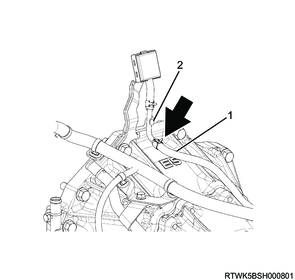
1) Install the automatic transmission control cable bracket to the transmission.
Caution
- Be sure to check that the automatic transmission cable route is not interfered with surrounding parts.
- In case of interference found, reinstall the automatic transmission cable.
- Do not twist the automatic transmission bracket when fixing on the transmission.
Tightening torque: 9.4 N・m { 1.0 kgf・m / 83 lb・in }
Legend
- Automatic transmission control cable bracket
- Automatic transmission control cable
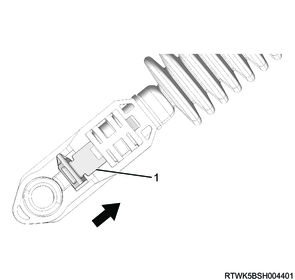
2) Unlock the adjuster of the cable.
Note
- Slide the cover in the direction by the arrow.
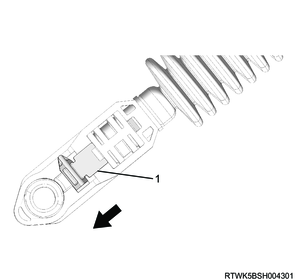
Legend
- Cover
Note
- Use an ordinary screwdriver to move the lock piece from the position indicated by the arrow.
- Continue to move the lock piece until the adjuster position begins to change.
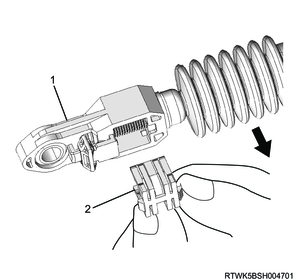
Legend
- Adjuster
- Lock piece
3) Check that the selector lever and transmission are in N position.
Legend
- P
- R
- N
- D
4) Connect the automatic transmission control cable to the select control lever.
Legend
- Automatic transmission control cable bracket
- Automatic transmission control cable
5) Lock the automatic transmission cable adjuster.
Note
- Insert the lock piece to the adjuster.
- Slide the cover on the adjuster and secure lock piece.
Legend
- Cover
6) Press the select lever knob button 5 times, and then check that the select lever moves to each position smoothly.
Note
- Check on ACC condition or Engine start condition with the brake applied.
7) Check that the shift position indicated on the meter cluster and the actual shift position are matched.
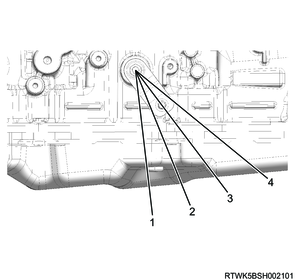
8. Engine harness connect
1. 4WD models
1) Connect the connectors of the following parts to the engine harness.
- Turbine speed sensor connector
- Transmission internal harness connector
- Output speed sensor connector
- Inhibitor switch connector
- 2-4 switch connector
- Neutral switch connector
- Actuator connector
Caution
- If bonding tapes were removed from the turbine speed sensor connector and output speed sensor connector, be sure to re-tape the connectors.
Transmission left side

Legend
- Turbine speed sensor connector
Transmission right side
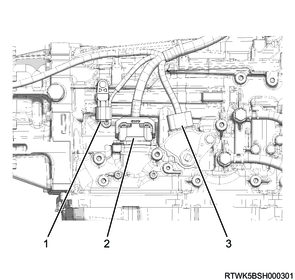
Legend
- Output speed sensor connector
- Transmission internal harness connector
- Inhibitor switch connector
Transfer side
Legend
- 2-4 switch connector
- Neutral switch connector
- Actuator connector
2) Connect the clips.
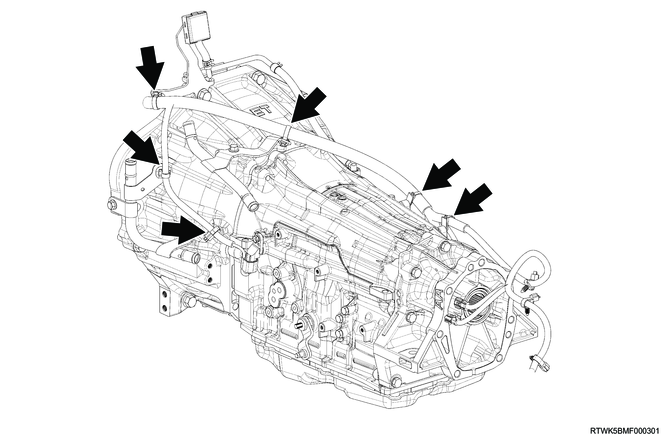
2. 2WD models
1) Connect the connectors of the following parts to the engine harness.
- Turbine speed sensor connector
- Transmission internal harness connector
- Output speed sensor connector
- Inhibitor switch connector
Caution
- If bonding tapes were removed from the turbine speed sensor connector and output speed sensor connector, be sure to re-tape the connectors.
Transmission left side
Legend
- Turbine speed sensor connector
Transmission right side
Legend
- Output speed sensor connector
- Transmission internal harness connector
- Inhibitor switch connector
2) Connect the clips.
4JJ3 equipped models

RZ4E-TC equipped models

9. ATF cooler/warmer installation
10. Front propeller shaft installation
1. 4WD models
Refer to "3.Driveline, Axle 3C.Drive Shaft System front propeller shaft installation".
11. Rear propeller shaft installation
12. Cowl panel installation
1) Install the cowl panel to vehicle.

13. Wiper linkage installation
14. Engine cover installation
1) Install the engine cover to the engine.
15. Engine hood installation
16. Preliminary and post procedures
1. Post procedures
1) Connect the battery cable to the battery negative terminal.
2) Referring to the following, perform the setting of the front door power window switch with AUTO UP/AUTO DOWN function.
Refer to "9.Body, Cab, Accessories 9T.Glass, Windows, Mirrors front door power window switch setting".
3) Close the engine hood.
17. ATF filling
If the transmission has been disassembled
1) Clean the drain plug.
2) Install a new gasket and the drain plug to the oil pan.
Caution
- Do not reuse the gasket.
Tightening torque: 20 N・m { 2.0 kgf・m / 15 lb・ft }

3) Remove the filler plug and O-ring from the transmission.
| Inner diameter |
Thickness |
| 15.41 mm { 0.61 in } |
2.20 mm { 0.09 in } |
4WD models

2WD models

4) Replenish the transmission with the ATF.
Caution
- When Replenishing ATF, always perform the oil level adjustment using the overflow hole.
| Engine model |
Oil capacity [Reference value] |
| 4JJ3 |
9.6 L { 2.54 US gal / 2.11 Imp.gal } |
| RZ4E-TC |
7.9 L { 2.09 US gal / 1.74 Imp.gal } |
Note
- The volume of oil cooler on the vehicle side is contained.
18. Coolant filling
Refer to the following items about adding engine coolant.
Caution
- Be sure to add ATF for the transmission before starting work.
If performing work without adding ATF, this may cause the transmission seizing.
Refer to "1.Engine 1D.Cooling(4JJ3 with DPD) coolant replacement".
Refer to "1.Engine 1D.Cooling(4JJ3 without DPD) coolant replacement".
Refer to "1.Engine 1D.Cooling(RZ4E-TC) coolant replacement".
19. ATF adjustment
Refer to the following items about ATF adjustment.
Caution
- Be sure to add engine coolant before starting work.
If performing work without adding ATF, this may cause the engine seizing.
Refer to "5.Transmission, Transaxle 5B.Automatic(AWR6B45) ATF replacement".
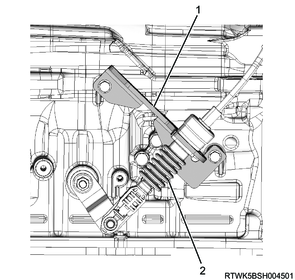
20. Transmission air deflector installation
1) Install the transmission air deflector to the frame.
Tightening torque: 20 N・m { 2.0 kgf・m / 15 lb・ft }
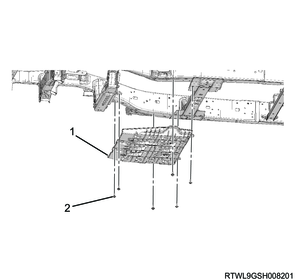
Legend
- Transmission air deflector
- Bolt
21. TCM reset
Caution
- After replacing the following parts, it is necessary to clear the TCM self-learning data.
- Transmission
- Valve body assembly
- Clutch No. 1 and No. 2 components
- Brake No. 1, No. 2, and No. 4 components
1) Connect the scan tool to the DLC.
2) Turn ON the ignition switch.
3) Select Diagnostics.
4) Select Transmission.
5) Select AT.
6) Select Programming.
7) Select Clear Learning Value and Diag Information.
Note
- Clear the self-learning date following the instructions on the screen.