A/C UNIT REMOVAL/INSTALLATION [FULL-AUTO AIR CONDITIONER]
id0711a1800200
1. Disconnect the negative battery cable.
2. Discharge the refrigerant from the system. (See REFRIGERANT RECOVERY.) (See REFRIGERANT CHARGING.)
3. Drain the engine coolant. (See ENGINE COOLANT REPLACEMENT [L3 Turbo].)
4. Remove the following parts:
- (1) Console panel (See CONSOLE PANEL REMOVAL/INSTALLATION.)
- (2) Console (See CONSOLE REMOVAL/INSTALLATION.)
- (3) Front scuff plate inner (See FRONT SCUFF PLATE REMOVAL/INSTALLATION.)
- (4) Front side trim (See FRONT SIDE TRIM REMOVAL/INSTALLATION.)
- (5) Dashboard under cover
- (6) Glove compartment (See GLOVE COMPARTMENT REMOVAL/INSTALLATION.)
- (7) Bonnet release lever (See BONNET LATCH AND RELEASE LEVER REMOVAL/INSTALLATION.)
- (8) Lower panel (See LOWER PANEL REMOVAL/INSTALLATION.)
- (9) Center panel (See CENTER PANEL REMOVAL/INSTALLATION.)
- (10) Audio unit (See AUDIO UNIT REMOVAL/INSTALLATION.)
- (11) Climate control unit (See CLIMATE CONTROL UNIT REMOVAL/INSTALLATION [FULL-AUTO AIR CONDITIONER].)
- (12) Meter hood (See METER HOOD REMOVAL/INSTALLATION.)
- (13) Column cover (See COLUMN COVER REMOVAL/INSTALLATION.)
- (14) Instrument cluster (See INSTRUMENT CLUSTER REMOVAL/INSTALLATION.)
- (15) Driver-side air bag module (See DRIVER-SIDE AIR BAG MODULE REMOVAL/INSTALLATION.)
- (16) Steering wheel (See STEERING WHEEL AND COLUMN REMOVAL/INSTALLATION.)
- (17) Combination switch (See COMBINATION SWITCH REMOVAL/INSTALLATION.)
- (18) Steering shaft (See STEERING WHEEL AND COLUMN REMOVAL/INSTALLATION.)
- (19) A-pillar lower trim (See A-PILLAR LOWER TRIM REMOVAL/INSTALLATION.)
- (20) A-pillar trim (See A-PILLAR TRIM REMOVAL/INSTALLATION.)
- (21) Dashboard (See DASHBOARD REMOVAL/INSTALLATION.)
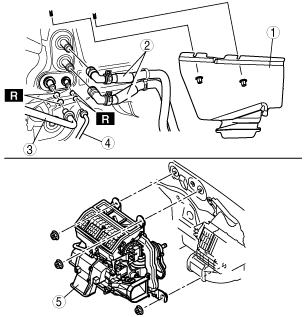
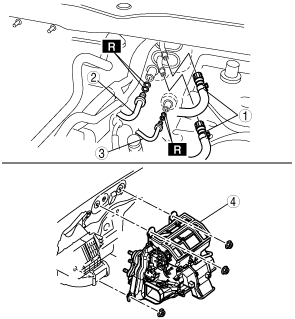
5. Remove in the order indicated in the table. Do not allow compressor oil to spill.
L.H.D.
|
1
|
Insulator
|
|
2
|
Heater hose
|
|
3
|
Cooler hose (LO)
|
|
4
|
Cooler pipe No.1
|
|
5
|
A/C unit
|
R.H.D.
|
1
|
Heater hose
|
|
2
|
Cooler pipe No.2
|
|
3
|
Cooler pipe No.1
|
|
4
|
A/C unit
|
6. Install in the reverse order of removal.
7. Perform the refrigerant system performance test. (See REFRIGERANT SYSTEM PERFORMANCE TEST.)
A/C Unit Installation Note
1. When installing a new A/C unit or evaporator, add a supplemental amount of ATMOS GU10 compressor oil into the refrigerant cycle.
-
Supplemental amount (approx. quantity)
-
25 ml {25 cc, 0.8 fl oz}