 |
acxaaw00000818
EXPANSION VALVE REMOVAL/INSTALLATION [FULL-AUTO AIR CONDITIONER]
id0711a1800400
1. Disconnect the negative battery cable.
2. Discharge the refrigerant from the system. (See REFRIGERANT RECOVERY.) (See REFRIGERANT CHARGING.)
3. Remove the insulator. (See A/C UNIT REMOVAL/INSTALLATION [FULL-AUTO AIR CONDITIONER].)
4. Disconnect the cooler pipe No.1 and cooler hose (LO). (L.H.D.) (See A/C UNIT REMOVAL/INSTALLATION [FULL-AUTO AIR CONDITIONER].)
5. Disconnect the cooler pipe No.1 and cooler pipe No.2. (R.H.D.) (See A/C UNIT REMOVAL/INSTALLATION [FULL-AUTO AIR CONDITIONER].)
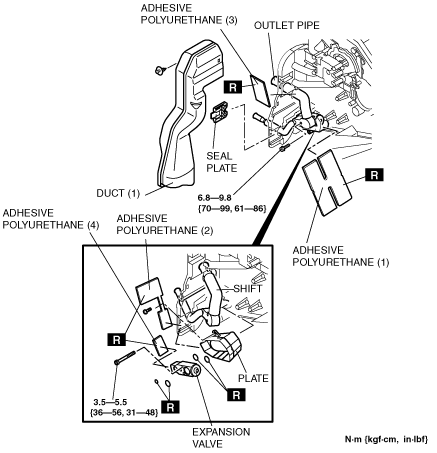
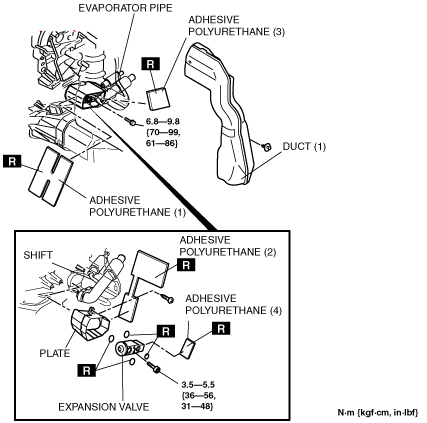
6. Remove the following parts:
7. Remove the air mix actuator. (R.H.D.) (See AIR MIX ACTUATOR REMOVAL/INSTALLATION [FULL-AUTO AIR CONDITIONER].)
8. Remove the air intake actuator. (R.H.D.) (See AIR INTAKE ACTUATOR REMOVAL/INSTALLATION [FULL-AUTO AIR CONDITIONER].)
9. Remove the duct (1).
10. Remove the adhesive polyurethane (1). (See A/C UNIT DISASSEMBLY/ASSEMBLY [FULL-AUTO AIR CONDITIONER].)
11. Remove the one seal plate. (R.H.D.)
12. Remove the one bolt and shift the evaporator pipe. Do not allow compressor oil to spill.
13. Remove the two bolts.
14. Remove the expansion valve. Do not allow compressor oil to spill.
15. Remove the screws and plate.
16. Remove the adhesive polyurethane (2). (See A/C UNIT DISASSEMBLY/ASSEMBLY [FULL-AUTO AIR CONDITIONER].)
17. Remove the adhesive polyurethane (3). (See A/C UNIT DISASSEMBLY/ASSEMBLY [FULL-AUTO AIR CONDITIONER].)
18. Remove the adhesive polyurethane (4). (See A/C UNIT DISASSEMBLY/ASSEMBLY [FULL-AUTO AIR CONDITIONER].)
L.H.D.
acxaaw00000818
|
R.H.D.
acxaaw00000819
|
19. Install in the reverse order of removal.
20. Perform the refrigerant system performance test. (See REFRIGERANT SYSTEM PERFORMANCE TEST.)