 |
a30zzw00002811
FRONT COOLER PIPE REMOVAL/INSTALLATION
id071100703500
Replacement parts
|
ADHESIVE POLYURETHANE
Quantity: 1
Location of use: Temperature sensor of refrigerant line for condenser outlet
|
O-ring
Quantity: 2
Location of use: Front cooler pipe No.1
|
O-ring
Quantity: 2
Location of use: Front cooler pipe No.2
|
Oil and chemical type
|
Refrigerant
Type: HFO-1234yf (R-1234yf)
|
Compressor oil
Type: ND-OIL11
|
Front cooler pipe No.1
1. Disconnect the negative lead-acid battery terminal. (See NEGATIVE LEAD-ACID BATTERY TERMINAL DISCONNECTION/CONNECTION.)
2. Remove the front under cover No.2. (See FRONT UNDER COVER No.2 REMOVAL/INSTALLATION.)
3. Remove the front under cover No.1. (See FRONT UNDER COVER No.1 REMOVAL/INSTALLATION.)
4. Drain the coolant. (See COOLANT REPLACEMENT.)
5. Collect the refrigerant. (See REFRIGERANT RECOVERY.)
6. Remove the following parts:
7. Remove the bolt.
a30zzw00002811
|
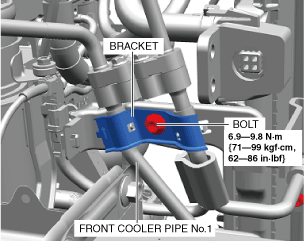
8. Remove the bracket.
a30zzw00002812
|
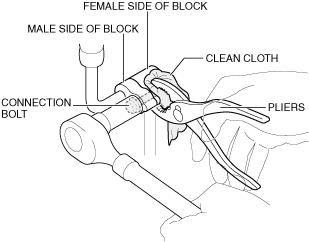
9. Secure the female side block with pliers and remove the bolts. (See Bolt Installation Note.)
a30zzw00002813
|
10. Remove the front cooler pipe No.1 being careful not to allow compressor oil to spill.
11. Install in the reverse order of removal.
12. If the front cooler pipe No. 1 is replaced, add compressor oil in the refrigeration cycle.
Compressor oil
|
Category |
Supplemental amount (reference) |
|---|---|
|
ND-OIL11
|
1 ml {1 cc, 0.03 US fl oz}
|
13. Charge the refrigerant. (See REFRIGERANT CHARGING.)
14. Perform the air-conditioning system performance test. (See REFRIGERANT SYSTEM PERFORMANCE TEST.)
Bolt Installation Note
1. Apply compressor oil to the O-ring at the connection.
2. Perform initial tightening of bolts fully by hand.
Front cooler pipe No.2
1. Disconnect the negative lead-acid battery terminal. (See NEGATIVE LEAD-ACID BATTERY TERMINAL DISCONNECTION/CONNECTION.)
2. Remove the front under cover No.2. (See FRONT UNDER COVER No.2 REMOVAL/INSTALLATION.)
3. Remove the front under cover No.1. (See FRONT UNDER COVER No.1 REMOVAL/INSTALLATION.)
4. Drain the coolant. (See COOLANT REPLACEMENT.)
5. Collect the refrigerant. (See REFRIGERANT RECOVERY.)
6. Remove the following parts:
7. Disconnect the connector.
a30zzw00002814
|
8. Remove the clip.
9. Remove the bolt.
10. Remove the bracket.
a30zzw00002812
|
11. Secure the female side block with pliers and remove the bolts. (See Bolt Installation Note.)
a30zzw00002815
|
12. Remove the front cooler pipe No.2 being careful not to allow compressor oil to spill.
13. Install in the reverse order of removal.
14. If the front cooler pipe No.2 is replaced, add compressor oil in the refrigeration cycle.
Compressor oil
|
Category |
Supplemental amount (reference) |
|---|---|
|
ND-OIL11
|
1 ml {1 cc, 0.03 US fl oz}
|
15. Charge the refrigerant. (See REFRIGERANT CHARGING.)
16. Perform the air-conditioning system performance test. (See REFRIGERANT SYSTEM PERFORMANCE TEST.)
Bolt Installation Note
1. Apply compressor oil to the O-ring at the connection.
2. Perform initial tightening of bolts fully by hand.