BODY CONTROL MODULE (BCM) REMOVAL/INSTALLATION
id094000700100
-
Caution
-
• When replacing the body control module (BCM), perform the configuration to assure that the system operates correctly.
• Do not do the following during the body control module (BCM) configuration because the windshield wipers may operate even if the wiper switch is turned off, which could lead to personal injury or part damage.
-
― Put a hand near windshield glass
― Raise windshield wiper arm
― Put object on windshield glass
-
Note
-
• Prepare 2 remote transmitters because key programming will be necessary after replacing the body control module (BCM).
1. When replacing the body control module (BCM), perform the following procedure.
- (1) Verify the setting values for the following.
-
-
• Personalization features
-
Note
-
• For personalization features setting using the center display, refer to Mazda Connect's [PERSONALIZATION FEATURES].
- (2) Leave the front doors on both sides and liftgate open until the synchronization between the following units and the body control module (BCM) is complete.
-
-
• Electrical supply unit (ESU)
• Door-electrical supply unit
- (3) Turn the wiper and washer switch off.
-
- (4) Connect the M-MDS to the DLC-2.
-
- (5) Switch the main power ON (READY off).
-
- (6) Activate the M-MDS and perform the following procedure.
-
- 1) Press [Start] to start the vehicle identification.
-
- 2) Press the [Toolbox] tab.
-
- 3) Press the [Work Support] icon.
-
- 4) Press [Configuration].
-
- 5) Press [Run] to perform the configuration.
-
- 6) Press [BCM].
-
- 7) Verify that the main power is switched ON (READY off) and press [Next].
-
-
• If the main power cannot be switched ON (READY off), leave it as it is and press [Next].
- 8) When [Install the new ECU] is displayed, move to the body control module (BCM) replacement procedure.
-
2. Disconnect the negative lead-acid battery terminal. (See NEGATIVE LEAD-ACID BATTERY TERMINAL DISCONNECTION/CONNECTION.)
3. Remove the front scuff plate (LH). (See SCUFF PLATE REMOVAL/INSTALLATION.)
4. Remove the front side trim (LH). (See FRONT SIDE TRIM REMOVAL/INSTALLATION.)
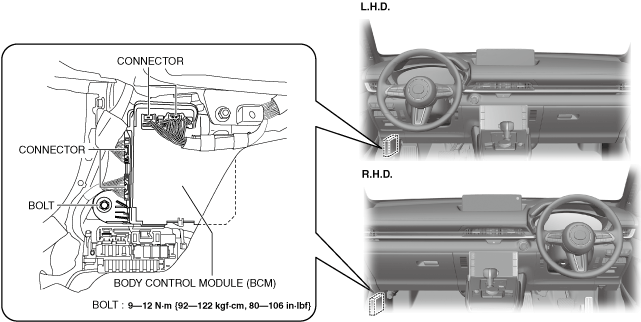
5. Disconnect the connectors.
6. Remove the bolt.
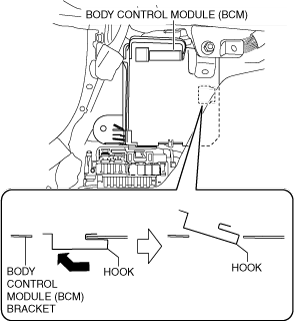
7. Move the body control module (BCM) in the direction of the arrow shown in the figure to detach the body control module (BCM) hook from the body control module (BCM) bracket.
8. Remove the body control module (BCM)
9. Install in the reverse order of removal.
10. If the body control module (BCM) is replaced, perform the following procedure.
-
Note
-
• For the data to be written to the new body control module (BCM) during configuration, either of the following is selected depending on the vehicle conditions.
-
― Data read from body control module (BCM) before replacement
― Data as of shipment from manufacturer (As-Built data)
-
• If configuration is performed using the data as of shipment from manufacturer (As-Built data), the odometer indication will be 0 km.
― Which data was used can be confirmed from the message displayed at the bottom of the screen that indicates the completion of the M-MDS configuration.
- (1) Return to the M-MDS operation and press [Continue].
-
- (2) Take all of the remote transmitters out of the vehicle (keep them 1 m or more away from vehicle) and press [Next].
-
- (3) Verify that the main power is switched ON (READY off) and press [Next].
-
-
• If the main power is not switched ON (READY off), operate the power switch to switch the main power ON (READY off).
- (4) When [Procedure successful.] is displayed, press [Next].
-
- (5) When the M-MDS processing is completed, press [Next].
-
- (6) When the download is completed, press [Next].
-
- (7) Verify that the following conditions/operations are met/completed, mark the check boxes, and then press [Next].
-
-
• Switch the main power ON (READY off)
• Install battery charger to vehicle
• Lead-acid battery voltage: 11.6 V or more
• Connect power cable to M-MDS
• Front doors on both sides and liftgate are open
- (8) Press [Finish].
-
- (9) Perform the following procedure using the M-MDS.
-
- 1) Immobilizer system-related part programming (See IMMOBILIZER SYSTEM-RELATED PARTS PROGRAMMING.)
-
- 2) Position memory system memory clearing (With position memory system) (See POSITION MEMORY SYSTEM MEMORY CLEARING.)
-
- 3) Seat position initial learning (With position memory system) (See SEAT POSITION INITIAL LEARNING.)
-
- 4) Vehicle control module (VCM) initial setting (See VEHICLE CONTROL MODULE (VCM) INITIAL SETTING.)
-
- 5) Activating remote control by smart phone (See ACTIVATING REMOTE CONTROL BY SMART PHONE.)
-
- (10) Switch the main power ON (READY on) and wait for 1 s or more, then synchronize the following parts with the body control module (BCM).
-
-
• Electrical Supply Unit (ESU)
• Door-electrical supply unit
- (11) Switch the main power OFF.
-
- (12) Switch the main power ON (READY off) again.
-
- (13) Perform the DTC inspection. (See DTC INSPECTION.)
-
-
- (14) If configuration is performed using the As-Built data, input the setting values for the following verified before replacing the BCM.
-
-
• Personalization features
-
Note
-
• For personalization features setting using the center display, refer to Mazda Connect's [PERSONALIZATION FEATURES].