FRONT BUMPER REINFORCEMENT REMOVAL/INSTALLATION
id091000800600
1. Disconnect the negative battery cable. (See NEGATIVE BATTERY CABLE DISCONNECTION/CONNECTION [SKYACTIV-G 1.5, SKYACTIV-G 2.0, SKYACTIV-G 2.5].) (See NEGATIVE BATTERY CABLE DISCONNECTION/CONNECTION [MZR 1.6].) (See NEGATIVE BATTERY CABLE DISCONNECTION/CONNECTION [SKYACTIV-D 2.2].) (See NEGATIVE BATTERY CABLE DISCONNECTION/CONNECTION [SKYACTIV-D 1.5].)
2. Remove the following parts:
- (1) Set plate (See SET PLATE REMOVAL/INSTALLATION.)
- (2) Front bumper (See FRONT BUMPER REMOVAL.) (See FRONT BUMPER INSTALLATION.)
- (3) Front combination light (See FRONT COMBINATION LIGHT REMOVAL/INSTALLATION.)
- (4) Intake air guide (See INTAKE AIR GUIDE REMOVAL/INSTALLATION.)
- (5) Front energy-absorbing form (With front energy-absorbing form) (See ENERGY-ABSORBING FORM REMOVAL/INSTALLATION.)
- (6) Active air shutter (With active air shutter system) (See ACTIVE AIR SHUTTER REMOVAL/INSTALLATION.)
- (7) Charge air cooler (SKYACTIV-D 2.2) (See CHARGE AIR COOLER REMOVAL/INSTALLATION [SKYACTIV-D 2.2].)
- (8) Front under cover No.1 (See FRONT UNDER COVER No.1 REMOVAL/INSTALLATION.)
- (9) Bumper stiffener lower (See BUMPER STIFFENER LOWER REMOVAL/INSTALLATION.)
-
Caution
-
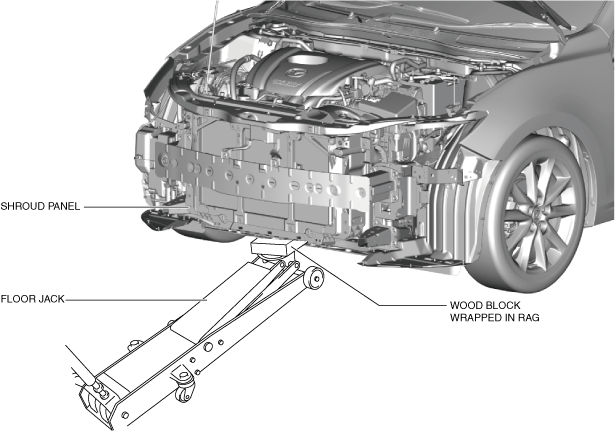
• The front bumper reinforcement supports the shroud panel. After removing the front bumper reinforcement, an excessive load applied to the shroud panel could result in damage. When removing the front bumper reinforcement, always use a floor jack to support the shroud panel.
3. Support the shroud panel using a floor jack.
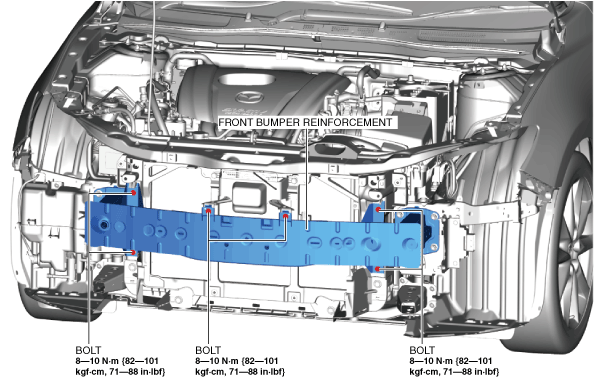
4. Remove the bolts shown in the figure.
-
Warning
-
• Removing the front bumper reinforcement without supporting it could cause the front bumper reinforcement to fall and cause serious injury. Always perform the procedure with at least another person to prevent the front bumper reinforcement from falling.
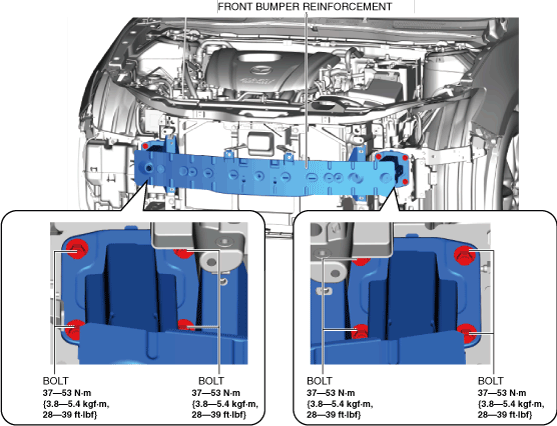
5. Remove the bolts shown in the figure and remove the front bumper reinforcement.
6. Install in the reverse order of removal.
7. Adjust the headlight aiming. (See HEADLIGHT AIMING.)