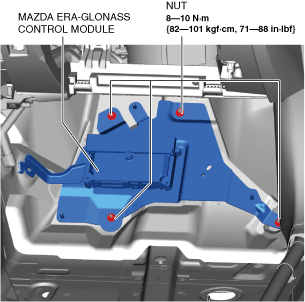
MAZDA ERA-GLONASS CONTROL MODULE REMOVAL/INSTALLATION


id092200666000

1.  When replacing the Mazda ERA-GLONASS control module, perform the forrowing procedure.

(1)  Connect the M-MDS to the DLC-2.
(2)  After the vehicle is identified, select the following items from the initialization screen of the M-MDS.
1.  Select "Electrical" .
(3)  Then, select items from the screen menu in the following order.
1.  Select "DCM" .
2.  Select "Configuration mode" .
3.  Select "Install new module" .
(4)  Perform the procedure according to the directions on the screen.

2.  Set the wheel blocks for both the front and rear wheels (without electric parking brake).

3.  Disconnect the negative battery cable. (See NEGATIVE BATTERY CABLE DISCONNECTION/CONNECTION [MZR 1.6].) (See NEGATIVE BATTERY CABLE DISCONNECTION/CONNECTION [SKYACTIV-G 1.5, SKYACTIV-G 2.0, SKYACTIV-G 2.5].) (See NEGATIVE BATTERY CABLE DISCONNECTION/CONNECTION [SKYACTIV-D 1.5].) (See NEGATIVE BATTERY CABLE DISCONNECTION/CONNECTION [SKYACTIV-D 2.2].)

4.  Shift the selector lever from the P position to the D position (ATX).

5.  Remove the following parts:

(1)  Passenger-side front scuff plate (See FRONT SCUFF PLATE REMOVAL/INSTALLATION.)
(2)  Passenger-side side trim (See FRONT SIDE TRIM REMOVAL/INSTALLATION.)
(3)  Upper panel (See UPPER PANEL REMOVAL.) (See UPPER PANEL INSTALLATION.)
(4)  Rear console (See REAR CONSOLE REMOVAL/INSTALLATION.)
(5)  Shift lever knob (MTX) (See MANUAL TRANSAXLE SHIFT MECHANISM REMOVAL/INSTALLATION [F35M-R].) (See MANUAL TRANSAXLE SHIFT MECHANISM REMOVAL/INSTALLATION [C66M-R].) (See MANUAL TRANSAXLE SHIFT MECHANISM REMOVAL/INSTALLATION [D66M-R].) (See MANUAL TRANSAXLE SHIFT MECHANISM REMOVAL/INSTALLATION [F66M-R].)
(6)  Selector lever knob (ATX) (See AUTOMATIC TRANSAXLE SHIFT MECHANISM REMOVAL/INSTALLATION.)
(7)  Shift panel (See SHIFT PANEL REMOVAL/INSTALLATION.)
(8)  Front console box (without electric parking brake) (See FRONT CONSOLE BOX REMOVAL/INSTALLATION.)
(9)  CD player (with CD player) (See CD PLAYER REMOVAL.) (See CD PLAYER INSTALLATION.)
(10)  DVD/CD player (with DVD/CD player) (See DVD/CD PLAYER REMOVAL.) (See DVD/CD PLAYER INSTALLATION.)
(11)  Glove compartment (See GLOVE COMPARTMENT REMOVAL/INSTALLATION.)
(12)  Decoration panel (See DECORATION PANEL REMOVAL/INSTALLATION.)
(13)  Side wall (See SIDE WALL REMOVAL/INSTALLATION.)
(14)  Front console (See FRONT CONSOLE REMOVAL/INSTALLATION.)
(15)  floor insulator (See FLOOR INSULATOR REMOVAL/INSTALLATION.)

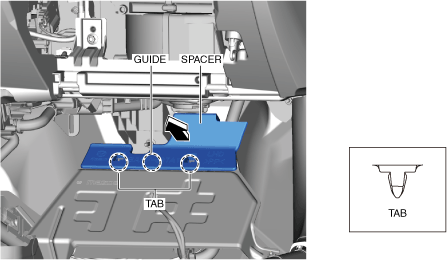
6.  Move the spacer in the direction of the arrow shown in the figure and detach the tabs.

am3zzw00020394

7.  Remove the spacer.

8.  Remove the nuts.

am3zzw00020395

9.  Remove the cover.

10.  Remove the ground bolt.

am3zzw00020396

11.  Remove the ground.

12.  Disconnect the connectors.

13.  Remove the clip.

14.  Remove the nuts.

am3zzw00020397

15.  Remove the Mazda ERA-GLONASS control module and bracket as a single unit.

16.  Remove the screws.

am3zzw00020398

17.  Remove the Mazda ERA-GLONASS control module from bracket.

18.  Install in the reverse order of removal.

19.  When replacing the Mazda ERA-GLONASS control module, perform the procedure according to the directions on the M-MDS screen.

20.  When the Mazda ERA-GLONASS control module is replaced, perform the Mazda ERA-GLONASS control module finalization procedure.(See MAZDA ERA-GLONASS CONTROL MODULE FINALIZATION PROCEDURE.)