 |
am3uuw00002097
CLUTCH RELEASE COLLAR INSPECTION [G66M-R]
id0510008010m5
1. Remove the battery cover. (See BATTERY INSPECTION [MZR 2.0, MZR 2.5].)(See BATTERY REMOVAL/INSTALLATION [MZR 2.0 DISI i-stop].)
2. Disconnect the negative battery cable. (See BATTERY INSPECTION [MZR 2.0, MZR 2.5].)(See BATTERY REMOVAL/INSTALLATION [MZR 2.0 DISI i-stop].)
3. Remove the battery component. (ex: battery, battery tray and PCM component) (MZR 2.0, MZR 2.5)(See BATTERY INSPECTION [MZR 2.0, MZR 2.5].)
4. Remove the battery and battery tray. (MZR 2.0 DISI i-stop)(See BATTERY REMOVAL/INSTALLATION [MZR 2.0 DISI i-stop].)
5. Remove the air cleaner component. (See INTAKE-AIR SYSTEM REMOVAL/INSTALLATION [MZR 2.0, MZR 2.5].)(See INTAKE-AIR SYSTEM REMOVAL/INSTALLATION [MZR 2.0 DISI i-stop].)
6. Remove the exhaust manifold insulator installation bolts and set the exhaust manifold insulator aside.
7. Remove the following parts:
8. Drain the transaxle oil into a suitable container. (See TRANSAXLE OIL REPLACEMENT [G66M-R].)
9. Remove the manual transaxle.(See MANUAL TRANSAXLE REMOVAL/INSTALLATION [G66M-R (EXCEPT MZR 2.0 DISI i-stop)].)(See MANUAL TRANSAXLE REMOVAL/INSTALLATION [G66M-R (MZR 2.0 DISI i-stop)].)
10. Remove the clutch release collar. (See CLUTCH UNIT REMOVAL/INSTALLATION [G66M-R].)
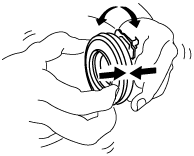
11. Turn the collar while applying force in the axial direction, and inspect for sticking, excessive resistance, and an abnormal noise.
am3uuw00002097
|
12. Install the clutch release collar. (See CLUTCH UNIT REMOVAL/INSTALLATION [G66M-R].)
13. Install in the reverse order of removal.
14. Add the specified amount of specified transaxle oil. (See TRANSAXLE OIL REPLACEMENT [G66M-R].)