|
am3zzw00009787
CENTER ROOF ANTENNA INSPECTION
id092000801700
Feeder Line Inspection
1. Disconnect the negative battery cable. (See BATTERY REMOVAL/INSTALLATION [MZR 1.5, MZR 1.6].)(See BATTERY REMOVAL/INSTALLATION [MZR 2.0, MZR 2.5].)(See BATTERY REMOVAL/INSTALLATION [MZR 2.0 DISI i-stop].)(See BATTERY REMOVAL/INSTALLATION [MZR 2.3 DISI Turbo].)(See BATTERY REMOVAL/INSTALLATION [MZR-CD 2.2].)(See BATTERY REMOVAL/INSTALLATION [SKYACTIV-G 2.0].)(See BATTERY REMOVAL/INSTALLATION [MZ-CD 1.6].)
2. Remove the rain sensor cover. (Vehicles with auto light/wiper system) (See RAIN SENSOR REMOVAL/INSTALLATION.)
3. Disconnect the rain sensor connector. (Vehicles with auto light/wiper system)
4. Partially peel back the seaming welts.
5. Remove the following parts:
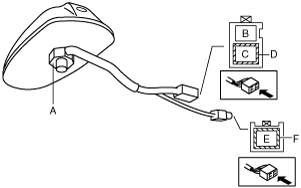
6. Verify that there is no continuity between the center roof antenna terminals A and C using an ohmmeter.
Type A
am3zzw00009787
|
Type B
am3zzw00005981
|
Type C
aaxjjw00011441
|
7. Inspect for continuity between the center roof antenna terminals using an ohmmeter.
Type A
am3zzw00009850
|
Type B
am3zzw00009851
|
Type C
am3zzw00009850
|
Antenna Amplifier Inspection
1. Connect the negative battery cable. (See BATTERY REMOVAL/INSTALLATION [MZR 1.5, MZR 1.6].)(See BATTERY REMOVAL/INSTALLATION [MZR 2.0, MZR 2.5].)(See BATTERY REMOVAL/INSTALLATION [MZR 2.0 DISI i-stop].)(See BATTERY REMOVAL/INSTALLATION [MZR 2.3 DISI Turbo].)(See BATTERY REMOVAL/INSTALLATION [MZR-CD 2.2].)(See BATTERY REMOVAL/INSTALLATION [SKYACTIV-G 2.0].)(See BATTERY REMOVAL/INSTALLATION [MZ-CD 1.6].)
2. Switch the ignition to ON.
3. Turn the audio unit power to ON.
4. Tune in the radio.
5. Verify that voltage is B+ at the antenna amplifier terminal B.
Type A
am3zzw00009787
|
Type B
am3zzw00005981
|
Type C
aaxjjw00011441
|