|
am3zzw00006045
ANTENNA FEEDER NO.6 REMOVAL/INSTALLATION
id092000888200
4SD
1. Disconnect the negative battery cable. (See BATTERY REMOVAL/INSTALLATION [MZR 1.5, MZR 1.6].)(See BATTERY REMOVAL/INSTALLATION [MZR 2.0, MZR 2.5].)(See BATTERY REMOVAL/INSTALLATION [MZR 2.0 DISI i-stop].)(See BATTERY REMOVAL/INSTALLATION [MZR 2.3 DISI Turbo].)(See BATTERY REMOVAL/INSTALLATION [MZR-CD 2.2].)(See BATTERY REMOVAL/INSTALLATION [SKYACTIV-G 2.0].)(See BATTERY REMOVAL/INSTALLATION [MZ-CD 1.6].)
2. Remove the rain sensor cover. (Vehicles with auto light/wiper system) (See RAIN SENSOR REMOVAL/INSTALLATION.)
3. Disconnect the rain sensor connector. (Vehicles with auto light/wiper system)
4. Partially peel back the seaming welts.
5. Remove the following parts:
6. Disconnect the antenna feeder No.5.
am3zzw00006045
|
7. Disconnect the connector A.
8. Remove the clips A and B.
9. Disconnect the connector B.
am3zzw00006046
|
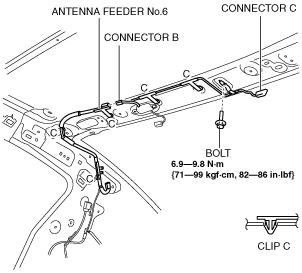
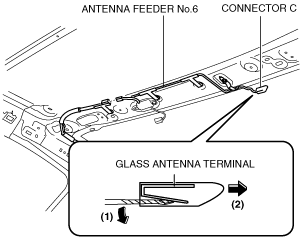
10. Disconnect the connector C. (See Connector C Removal Note.)
11. Remove the bolt.
12. Remove the clips C.
13. Remove the antenna feeder No.6.
14. Install in the reverse order of removal.
Connector C Removal Note
1. Remove the connector C in the direction of the arrow (2) shown in the figure while pressing the glass antenna terminal in the direction of the arrow (1).
am3zzw00006078
|
5HB
1. Disconnect the negative battery cable. (See BATTERY REMOVAL/INSTALLATION [MZR 1.5, MZR 1.6].)(See BATTERY REMOVAL/INSTALLATION [MZR 2.0, MZR 2.5].)(See BATTERY REMOVAL/INSTALLATION [MZR 2.0 DISI i-stop].)(See BATTERY REMOVAL/INSTALLATION [MZR 2.3 DISI Turbo].)(See BATTERY REMOVAL/INSTALLATION [MZR-CD 2.2].)(See BATTERY REMOVAL/INSTALLATION [SKYACTIV-G 2.0].)(See BATTERY REMOVAL/INSTALLATION [MZ-CD 1.6].)
2. Remove the rain sensor cover. (Vehicles with auto light/wiper system) (See RAIN SENSOR REMOVAL/INSTALLATION.)
3. Disconnect the rain sensor connector. (Vehicles with auto light/wiper system)
4. Partially peel back the seaming welts.
5. Remove the following parts:
6. Disconnect the antenna feeder No.7. (with RDS (radio data system)) (See ANTENNA FEEDER NO.7 REMOVAL/INSTALLATION.)
7. Disconnect the antenna feeder No.5. (with RDS (radio data system))
am3zzw00006047
|
8. Remove the clips A and B.
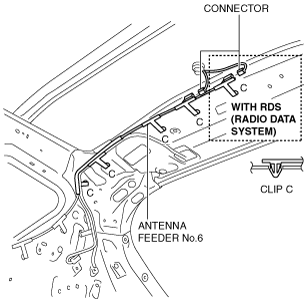
9. Remove the bolt. (with RDS (radio data system))
10. Disconnect the connector.
am3zzw00006048
|
11. Remove the clips C.
12. Remove the antenna feeder No.6.
13. Install in the reverse order of removal.