BACKUP POWER SUPPLY BRACKET REMOVAL/INSTALLATION
id092100909100
1. Disconnect the negative battery terminal. (See NEGATIVE BATTERY TERMINAL DISCONNECTION/CONNECTION.)
2. Remove the following parts:
- (1) Rear scuff plate (LH) (See REAR SCUFF PLATE REMOVAL/INSTALLATION.)
-
- (2) Trunk covering (See TRUNK COVERING REMOVAL/INSTALLATION.)
-
- (3) Trunk board (See TRUNK BOARD REMOVAL/INSTALLATION.)
-
- (4) Trunk side pocket (See TRUNK SIDE POCKET REMOVAL/INSTALLATION.)
-
- (5) Trunk end trim (See TRUNK END TRIM REMOVAL/INSTALLATION.)
-
- (6) Rear seat belt lower anchor installation bolt (LH) (See REAR SEAT BELT REMOVAL/INSTALLATION.)
-
- (7) Trunk side upper trim (LH) (See TRUNK SIDE UPPER TRIM REMOVAL/INSTALLATION.)
-
- (8) Trunk side trim (LH) (See TRUNK SIDE TRIM REMOVAL/INSTALLATION.)
-
- (9) Rear body control module (RBCM), rear body control module (RBCM) bracket, and backup power supply as a single unit (See REAR BODY CONTROL MODULE (RBCM) REMOVAL/INSTALLATION.)
-
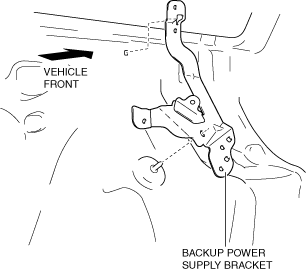
3. While pressing the clip tabs in the direction of the arrows (1) shown in the figure, pull the clip in the direction of the arrow (2) shown in the figure to detach the clip tabs from the backup power supply bracket.
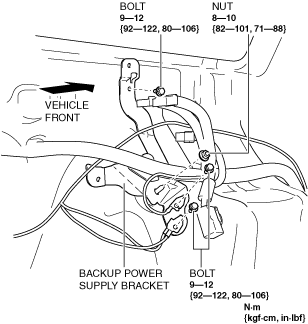
4. Remove the bolts.
5. Remove the nut.
6. Remove the backup power supply bracket.
7. Install in the reverse order of removal.