 |
am6zzw00001816
HEADLINER REMOVAL/INSTALLATION
id091700801600
4SD
1. Disconnect the negative battery cable.
2. Partially peel back the seaming welt.
3. Remove the rain sensor cover. (Vehicles with auto light / wiper system) (See RAIN SENSOR REMOVAL/INSTALLATION)
4. Disconnect the rain sensor connector. (Vehicles auto light / wiper system)
5. Remove the following parts:
6. Disconnect the auto-dimming mirror connector. (vehicles with auto-dimming mirror only)
7. Remove the sunvisors. (See SUNVISOR REMOVAL/INSTALLATION)
8. Remove the front map light. (See MAP LIGHT REMOVAL/INSTALLATION)
9. Remove the assist handle. (See ASSIST HANDLE REMOVAL/INSTALLATION)
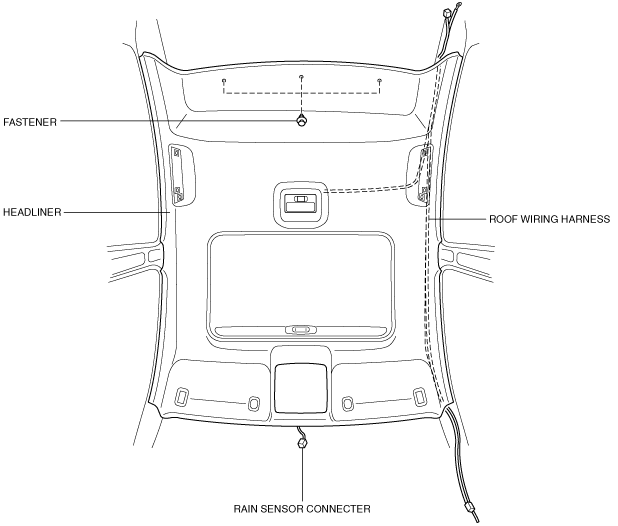
10. Disconnect the roof harness connector, remove the clip, and remove the connector.
11. Remove the fasteners.
am6zzw00001816
|
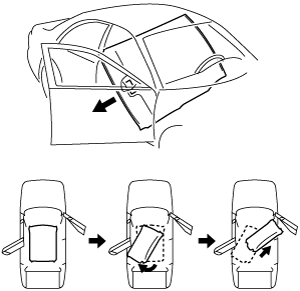
12. Remove the retainer holding the roof panel and remove the headliner.
13. Take the headliner off from the passenger-side door opening.
e3u917zw7101
|
14. Install in the reverse order of removal.
5HB
1. Disconnect the negative battery cable.
2. Partially peel back the seaming welt.
3. Remove the rain sensor cover. (Vehicles with auto light / wiper system) (See RAIN SENSOR REMOVAL/INSTALLATION)
4. Disconnect the rain sensor connector. (Vehicles auto light / wiper system)
5. Remove the following parts:
6. Disconnect the auto-dimming mirror connector. (Vehicles with auto-dimming mirror only)
7. Remove the sunvisors. (See SUNVISOR REMOVAL/INSTALLATION)
8. Remove the front map light. (See MAP LIGHT REMOVAL/INSTALLATION)
9. Remove the assist handle. (See ASSIST HANDLE REMOVAL/INSTALLATION)
10. Disconnect the roof harness connector, remove the clip, and remove the connector.
11. Disconnect the rear washer hose.
12. Remove the fasteners.
am6zzw00001817
|
13. Remove the retainer holding the roof panel and remove the headliner.
14. Take the headliner off from the liftgate opening.
15. Install in the reverse order of removal.
Wagon
1. Disconnect the negative battery cable.
2. Partially peel back the seaming welt.
3. Remove the rain sensor cover. (Vehicles with auto light / wiper system) (See RAIN SENSOR REMOVAL/INSTALLATION)
4. Disconnect the rain sensor connector. (Vehicles auto light / wiper system)
5. Remove the following parts:
6. Disconnect the auto-dimming mirror connector. (Vehicles with auto-dimming mirror only)
7. Remove the sunvisors. (See SUNVISOR REMOVAL/INSTALLATION)
8. Remove the front map light. (See MAP LIGHT REMOVAL/INSTALLATION)
9. Remove the assist handles. (See ASSIST HANDLE REMOVAL/INSTALLATION)
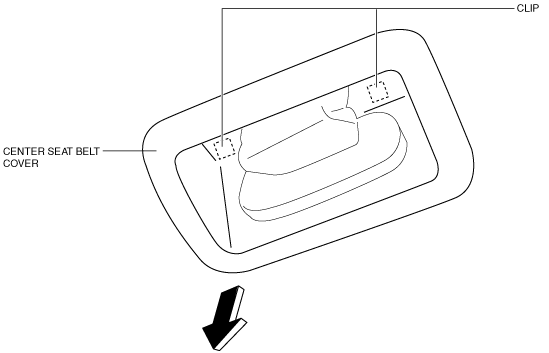
10. Remove the clip then remove the center seat belt cover.
am6zzw00003455
|
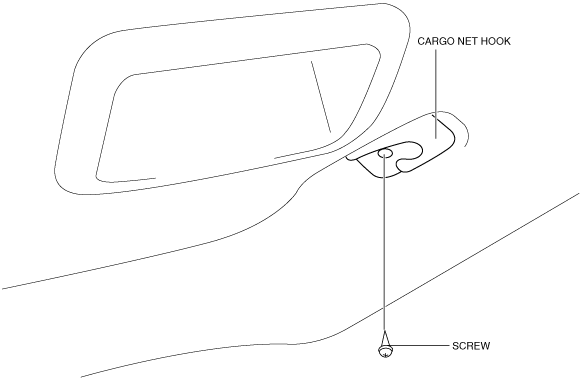
11. Insert a phillips screwdriver with no wear securely into each screw groove and remove the screws.
am6zzw00003456
|
12. Remove the cargo net hook.
13. Disconnect the roof harness connector, remove the clip, and remove the connector.
14. Disconnect the rear washer hose.
15. Remove the fasteners.
am6zzw00003402
|
16. Remove the retainer holding the roof panel and remove the headliner.
17. Take the headliner off from the liftgate opening.
18. Install in the reverse order of removal.