WINDSHIELD INSTALLATION
id091200000700
Replacement part
|
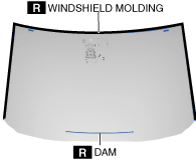
Windshield molding
Quantity: 1
Location of use: Windshield
|
Dam
Quantity: 1
Location of use: Windshield
|
-
Warning
-
• Always wear gloves when using a utility knife. Using a utility knife with bare hands can cause injury.
-
Caution
-
• If a door is opened or closed when all the door glass is fully closed, the resulting change in air pressure could cause the sealant to crack preventing the proper installation of the windshield. Keep the door glass open until the windshield installation is completed.
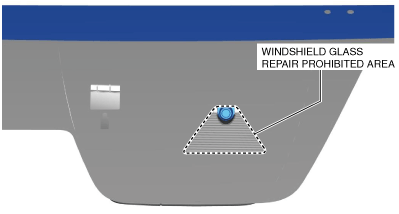
• If there is damage or cracking in the windshield glass repair prohibited area, replace the windshield. If the damage or cracking in the windshield glass repair prohibited area is repaired, it could affect the recognition of the Forward Sensing Camera (FSC) and the system may not operate normally.
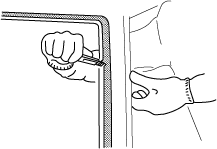
1. Remove the sealant along the perimeter of the glass using a utility knife. (Not reusing windshield)
2. Clean and degrease an approx. 50 mm {2.0 in} wide strip along the perimeter of the windshield.
3. Inspect the windshield for cracks. If it is cracked, chamfer it using sandpaper.
4. Install the windshield molding.
5. Apply the dam.
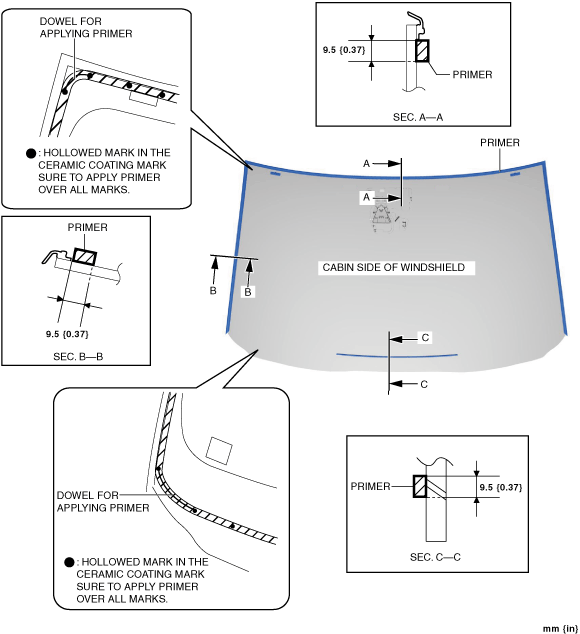
6. Apply primer to the area of the glass shown in the figure.
-
• Follow the primer product instructions for the drying time.
-
Caution
-
• To prevent weakening of the primer adhesion, keep the bonding surface free of dirt, moisture, and grease. Do not touch the surface with your hand.
-
Note
-
• Apply primer also to the hollowed marks in the ceramic coating.
7. Cut away the old sealant using a utility knife or scraper so that a 1—2 mm {0.04—0.07 in} thickness of sealant remains along the perimeter of the frame.
8. Clean and degrease along the perimeter of the bonding area on the body.
9. Apply primer to the area of the body shown in the figure.
-
• Follow the primer product instructions for the drying time.
-
Caution
-
• To prevent weakening of the primer adhesion, keep the bonding surface free of dirt, moisture, and grease. Do not touch the surface with your hand.
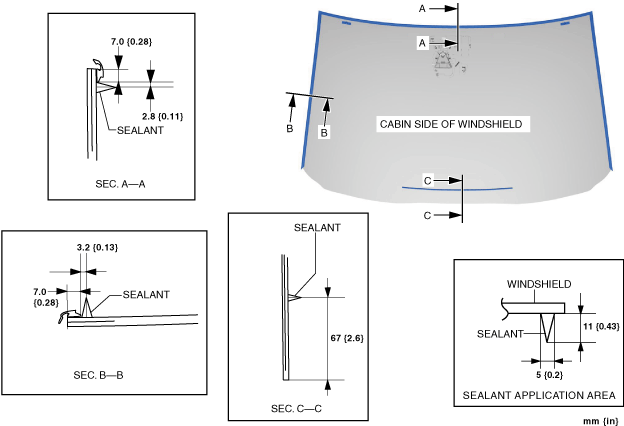
10. Apply sealant to the area of the glass surface as shown in the figure.
11. Insert the positioning pins to the body and install the windshield.
12. Install the cowl grille. (See COWL GRILLE REMOVAL/INSTALLATION.)
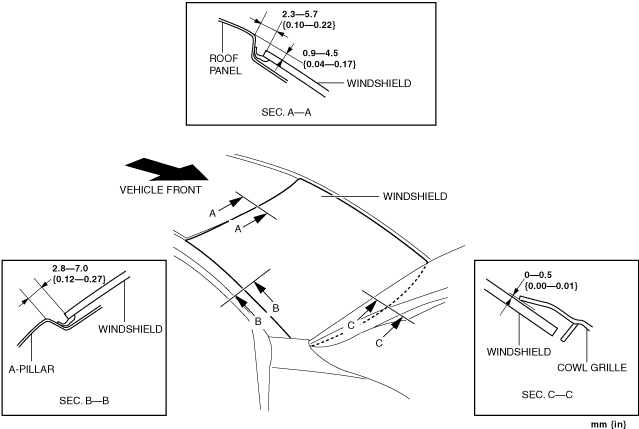
13. Verify that the gaps between the A-pillar and windshield, between the roof and windshield, and between the cowl grille and windshield are within the ranges shown in the figure, and completely press along the perimeter of the glass.
14. Install the headliner.
15. Install the following parts:
- (1) Assist handle (See ASSIST HANDLE REMOVAL/INSTALLATION.)
-
- (2) Front map light (See FRONT MAP LIGHT REMOVAL/INSTALLATION.)
-
- (3) Sunvisor (See SUNVISOR REMOVAL/INSTALLATION.)
-
- (4) A-pillar trim (See A-PILLAR TRIM REMOVAL/INSTALLATION.)
-
- (5) Auto-dimming rearview mirror (With auto-dimming rearview mirror) (See AUTO-DIMMING REARVIEW MIRROR REMOVAL/INSTALLATION.)
-
- (6) Rearview mirror (Without auto-dimming rearview mirror) (See REARVIEW MIRROR REMOVAL/INSTALLATION.)
-
- (7) Rain sensor (See RAIN SENSOR REMOVAL/INSTALLATION.)
-
- (8) Forward sensing camera (FSC) (See FORWARD SENSING CAMERA (FSC) REMOVAL/INSTALLATION.)
-
- (9) Sensor cover (See SENSOR COVER REMOVAL/INSTALLATION.)
-
- (10) Windshield wiper arm and blade (See WINDSHIELD WIPER ARM AND BLADE REMOVAL/INSTALLATION.)
-
16. Connect the negative battery terminal. (See NEGATIVE BATTERY TERMINAL DISCONNECTION/CONNECTION.)
17. Allow the sealant to harden completely.
Reference for sealant hardening time: 24 h
-
Note
-
• Follow the product instructions for the sealant hardening time.
18. Perform the forward sensing camera (FSC) aiming in the following cases. (See FORWARD SENSING CAMERA (FSC) AIMING.)
• Windshield is replaced
• Windshield is reused and forward sensing camera (FSC) or forward sensing camera (FSC) clips are replaced
19. If the rain sensor is replaced, perform the auto light sensitivity setting. (See CONTROL SYSTEM PERSONALIZATION FEATURES SETTING PROCEDURE.)