1. Disconnect the negative battery cable. (SeeBATTERY REMOVAL/INSTALLATION [L8, LF].)
2. Remove the console.(See CONSOLE REMOVAL/INSTALLATION.)
3. Remove the quarter trim.(See QUARTER TRIM REMOVAL/INSTALLATION.)
4. Remove the scuff plate.(See SCUFF PLATE REMOVAL/INSTALLATION.)
5. Remove the tire house trim.(See TIRE HOUSE TRIM REMOVAL/INSTALLATION.)
6. Remove the aeroboard.(See AEROBOARD REMOVAL/INSTALLATION.)
7. Remove the seat back bar garnish.(See SEAT BACK BAR GARNISH REMOVAL/INSTALLATION.)
8. Remove the open hook lever.(See BACK TRIM REMOVAL/INSTALLATION.)
9. Remove the back trim.(See BACK TRIM REMOVAL/INSTALLATION.)
10. Remove the open hook.(See OPEN HOOK REMOVAL/INSTALLATION.)
11. Remove the rear speaker.(See REAR SPEAKER REMOVAL/INSTALLATION.)
12. Remove the seat belt set plate.(See SEAT BELT REMOVAL/INSTALLATION.)
13. Remove the seat belt upper anchor installation bolt. (See SEAT BELT REMOVAL/INSTALLATION.)
14. Remove the power retractable hardtop link bracket. (Vehicle with power retractable hardtop) (See POWER RETRACTABLE HARDTOP LINK BRACKET REMOVAL/INSTALLATION.)
15. Half open the power retractable hardtop.
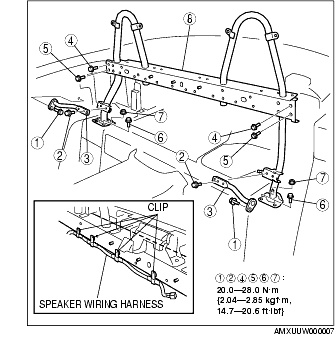
16. Remove the clips, then remove the speaker wiring harness.
17. Remove in the order indicated in the table.
|
1
|
Bolt A
|
|
2
|
Bolt B
|
|
3
|
Junction
|
|
4
|
Bolt C (Except power retractable hardtop)
|
|
5
|
Bolt D (Except power retractable hardtop)
|
|
6
|
Bolt E
|
|
7
|
Nut
|
|
8
|
Seat Back Crossmember Assembly (See Seat Back Crossmember Assembly Installation Note.)
|
18. Install in the reverse order of removal.
1. After temporarily tightening all of the bolts and nuts, tighten them to the specified torque.