 |
am3zzw00029520
FUEL-FILLER LID LOCK ACTUATOR SHORT-CORD REMOVAL/INSTALLATION [(E)]
id0914007011x2
Replacement Part
|
Band
Quantity: 2
Location of use: Fuel-filler lid lock actuator short-cord (5HB)
|
4SD
1. Level the vehicle.
2. Complete the “BEFORE SERVICE PRECAUTION”. (See BEFORE SERVICE PRECAUTION [SKYACTIV-G (WITHOUT CYLINDER DEACTIVATION (E))].) (See BEFORE SERVICE PRECAUTION [SKYACTIV-G (WITH CYLINDER DEACTIVATION (E))].) (See BEFORE SERVICE PRECAUTION [SKYACTIV-X 2.0].) (See BEFORE SERVICE PRECAUTION [SKYACTIV-D 1.8].)
3. Drain the fuel. (See FUEL DRAINING PROCEDURE [SKYACTIV-G (WITHOUT CYLINDER DEACTIVATION (E))].) (See FUEL DRAINING PROCEDURE [SKYACTIV-G (WITH CYLINDER DEACTIVATION (E))].) (See FUEL DRAINING PROCEDURE [SKYACTIV-X 2.0].) (See FUEL DRAINING PROCEDURE [SKYACTIV-D 1.8].)
4. Open the fuel-filler lid.
5. Disconnect the negative battery terminal. (See NEGATIVE BATTERY TERMINAL DISCONNECTION/CONNECTION [(E)].)
6. Remove the following parts:
7. Partially peel the trunk side trim (LH). (See TRUNK SIDE TRIM REMOVAL/INSTALLATION [(E)].)
8. Remove the trunk side insulator (LH). (See TRUNK SIDE INSULATOR REMOVAL/INSTALLATION.)
9. Remove the fuel-filler lid box. (See FUEL-FILLER LID LOCK ACTUATOR REMOVAL/INSTALLATION [(E)].)
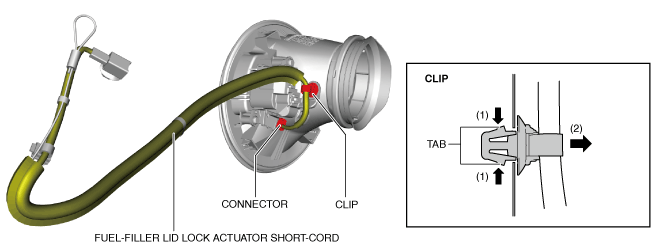
10. Remove the clip.
am3zzw00029520
|
11. Disconnect the connector.
12. Remove the fuel-filler lid lock actuator short-cord.
13. Install in the reverse order of removal.
14. Complete the “AFTER SERVICE PRECAUTION”. (See AFTER SERVICE PRECAUTION [SKYACTIV-G (WITHOUT CYLINDER DEACTIVATION (E))].) (See AFTER SERVICE PRECAUTION [SKYACTIV-G (WITH CYLINDER DEACTIVATION (E))].) (See AFTER SERVICE PRECAUTION [SKYACTIV-X 2.0].) (See AFTER SERVICE PRECAUTION [SKYACTIV-X 2.0].)
5HB
1. Level the vehicle.
2. Complete the “BEFORE SERVICE PRECAUTION”. (See BEFORE SERVICE PRECAUTION [SKYACTIV-G (WITHOUT CYLINDER DEACTIVATION (E))].) (See BEFORE SERVICE PRECAUTION [SKYACTIV-G (WITH CYLINDER DEACTIVATION (E))].) (See BEFORE SERVICE PRECAUTION [SKYACTIV-X 2.0].) (See BEFORE SERVICE PRECAUTION [SKYACTIV-D 1.8].)
3. Drain the fuel. (See FUEL DRAINING PROCEDURE [SKYACTIV-G (WITHOUT CYLINDER DEACTIVATION (E))].) (See FUEL DRAINING PROCEDURE [SKYACTIV-G (WITH CYLINDER DEACTIVATION (E))].) (See FUEL DRAINING PROCEDURE [SKYACTIV-X 2.0].) (See FUEL DRAINING PROCEDURE [SKYACTIV-D 1.8].)
4. Open the fuel-filler lid.
5. Disconnect the negative battery terminal. (See NEGATIVE BATTERY TERMINAL DISCONNECTION/CONNECTION [(E)].)
6. Remove the following parts:
7. Partially peel the trunk side trim (LH). (See TRUNK SIDE TRIM REMOVAL/INSTALLATION [(E)].)
8. Remove the trunk side insulator (LH). (See TRUNK SIDE INSULATOR REMOVAL/INSTALLATION.)
9. Remove the fuel-filler lid box. (See FUEL-FILLER LID LOCK ACTUATOR REMOVAL/INSTALLATION [(E)].)
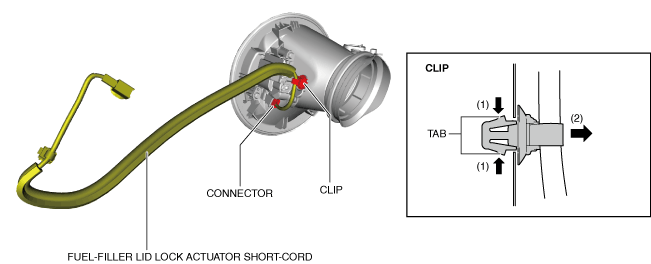
10. Remove the clip.
am3zzw00028088
|
11. Disconnect the connector.
12. Cut the bands.(See Band Assembly Note.)
am3zzw00028089
|
13. Remove the fuel-filler lid lock actuator short-cord.
14. Install in the reverse order of removal.
15. Complete the “AFTER SERVICE PRECAUTION”. (See AFTER SERVICE PRECAUTION [SKYACTIV-G (WITHOUT CYLINDER DEACTIVATION (E))].) (See AFTER SERVICE PRECAUTION [SKYACTIV-G (WITH CYLINDER DEACTIVATION (E))].) (See AFTER SERVICE PRECAUTION [SKYACTIV-X 2.0].) (See AFTER SERVICE PRECAUTION [SKYACTIV-X 2.0].)
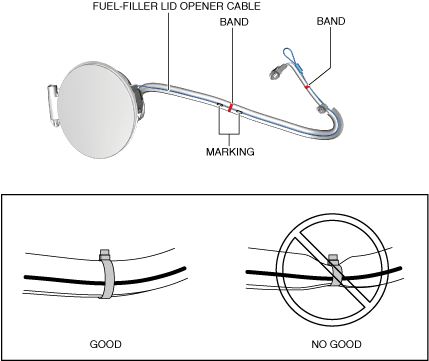
Band Assembly Note
1. Assemble the bands.
am3zzw00036153
|
2. Verify the operation of the fuel-filler lid opener cable.