 |
EXPANSION VALVE REMOVAL/INSTALLATION
id071100800400
1. Disconnect the negative battery cable.
2. Discharge the refrigerant. (See REFRIGERANT CHARGING.)(See REFRIGERANT CHARGING [MZ-CD 1.6 (Y6)].)
3. Remove the following parts: (L.H.D.)
4. Remove the following part: (R.H.D.)
5. Remove the insulator. (R.H.D. L3 Turbo) (See EXHAUST SYSTEM REMOVAL/INSTALLATION [L3 Turbo].)
6. Remove the steering shaft. (R.H.D. MTX) (See STEERING WHEEL AND COLUMN REMOVAL/INSTALLATION.)
7. Disconnect the two clutch pedal fluid pipes.(R.H.D. MTX) (See CLUTCH MASTER CYLINDER REMOVAL/INSTALLATION.)
8. Remove the four clutch pedal bracket retaining nuts, then set the clutch pedal on the steering shaft side so that it is out of the way.(R.H.D. MTX) (See CLUTCH MASTER CYLINDER REMOVAL/INSTALLATION.)
9. Disconnect the cooler hose (LO) and cooler pipe. Do not allow compressor oil to spill. (except MZ-CD 1.6 (Y6)) (See REFRIGERANT LINE REMOVAL/INSTALLATION [ZJ, ZY, Z6].)(See REFRIGERANT LINE REMOVAL/INSTALLATION [LF, L3].)(See REFRIGERANT LINE REMOVAL/INSTALLATION [L3 Turbo].)
10. Disconnect the cooler hose (LO) No.2 and cooler pipe No.2. Do not allow compressor oil to spill. (MZ-CD 1.6 (Y6))(See REFRIGERANT LINES REMOVAL/INSTALLATION [MZ-CD 1.6 (Y6)].)
11. Disconnect the cooler pipe No.1 and cooler pipe No.2. (MZR-CD (RF Turbo)) (See REFRIGERANT LINE REMOVAL/INSTALLATION [ZJ, ZY, Z6].)
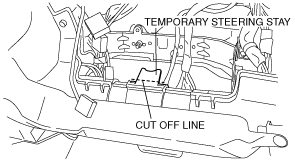
12. Cut off the temporary steering stay on the passenger’s side. (L.H.D. L3 Turbo, MZR-CD (RF Turbo)) (vehicle without advanced keyless system)
am3zzw00000837
|
13. Remove the screws shown in the figure and slide the blower case. (L.H.D. L3 Turbo, MZR-CD (RF Turbo))
am3zzw00003725
|
14. Disconnect the air intake actuator connector. (L.H.D. L3 Turbo, MZR-CD (RF Turbo))
15. Remove the blower case shown in the figure. (L.H.D. L3 Turbo, MZR-CD (RF Turbo))
am3zzw00003726
|
16. Remove the air guide. (L.H.D. L3 Turbo, MZR-CD (RF Turbo))
am3zzw00000843
|
17. Remove the adhesive polyurethane (3), (2) and (4) from the evaporator pipe.
18. Remove the bolt and shift the evaporator pipe. Do not allow compressor oil to spill.
19. Remove the expansion valve. Do not allow compressor oil to spill.
L.H.D.
am3zzw00000667
|
R.H.D.
am3zzw00000668
|
20. Install in the reverse order of removal.
21. Perform the refrigerant system performance test. (See REFRIGERANT SYSTEM PERFORMANCE TEST.)