BLOWER MOTOR REMOVAL
id074000807300
-
Note
-
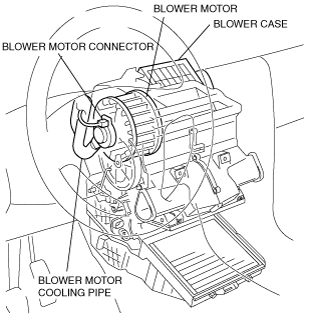
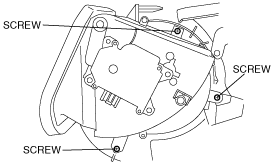
• The blower motor is located on the A/C unit as shown in the figure.
L.H.D.
R.H.D.
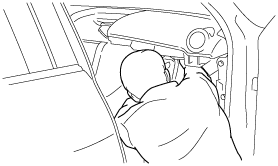
• Perform the work from the front passenger’s side in the posture shown in the figure.
1. Set the air intake mode to FRESH.
2. Set the airflow mode to DEFROSTER. (Full-auto air conditioner) (R.H.D.)
3. Disconnect the negative battery cable.
4. Remove the following parts:
- (1) Front scuff plate (See FRONT SCUFF PLATE REMOVAL/INSTALLATION.)
- (2) Front side trim (See FRONT SIDE TRIM REMOVAL/INSTALLATION.)
- (3) Decoration panel (See DECORATION PANEL REMOVAL/INSTALLATION.)
- (4) Glove compartment (See GLOVE COMPARTMENT REMOVAL/INSTALLATION.)
- (5) Bonnet release lever (See BONNET LATCH AND RELEASE LEVER REMOVAL/INSTALLATION [L.H.D.].) (See BONNET LATCH AND RELEASE LEVER REMOVAL/INSTALLATION [R.H.D.].)
- (6) Lower panel (See LOWER PANEL REMOVAL/INSTALLATION.)
- (7) Column cover (L.H.D.) (See COLUMN COVER REMOVAL/INSTALLATION.)
- (8) Meter hood (L.H.D.) (See METER HOOD REMOVAL/INSTALLATION.)
- (9) Instrument cluster (L.H.D.) (See INSTRUMENT CLUSTER REMOVAL/INSTALLATION.)
- (10) Steering shaft (L.H.D.) (See STEERING WHEEL AND COLUMN REMOVAL/INSTALLATION.)
- (11) Accelerator pedal (L.H.D.) (See ACCELERATOR PEDAL REMOVAL/INSTALLATION [ZJ, ZY, Z6].) (See ACCELERATOR PEDAL REMOVAL/INSTALLATION [LF, L3].) (See ACCELERATOR PEDAL (APP) REMOVAL/INSTALLATION [MZ-CD 1.6 (Y6)].) (See ACCELERATOR PEDAL REMOVAL/INSTALLATION [L3 Turbo].) (See ACCELERATOR PEDAL REMOVAL/INSTALLATION [MZR-CD (RF Turbo)].)
- (12) Brake pedal (L.H.D.) (See BRAKE PEDAL REMOVAL/INSTALLATION [EXCEPT MZ-CD 1.6 (Y6)].) (See BRAKE PEDAL REMOVAL/INSTALLATION [MZ-CD 1.6 (Y6)].)
- (13) PJB and PJB bracket (See PASSENGER JUNCTION BOX (PJB) REMOVAL/INSTALLATION.)
- (14) Keyless antenna (vehicle with advanced keyless system)
- (15) Car-navigation unit (See CAR-NAVIGATION UNIT REMOVAL/INSTALLATION.)
- (16) Auto leveling control module (L.H.D.)(See AUTO LEVELING CONTROL MODULE REMOVAL/INSTALLATION.)
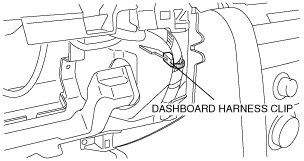
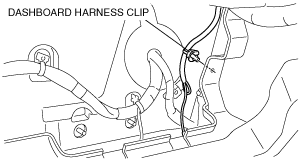
5. Remove the dashboard harness clip.(R.H.D.)
6. Remove the dashboard harness clip. (R.H.D.)
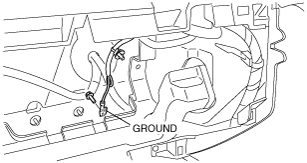
7. Remove the ground. (R.H.D.)
8. Remove the air intake wire with wire clamp. (manual air conditioner) (Australian specs. General specs.)
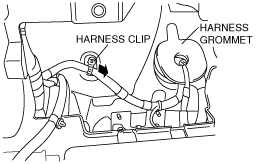
9. Remove the harness clip and harness grommet. (MZR-CD (RF Turbo))
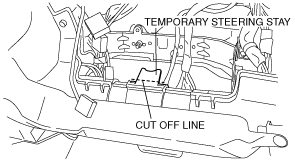
10. Cut off the temporary steering stay on the passenger’s side. (vehicle with advanced keyless system)
11. Remove the PJB wiring harness grommets. (R.H.D.)
12. Disconnect the two fluid pipes for the clutch pedal and remove the four clutch pedal bracket installation nuts. (R.H.D.)(See CLUTCH PEDAL REMOVAL/INSTALLATION.)
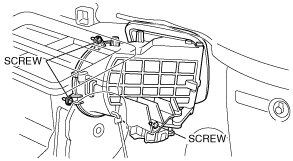
13. Remove the screws shown in the figure and slide the blower case.
L.H.D. (Except L3 Turbo, MZR-CD (RF Turbo))
L.H.D. (L3 Turbo, MZR-CD (RF Turbo))
R.H.D.
14. Disconnect the air intake actuator connector.
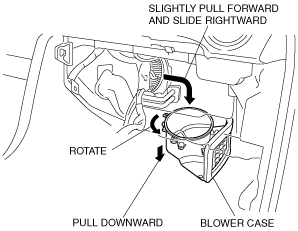
15. Remove the blower case shown in the figure.
L.H.D. (Except L3 Turbo, MZR-CD (RF Turbo))
L.H.D. (L3 Turbo, RF Turbo)
R.H.D.
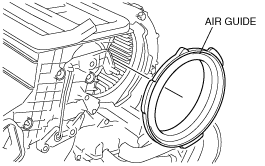
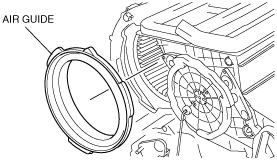
16. Remove the air guide.
L.H.D.
R.H.D.
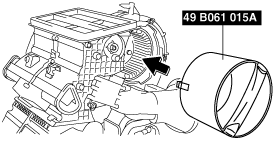
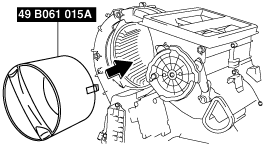
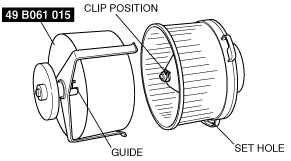
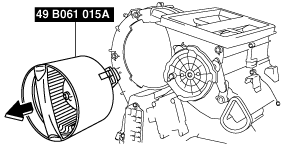
17. Install the SST (49 B061 015A or 49 B061 015) to the blower motor. (See SST (49 B061 015A) Installation Note.) (See SST (49 B061 015) Installation Note.)
L.H.D.
R.H.D.
18. Disconnect the resistor connector. (Manual air conditioner) (L.H.D.)
19. Disconnect the blower motor cooling pipe connected to the blower motor.
L.H.D.
R.H.D.
20. Remove the airflow mode actuator. (L.H.D.) (See AIRFLOW MODE ACTUATOR REMOVAL/INSTALLATION.)
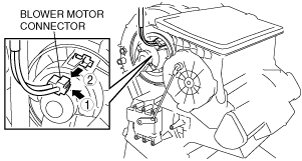
21. Disconnect the blower motor connector as shown in the figure.
L.H.D.
R.H.D.
22. Remove the blower motor cover. (See Blower Motor Cover Removal Note.)
-
Caution
-
• When the blower motor cover is removed, the blower motor could fall in the A/C unit case causing the sirocco fan to be damaged. Therefore another person must hold the blower motor at the installation position.
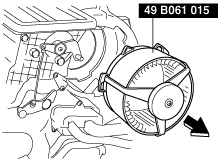
23. Remove the blower motor by pulling it out. (See Blower Motor Removal Note.)
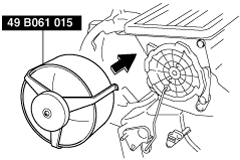
SST (49 B061 015A) Installation Note
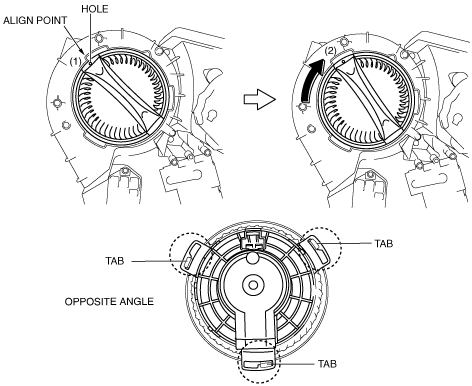
1. Align the SST hole with the align point (1) and rotate the SST (2) and then confirm that the SST tabs into the three set holes on the blower motor they are inserted as shown in the figure.
L.H.D.
R.H.D.
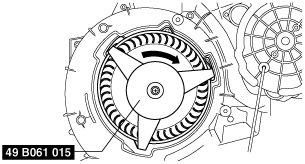
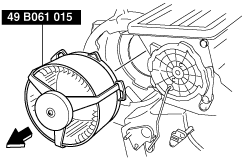
SST (49 B061 015) Installation Note
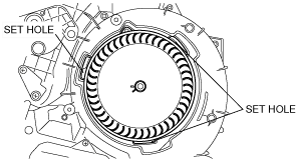
1. Align the SST guide with the sirocco fan clip position and press the SST tabs (3) into the three set holes on the blower motor until they are inserted.
L.H.D.
R.H.D.
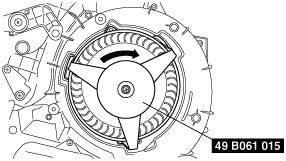
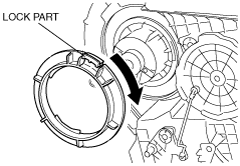
2. Rotate the SST clockwise to lock the SST and blower motor.
L.H.D.
R.H.D.
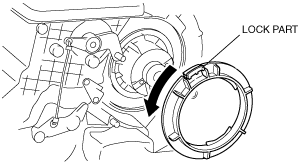
Blower Motor Cover Removal Note
1. Pull the lock on the top of the blower motor cover and rotate the blower motor cover.
L.H.D.
R.H.D.
Blower Motor Removal Note
-
Caution
-
• To prevent damage to the sirocco fan, pull the blower motor out being careful that the blower motor does not interfere with the A/C unit.
L.H.D.
R.H.D.