|
am3uuw00004685
LOWER PANEL REMOVAL/INSTALLATION
id091700801100
L.H.D.
Driver-side
1. Disconnect the negative battery cable. (See BATTERY REMOVAL/INSTALLATION [MZR 2.0, MZR 2.5].) (See BATTERY REMOVAL/INSTALLATION [MZR 2.3 DISI Turbo].) (See BATTERY REMOVAL/INSTALLATION [MZR 2.0 DISI i-stop].) (See BATTERY REMOVAL/INSTALLATION [MZ-CD 1.6].) (See BATTERY REMOVAL/INSTALLATION [MZR-CD 2.2].) (See BATTERY REMOVAL/INSTALLATION [SKYACTIV-G 2.0].) (See BATTERY REMOVAL/INSTALLATION [MZR 1.5, MZR 1.6].)
2. Remove the following parts:
3. Partially peel back the seaming welt.
4. Remove the screw.
am3uuw00004685
|
5. Pull the lower panel in the direction of the arrow in the order of (1), (2), (3) and remove the lower panel while detaching the hooks, clips and guide.
am3uuw00004686
|
6. Disconnect the switch connector.
7. Install in the reverse order of removal.
Passenger-side
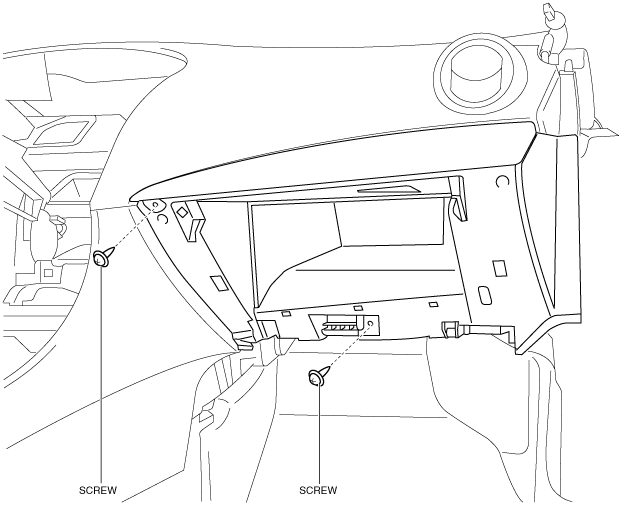
1. Remove the following parts:
2. Partially peel back the seaming welt.
3. Remove the screws.
am3uuw00004687
|
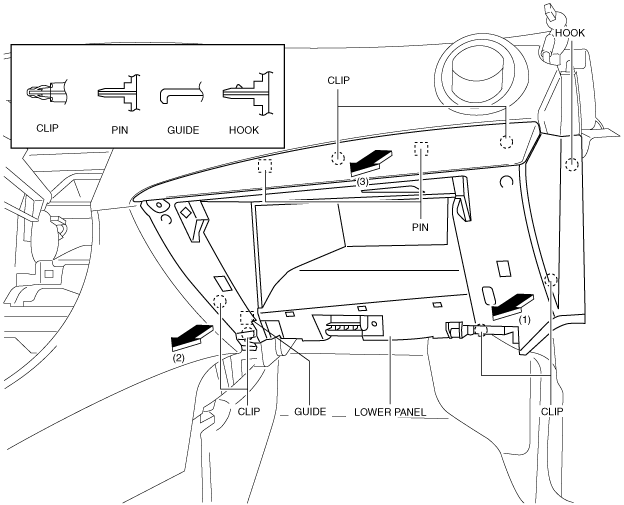
4. Pull the lower panel in the direction of the arrow in the order of (1), (2), (3) and remove the lower panel while detaching the hook, clips, guide and pins.
am3uuw00004704
|
5. Install in the reverse order of removal.
R.H.D.
Driver-side
1. Disconnect the negative battery cable. (See BATTERY REMOVAL/INSTALLATION [MZR 2.0, MZR 2.5].) (See BATTERY REMOVAL/INSTALLATION [MZR 2.3 DISI Turbo].) (See BATTERY REMOVAL/INSTALLATION [MZR 2.0 DISI i-stop].) (See BATTERY REMOVAL/INSTALLATION [MZ-CD 1.6].) (See BATTERY REMOVAL/INSTALLATION [MZR-CD 2.2].) (See BATTERY REMOVAL/INSTALLATION [SKYACTIV-G 2.0].) (See BATTERY REMOVAL/INSTALLATION [MZR 1.5, MZR 1.6].)
2. Remove the following parts:
3. Partially peel back the seaming welt.
4. Remove the screw.
am3zzw00005847
|
5. Pull the lower panel in the direction of the arrow in the order of (1), (2), (3) and remove the lower panel while detaching the hooks, clips and guide.
am3zzw00005848
|
6. Disconnect the switch connector.
7. Install in the reverse order of removal.
Passenger-side
1. Remove the following parts:
2. Partially peel back the seaming welt.
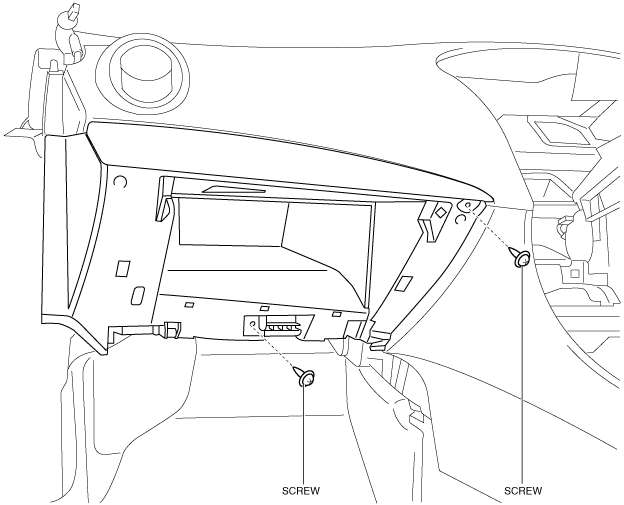
3. Remove the screws.
am3zzw00005849
|
4. Pull the lower panel in the direction of the arrow in the order of (1), (2), (3) and remove the lower panel while detaching the hook, clips, guide and pins.
am3zzw00005850
|
5. Install in the reverse order of removal.