 |
am6zzw00005108
ACCESSORY SOCKET REMOVAL/INSTALLATION
id092000800400
Front
1. Disconnect the negative battery cable.
2. Remove the following parts:
3. Remove in the order indicated in the table.
am6zzw00005108
|
|
1
|
Accessory socket cap
|
|
2
|
Accessory socket
|
|
3
|
Ring
(See Ring Removal Note.)
|
4. Install in the reverse order of removal.
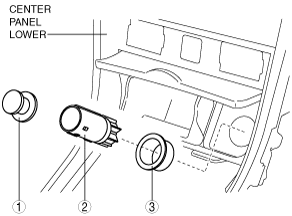
Center
1. Disconnect the negative battery cable.
2. Remove the upper panel. (See UPPER PANEL REMOVAL/INSTALLATION.)
3. Remove in the order indicated in the table.
am6zzw00001359
|
|
1
|
Accessory socket
|
|
2
|
Cap
(See Cap Removal Note.)
|
4. Install in the reverse order of removal.
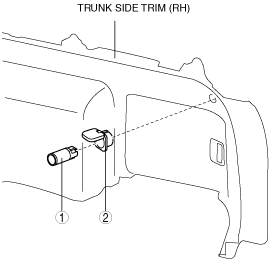
Rear (WGN only)
1. Disconnect the negative battery cable.
2. Remove the following parts:
3. Remove in the order indicated in the table.
am6zzw00003237
|
|
1
|
Accessory socket
|
|
2
|
Cap
(See Cap Removal Note.)
|
4. Install in the reverse order of removal.
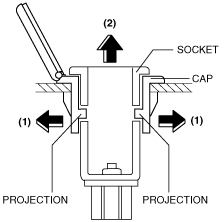
Accessory Socket Removal Note
1. Remove the socket in the direction of the arrow (2) shown in the figure while opening the caps in the direction of the arrow (1) using a tape-wrapped fastener remover.
am6zzw00001360
|
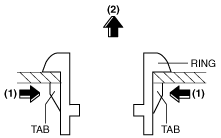
Ring Removal Note
1. Remove the ring in the direction of the arrow (2) shown in the figure while pressing the ring tabs in the direction of the arrow (1).
am6zzw00003541
|
Cap Removal Note
1. Remove the cap in the direction of the arrow (2) shown in the figure while pressing the cap tabs in the direction of the arrow (1).
am6zzw00001361
|