MANUAL TRANSAXLE SHIFT MECHANISM REMOVAL/INSTALLATION [A26M-R]
id0516c5800200
1. Disconnect the negative battery cable. (See BATTERY REMOVAL/INSTALLATION [MZR-CD 2.2].)
2. Discharge the refrigerant. (See REFRIGERANT CHARGING.)
3. Drain the engine coolant. (See ENGINE COOLANT REPLACEMENT [MZR-CD 2.2].)
4. Remove the following parts:
- (1) Battery and battery tray (See BATTERY REMOVAL/INSTALLATION [MZR-CD 2.2].)
- (2) Glove compartment (See GLOVE COMPARTMENT REMOVAL/INSTALLATION.)
- (3) Dashboard under cover (See DASHBOARD UNDER COVER REMOVAL/INSTALLATION.)
- (4) Side panel (See SIDE PANEL REMOVAL/INSTALLATION.)
- (5) Front scuff plates (See FRONT SCUFF PLATE REMOVAL/INSTALLATION.)
- (6) Front side trim (See FRONT SIDE TRIM REMOVAL/INSTALLATION.)
- (7) Upper panel (See UPPER PANEL REMOVAL/INSTALLATION.)
- (8) Decoration panel (See DECORATION PANEL REMOVAL/INSTALLATION.)
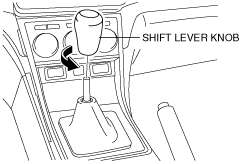
- (9) Shift lever knob
-
- (10) Shift panel (See SHIFT PANEL REMOVAL/INSTALLATION.)
- (11) Center panel lower (See CENTER PANEL LOWER REMOVAL/INSTALLATION.)
- (12) Climate control unit (See CLIMATE CONTROL UNIT REMOVAL/INSTALLATION [FULL-AUTO AIR CONDITIONER].)
- (13) Rear console (See REAR CONSOLE REMOVAL/INSTALLATION.)
- (14) Bonnet release lever (See BONNET LATCH AND RELEASE LEVER REMOVAL/INSTALLATION.)
- (15) Lower panel (See LOWER PANEL REMOVAL/INSTALLATION.)
- (16) Driver-side air bag module (See DRIVER-SIDE AIR BAG MODULE REMOVAL/INSTALLATION.)
- (17) Steering wheel (See STEERING WHEEL AND COLUMN REMOVAL/INSTALLATION [WITHOUT ADVANCED KEYLESS ENTRY AND PUSH BUTTON START SYSTEM].)(See STEERING WHEEL AND COLUMN REMOVAL/INSTALLATION [WITH ADVANCED KEYLESS ENTRY AND PUSH BUTTON START SYSTEM].)
- (18) Column cover (See STEERING WHEEL AND COLUMN REMOVAL/INSTALLATION [WITHOUT ADVANCED KEYLESS ENTRY AND PUSH BUTTON START SYSTEM].)(See STEERING WHEEL AND COLUMN REMOVAL/INSTALLATION [WITH ADVANCED KEYLESS ENTRY AND PUSH BUTTON START SYSTEM].)
- (19) Combination switch (See COMBINATION SWITCH REMOVAL/INSTALLATION.)
- (20) Meter hood (See METER HOOD REMOVAL/INSTALLATION.)
- (21) Instrument cluster (See INSTRUMENT CLUSTER REMOVAL/INSTALLATION.)
- (22) Center panel upper (See CENTER PANEL UPPER REMOVAL/INSTALLATION.)
- (23) Audio unit (See AUDIO UNIT REMOVAL/INSTALLATION.)
- (24) Cowl panel (See COWL PANEL REMOVAL/INSTALLATION.)
- (25) Steering shaft cover (See STEERING GEAR AND LINKAGE REMOVAL/INSTALLATION [L.H.D.].)(See STEERING GEAR AND LINKAGE REMOVAL/INSTALLATION [R.H.D.].)
- (26) Steering shaft (See STEERING GEAR AND LINKAGE REMOVAL/INSTALLATION [L.H.D.].)(See STEERING GEAR AND LINKAGE REMOVAL/INSTALLATION [R.H.D.].)
- (27) Passenger-side air bag module (See PASSENGER-SIDE AIR BAG MODULE REMOVAL/INSTALLATION.)
- (28) A-pillar trims (See A-PILLAR TRIM REMOVAL/INSTALLATION.)
- (29) Dashboard (See DASHBOARD REMOVAL/INSTALLATION.)
- (30) A/C unit (See A/C UNIT REMOVAL/INSTALLATION.)
- (31) SAS control module (See SAS CONTROL MODULE REMOVAL/INSTALLATION.)
5. Remove in the order indicated in the table.
6. Install in the reverse order of removal.
7. After installation, verify that the shift lever can be shifted smoothly into each position.
|
1
|
Seal plate
|
|
2
|
Shift cable
|
|
3
|
Selector cable
|
|
4
|
Sift lever component
|
Shift Cable and Selector Cable Removal Note
1. Remove the both shift cable end and selector cable end using a fastener remover.
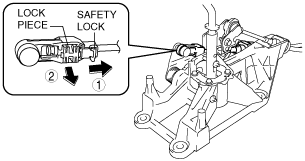
Selector Cable Installation Note
1. Make sure that the shift lever (transaxle side) is in neutral.
2. Unlock the lock piece of the selector cable in the order shown in the figure.
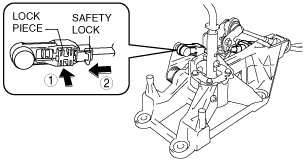
3. Shift the shift lever to neutral.
4. Lock the lock piece of the selector cable in the figure.
5. Shift the shift lever from neutral to other position, and make sure that there are no other components in that area to interfere with the lever.