INDICATOR UNIT REMOVAL/INSTALLATION
id092200037500
1. Disconnect the negative battery terminal. (See NEGATIVE BATTERY TERMINAL DISCONNECTION/CONNECTION.)
2. Remove the following parts.
- (1) Selector lever knob (See SELECTOR LEVER COMPONENT REMOVAL/INSTALLATION.)
-
- (2) Shift panel (See SHIFT PANEL REMOVAL/INSTALLATION.)
-
- (3) Console side panel (See CONSOLE SIDE PANEL REMOVAL/INSTALLATION.)
-
- (4) Front console box (See FRONT CONSOLE BOX REMOVAL/INSTALLATION.)
-
- (5) Side wall (See SIDE WALL REMOVAL/INSTALLATION.)
-
- (6) Rear console (See REAR CONSOLE REMOVAL/INSTALLATION.)
-
- (7) Lower decoration panel (See DECORATION PANEL REMOVAL/INSTALLATION.)
-
- (8) Upper decoration panel (See DECORATION PANEL REMOVAL/INSTALLATION.)
-
- (9) Driver's front scuff plate (See FRONT SCUFF PLATE REMOVAL/INSTALLATION.)
-
- (10) Driver's front side trim (See FRONT SIDE TRIM REMOVAL/INSTALLATION.)
-
- (11) Bonnet release lever (See BONNET RELEASE LEVER AND RELEASE CABLE REMOVAL/INSTALLATION.)
-
- (12) Fuel-filler lid opener lever (See FUEL-FILLER LID OPENER AND LEVER REMOVAL/INSTALLATION.)
-
- (13) Driver's lower panel (See LOWER PANEL REMOVAL/INSTALLATION.)
-
- (14) Center lower panel (See CENTER LOWER PANEL REMOVAL/INSTALLATION.)
-
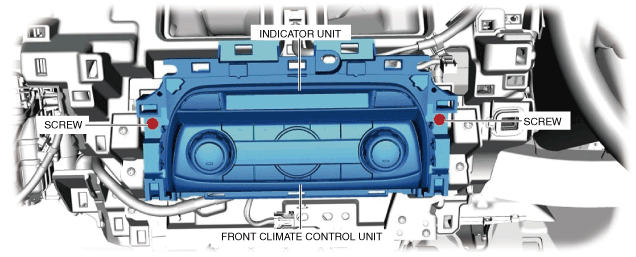
3. Remove the screws.
4. Remove the indicator unit/front climate control unit from the dashboard.
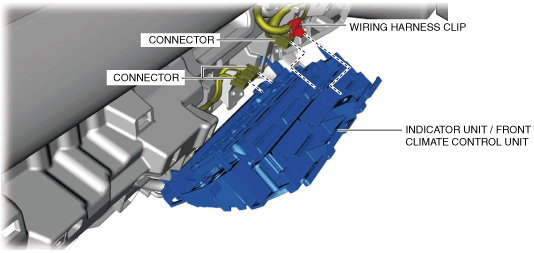
5. Disconnect the connectors.
6. Remove the wiring harness clip.
7. Remove the screws.
8. Remove the indicator unit from the front climate control unit.
9. Install in the reverse order of removal.
10. Switch the ignition ON and perform the front climate control unit automatic configuration.
11. Perform the DTC inspection for the front climate control unit using the M-MDS. (See FOREWORD [CLIMATE CONTROL UNIT (FULL-AUTO AIR CONDITIONER)].
-