QUARTER WINDOW GLASS INSTALLATION
id091200701200
Replacement parts
|
Quarter window glass
Quantity: 1
Location of use: Body panel
|
Fasteners
Quantity: 1
Location of use: Body panel
|
-
Warning
-
• Using a utility knife with bare hands can cause injury. Always wear gloves when using a utility knife.
-
Caution
-
• If a door is opened or closed when all the door glass is fully closed, the resulting change in air pressure could cause the sealant to crack preventing the proper installation of the quarter window glass. Keep the door glass open until the quarter window glass installation is completed.
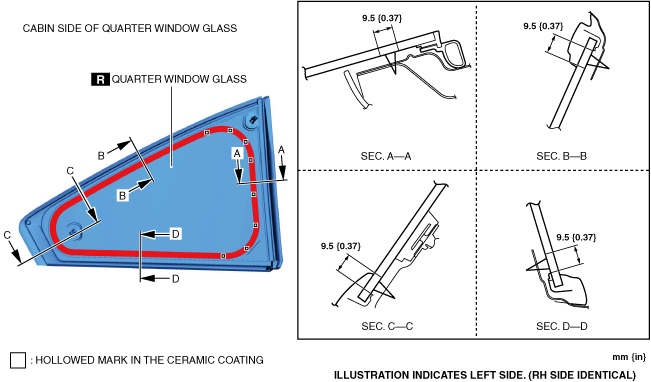
1. Clean then degrease along the perimeter of the bonding area on the quarter window glass.
-
Caution
-
• To prevent weakening of the primer adhesion, keep the bonding surface free of dirt, moisture, and grease. Do not touch the surface with your hand.
2. Apply primer to the quarter window glass in the area shown in the figure.
-
• Follow the primer product instructions for the drying time.
-
Note
-
• Apply primer to the hollowed marks in the ceramic coating.
3. Cut away the old sealant using a utility knife or scraper so that a 1—2 mm {0.04—0.07 in} thickness of sealant remains along the perimeter on the body panel side.
4. Clean then degrease along the perimeter of the bonding area on the body panel.
-
Caution
-
• To prevent weakening of the primer adhesion, keep the bonding surface free of dirt, moisture, and grease. Do not touch the surface with your hand.
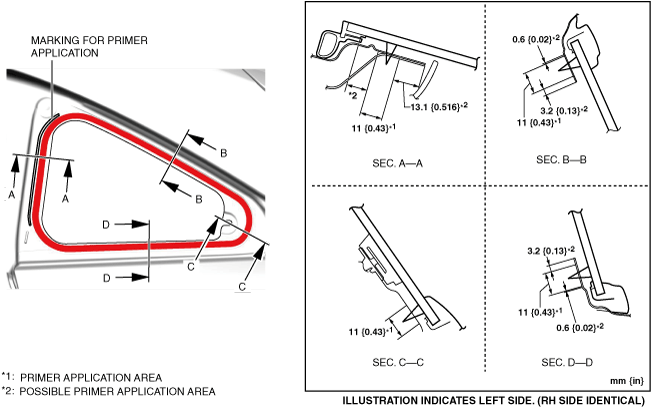
5. Apply primer to the body panel in the area shown in the figure.
-
• Follow the primer product instructions for the drying time.
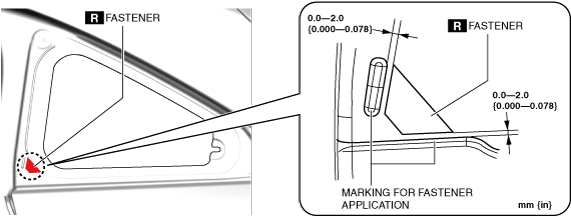
6. Install the fastener at the position shown in the figure.
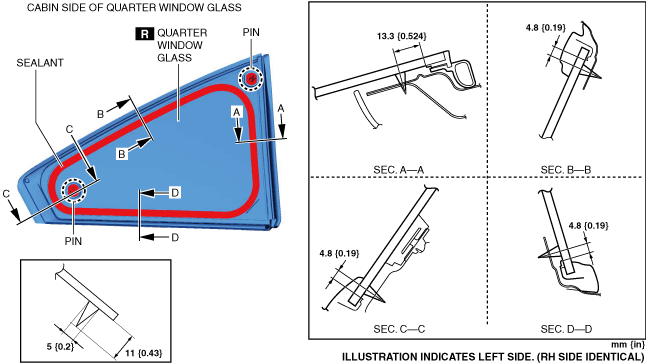
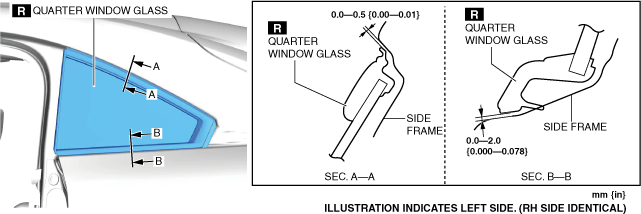
7. Apply sealant to the quarter window glass surface as shown in the figure.
8. Insert the pin into the body panel and install the quarter window glass.
9. Press the perimeter of the quarter window glass so that the gap between the side frame and the quarter window glass is within the range shown in the figure.
10. Install the following parts.
- (1) Pillar garnish (See PILLAR GARNISH REMOVAL/INSTALLATION.)
-
- (2) Tire house trim(See TIRE HOUSE TRIM REMOVAL/INSTALLATION [(E)].)
-
- (3) Rear seat back (See REAR SEAT BACK REMOVAL/INSTALLATION.)
-
11. When replacing the quarter window glass (LH), perform the following procedure.
- (1) Install the rear center seat belt anchor. (See REAR BUCKLE REMOVAL/INSTALLATION.)
-
- (2) Install the rear buckle (LH). (See REAR BUCKLE REMOVAL/INSTALLATION.)
-
12. Install the following parts.
- (1) Rear seat cushion (See REAR SEAT CUSHION REMOVAL/INSTALLATION.)
-
- (2) Scuff plate (See SCUFF PLATE REMOVAL/INSTALLATION.)
-
- (3) Rear pillar trim (See REAR PILLAR TRIM REMOVAL/INSTALLATION.)
-
- (4) Trunk side upper trim (See TRUNK SIDE UPPER TRIM REMOVAL/INSTALLATION.)
-
- (5) Rear package tray (See REAR PACKAGE TRAY REMOVAL/INSTALLATION.)
-
13. Connect the negative lead-acid battery terminal. (See NEGATIVE LEAD-ACID BATTERY TERMINAL DISCONNECTION/CONNECTION.)
14. Allow the sealant to harden completely.
Reference for sealant hardening time: 24 h
-
Note
-
• Follow the product instructions for the sealant hardening time.