DRIVER MONITORING CAMERA UNIT REMOVAL/INSTALLATION [(E)]
id1520001047x2
L.H.D.
1. Remove the selector lever knob. (See SELECTOR LEVER REMOVAL/INSTALLATION [A71M].)
2. Disconnect the negative lead-acid battery terminal. (See NEGATIVE LEAD-ACID BATTERY TERMINAL DISCONNECTION/CONNECTION.)
3. Remove the following parts:
- (1) Shift panel (See SHIFT PANEL REMOVAL/INSTALLATION.)
-
- (2) Console panel (See CONSOLE PANEL REMOVAL/INSTALLATION.)
-
- (3) Passenger-side decoration panel (See DECORATION PANEL REMOVAL/INSTALLATION.)
-
- (4) Passenger-side scuff plate (See SCUFF PLATE REMOVAL/INSTALLATION.)
-
- (5) Passenger-side front side trim (See FRONT SIDE TRIM REMOVAL/INSTALLATION.)
-
- (6) Glove compartment (See GLOVE COMPARTMENT REMOVAL/INSTALLATION [(E)].)
-
- (7) Dashboard under cover (See DASHBOARD UNDER COVER REMOVAL/INSTALLATION.)
-
- (8) Passenger-side lower panel (See PASSENGER-SIDE LOWER PANEL REMOVAL [(E)].) (See PASSENGER-SIDE LOWER PANEL INSTALLATION [(E)].)
-
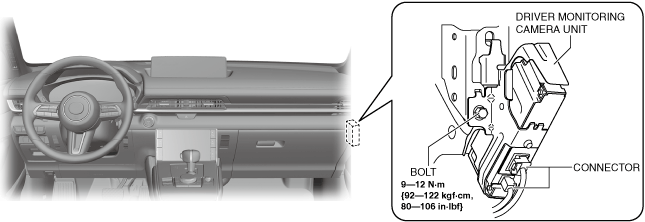
4. Disconnect the connectors.
5. Remove the bolt.
6. Remove the driver monitoring camera unit.(See Driver Monitoring Camera Unit Installation Note.)
7. Install in the reverse order of removal.
8. If the driver monitoring camera unit is replaced, perform the following procedure.
- (1) Switch the main power ON (READY off or on) to complete automatic configuration of the driver monitoring camera unit.
-
- (2) Clear the DTC. (See CLEARING DTC.)
-
R.H.D.
1. Remove the selector lever knob. (See SELECTOR LEVER REMOVAL/INSTALLATION [A71M].)
2. Disconnect the negative lead-acid battery terminal. (See NEGATIVE LEAD-ACID BATTERY TERMINAL DISCONNECTION/CONNECTION.)
3. Remove the following parts:
- (1) Shift panel (See SHIFT PANEL REMOVAL/INSTALLATION.)
-
- (2) Console panel (See CONSOLE PANEL REMOVAL/INSTALLATION.)
-
- (3) Passenger-side decoration panel (See DECORATION PANEL REMOVAL/INSTALLATION.)
-
- (4) driver-side scuff plate (See SCUFF PLATE REMOVAL/INSTALLATION.)
-
- (5) driver-side front side trim (See FRONT SIDE TRIM REMOVAL/INSTALLATION.)
-
- (6) driver-side lower panel (See DRIVER-SIDE LOWER PANEL REMOVAL/INSTALLATION.)
-
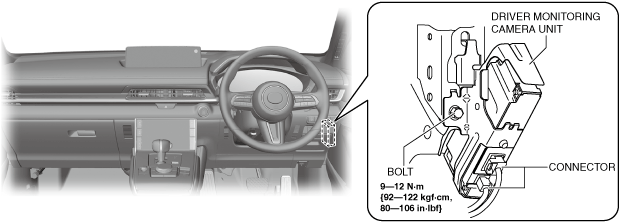
4. Disconnect the connectors.
5. Remove the bolt.
6. Remove the driver monitoring camera unit.(See Driver Monitoring Camera Unit Installation Note.)
7. Install in the reverse order of removal.
8. If the driver monitoring camera unit is replaced, perform the following procedure.
- (1) Switch the main power ON (READY off or on) to complete automatic configuration of the driver monitoring camera unit.
-
- (2) Clear the DTC. (See CLEARING DTC.)
-
Driver Monitoring Camera Unit Installation Note
-
Caution
-
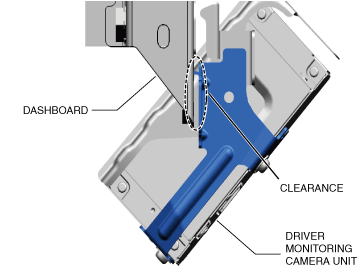
• If the driver monitoring camera unit is not installed correctly, it could cause vibration or noise while driving. When installing the driver monitoring camera unit hook to the dashboard, be careful not to apply an excessive load to the driver monitoring camera unit such as by raising it.
1. Install the driver monitoring camera unit hook to the dashboard.
2. Verify that there is a clearance between the dashboard and the driver monitoring camera unit.
-
• If there is no clearance, remove the driver monitoring camera unit once and perform Step 1 again.