ANTENNA FEEDER NO.1 REMOVAL/INSTALLATION
id092000812200
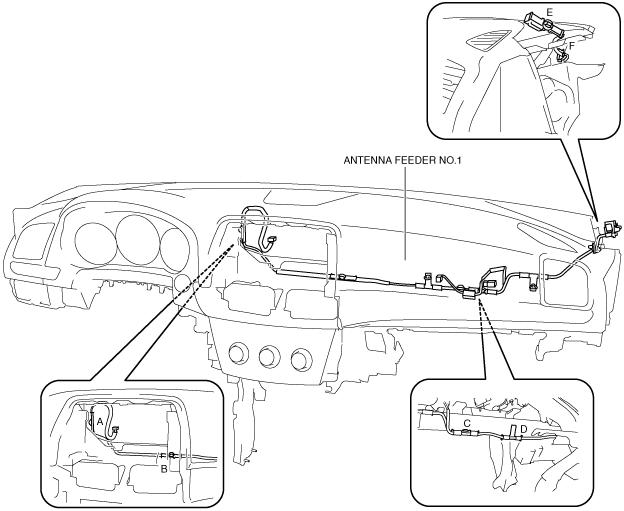
L.H.D. (With Audio System)
1. Disconnect the negative battery cable. (See NEGATIVE BATTERY CABLE DISCONNECTION/CONNECTION [SKYACTIV-D 2.2].) (See NEGATIVE BATTERY CABLE DISCONNECTION/CONNECTION [SKYACTIV-G 2.0, SKYACTIV-G 2.5].) (See NEGATIVE BATTERY CABLE DISCONNECTION/CONNECTION [SKYACTIV-G 2.0, SKYACTIV-G 2.5 (WITHOUT i-stop)].)
2. Remove the following parts:
- (1) A-pillar trim (See A-PILLAR TRIM REMOVAL/INSTALLATION.)
- (2) Passenger-side front scuff plate (See FRONT SCUFF PLATE REMOVAL/INSTALLATION.)
- (3) Passenger-side front side trim (See FRONT SIDE TRIM REMOVAL/INSTALLATION.)
- (4) Glove compartment (See GLOVE COMPARTMENT REMOVAL/INSTALLATION.)
- (5) Dashboard under cover (See DASHBOARD UNDER COVER REMOVAL/INSTALLATION.)
- (6) Decoration panel (See DECORATION PANEL REMOVAL/INSTALLATION.)
- (7) Passenger-side lower panel (See LOWER PANEL REMOVAL/INSTALLATION.)
- (8) Blower unit (See BLOWER UNIT REMOVAL/INSTALLATION.)
- (9) Center panel (See CENTER PANEL REMOVAL/INSTALLATION.)
- (10) Audio unit (See AUDIO UNIT REMOVAL/INSTALLATION.)
3. Remove clips A, B, C, D, E, and F.
4. Remove antenna feeder No.1.
5. Install in the reverse order of removal.
L.H.D. (With Car-navigation System (With Display-separated Type))
1. Disconnect the negative battery cable. (See NEGATIVE BATTERY CABLE DISCONNECTION/CONNECTION [SKYACTIV-D 2.2].) (See NEGATIVE BATTERY CABLE DISCONNECTION/CONNECTION [SKYACTIV-G 2.0, SKYACTIV-G 2.5].) (See NEGATIVE BATTERY CABLE DISCONNECTION/CONNECTION [SKYACTIV-G 2.0, SKYACTIV-G 2.5 (WITHOUT i-stop)].)
2. Remove the following parts:
- (1) Center speaker grille (See SPEAKER GRILLE REMOVAL/INSTALLATION.)
- (2) Front center speaker (with Bose®)/front center speaker dummy (without Bose®) (See FRONT CENTER SPEAKER REMOVAL/INSTALLATION.)
- (3) GPS antenna (See GLOBAL POSITIONING SYSTEM (GPS) ANTENNA REMOVAL/INSTALLATION.)
- (4) A-pillar trim (See A-PILLAR TRIM REMOVAL/INSTALLATION.)
- (5) Front scuff plate (See FRONT SCUFF PLATE REMOVAL/INSTALLATION.)
- (6) Front side trim (See FRONT SIDE TRIM REMOVAL/INSTALLATION.)
- (7) Pocket lid (See LOWER PANEL REMOVAL/INSTALLATION.)
- (8) Car-navigation unit (See CAR-NAVIGATION UNIT REMOVAL/INSTALLATION.)
- (9) Cluster switch (See CLUSTER SWITCH REMOVAL/INSTALLATION.)
- (10) Upper panel (See UPPER PANEL REMOVAL/INSTALLATION.)
- (11) Rear console (See REAR CONSOLE REMOVAL/INSTALLATION.)
- (12) Shift lever knob (MTX) (See MANUAL TRANSAXLE SHIFT MECHANISM REMOVAL/INSTALLATION [C66M-R].) (See MANUAL TRANSAXLE SHIFT MECHANISM REMOVAL/INSTALLATION [D66M-R].)
- (13) Shift panel (See SHIFT PANEL REMOVAL/INSTALLATION.)
- (14) Front console box (See FRONT CONSOLE BOX REMOVAL/INSTALLATION.)
- (15) Side wall (See SIDE WALL REMOVAL/INSTALLATION.)
- (16) Front console (See FRONT CONSOLE REMOVAL/INSTALLATION.)
- (17) Bonnet release lever (See BONNET LATCH AND RELEASE LEVER REMOVAL/INSTALLATION.)
- (18) Fuel-filler lid opener lever (See FUEL-FILLER LID OPENER AND LEVER REMOVAL/INSTALLATION.)
- (19) Driver-side lower panel (See LOWER PANEL REMOVAL/INSTALLATION.)
- (20) Glove compartment (See GLOVE COMPARTMENT REMOVAL/INSTALLATION.)
- (21) Passenger-side lower panel (See LOWER PANEL REMOVAL/INSTALLATION.)
- (22) Blower unit (See BLOWER UNIT REMOVAL/INSTALLATION.)
- (23) Decoration panel (See DECORATION PANEL REMOVAL/INSTALLATION.)
- (24) Center panel (See CENTER PANEL REMOVAL/INSTALLATION.)
- (25) Audio unit (See AUDIO UNIT REMOVAL/INSTALLATION.)
3. Remove clips A, B, C, D, E, F, G, H, I, J, K and L.
4. Remove antenna feeder No.1.
5. Install in the reverse order of removal.
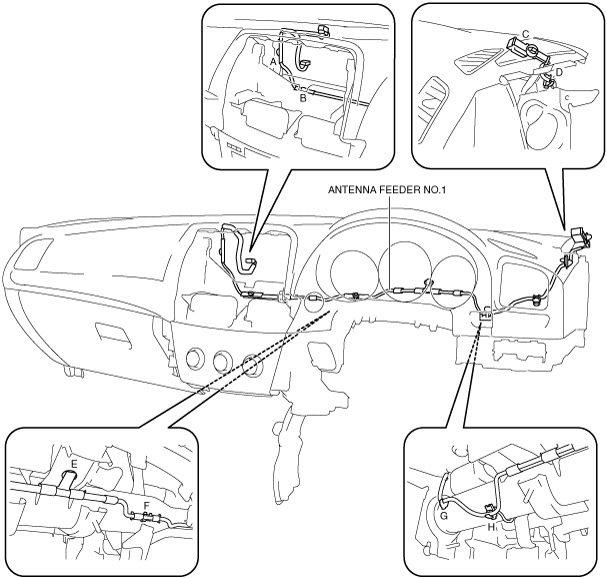
L.H.D. (With Car-navigation System (With Display-integrated Type))
1. Disconnect the negative battery cable. (See NEGATIVE BATTERY CABLE DISCONNECTION/CONNECTION [SKYACTIV-D 2.2].) (See NEGATIVE BATTERY CABLE DISCONNECTION/CONNECTION [SKYACTIV-G 2.0, SKYACTIV-G 2.5].) (See NEGATIVE BATTERY CABLE DISCONNECTION/CONNECTION [SKYACTIV-G 2.0, SKYACTIV-G 2.5 (WITHOUT i-stop)].)
2. Remove the following parts:
- (1) Center speaker grille (See SPEAKER GRILLE REMOVAL/INSTALLATION.)
- (2) Front center speaker (See FRONT CENTER SPEAKER REMOVAL/INSTALLATION.)
- (3) GPS antenna (See GLOBAL POSITIONING SYSTEM (GPS) ANTENNA REMOVAL/INSTALLATION.)
- (4) Decoration panel (See DECORATION PANEL REMOVAL/INSTALLATION.)
- (5) Genuine navigation system panel (See GENUINE NAVIGATION SYSTEM PANEL REMOVAL/INSTALLATION.)
- (6) Car-navigation unit (See CAR-NAVIGATION UNIT REMOVAL/INSTALLATION.)
- (7) A-pillar trim (See A-PILLAR TRIM REMOVAL/INSTALLATION.)
- (8) Glove compartment (See GLOVE COMPARTMENT REMOVAL/INSTALLATION.)
- (9) Dashboard under cover (See DASHBOARD UNDER COVER REMOVAL/INSTALLATION.)
- (10) Front scuff plate (passenger-side) (See FRONT SCUFF PLATE REMOVAL/INSTALLATION.)
- (11) Front side trim (passenger-side) (See FRONT SIDE TRIM REMOVAL/INSTALLATION.)
- (12) Lower panel (passenger-side) (See LOWER PANEL REMOVAL/INSTALLATION.)
- (13) Audio amplifier (See AUDIO AMPLIFIER REMOVAL/INSTALLATION.)
- (14) Blower unit (See BLOWER UNIT REMOVAL/INSTALLATION.)
3. Remove clips A, B, C, D, E, F, G and H.
4. Remove antenna feeder No.1.
5. Install in the reverse order of removal.
R.H.D. (With Audio System)
1. Disconnect the negative battery cable. (See NEGATIVE BATTERY CABLE DISCONNECTION/CONNECTION [SKYACTIV-D 2.2].) (See NEGATIVE BATTERY CABLE DISCONNECTION/CONNECTION [SKYACTIV-G 2.0, SKYACTIV-G 2.5].) (See NEGATIVE BATTERY CABLE DISCONNECTION/CONNECTION [SKYACTIV-G 2.0, SKYACTIV-G 2.5 (WITHOUT i-stop)].)
2. Remove the following parts:
- (1) A-pillar trim (RH) (See A-PILLAR TRIM REMOVAL/INSTALLATION)
- (2) Decoration panel (See DECORATION PANEL REMOVAL/INSTALLATION.)
- (3) Center panel (See CENTER PANEL REMOVAL/INSTALLATION.)
- (4) Audio unit (See AUDIO UNIT REMOVAL/INSTALLATION.)
3. Remove clips A, B, C, D, E, F, G and H.
4. Remove antenna feeder No.1.
5. Install in the reverse order of removal.
R.H.D. (With Car-navigation System)
1. Disconnect the negative battery cable. (See NEGATIVE BATTERY CABLE DISCONNECTION/CONNECTION [SKYACTIV-D 2.2].) (See NEGATIVE BATTERY CABLE DISCONNECTION/CONNECTION [SKYACTIV-G 2.0, SKYACTIV-G 2.5].) (See NEGATIVE BATTERY CABLE DISCONNECTION/CONNECTION [SKYACTIV-G 2.0, SKYACTIV-G 2.5 (WITHOUT i-stop)].)
2. Remove the following parts:
- (1) Center speaker grille (See SPEAKER GRILLE REMOVAL/INSTALLATION.)
- (2) Front center speaker (with Bose®)/front center speaker dummy (without Bose®) (See FRONT CENTER SPEAKER REMOVAL/INSTALLATION.)
- (3) GPS antenna (See GLOBAL POSITIONING SYSTEM (GPS) ANTENNA REMOVAL/INSTALLATION.)
- (4) A-pillar trim (RH) (See A-PILLAR TRIM REMOVAL/INSTALLATION)
- (5) Decoration panel (See DECORATION PANEL REMOVAL/INSTALLATION.)
- (6) Center panel (See CENTER PANEL REMOVAL/INSTALLATION.)
- (7) Audio unit (See AUDIO UNIT REMOVAL/INSTALLATION.)
- (8) Pocket lid (See LOWER PANEL REMOVAL/INSTALLATION.)
- (9) Car-navigation unit (See CAR-NAVIGATION UNIT REMOVAL/INSTALLATION.)
3. Remove clips A, B, C, D, E, F, G, H, I, J and K.
4. Remove antenna feeder No.1.
5. Install in the reverse order of removal.